

New FFVII Remake Screenshots, an In-Depth Analysis (Part 2)
by Vyzzuvazzadth December 22, 2019 0 commentsGreetings everyone and welcome to the second part of my in-depth screenshot analysis where I cover gameplay-related content, be it in battle or exploration! Part 1 of this analysis covers screenshots of cutscenes and can be found here.
If you haven’t seen those Final Fantasy VII Remake screenshots released on Monday December 16th yet, please check them out here on the official British Square Enix website.
Additional render images of President Shinra, Heidegger, Roche and Shiva can be viewed and downloaded from the Square Enix NA press website (under Artwork).
Why not create a video on those screenshots? Currently, there’s so much in my backlog and with the newly released Cloud trailer from The Game Awards, there’s just not enough room to create yet another video. That’s how this article series came to life.
For anyone who hasn’t played the original Final Fantasy VII yet and wants to go in fresh, I urge you to stop reading right now as we won’t shy away from spoilers in here.
With that being said, let’s stop the dillydallying and get to work!

Aerith’s Combat – Standard Attack
Aerith is being prominently featured in many of the battle screenshots. Which is great, since we haven’t seen or heard too much about her battle style besides the limited footage from the Abzû battle stage presentation at Tokyo Game Show 2019 and a brief explanation of how her Tempest triangle attack works. This screenshot and its description teach us how her normal attack functions.
Aerith’s multi-hit standard attack
Basically, when holding square or pressing it repeatedly, Aerith will keep launching magic projectiles at the current target, which then explode into balls of light. Each additional hit in her attack combo increases the size of the impact explosion, increasing inflicted damage (see Abzû boss battle: 34, 49, 60, 73 and 82 points of damage) and the area of effect. Furthermore, successive hits also increase the number of targets one projectile can hit. This first projectile shot in this screenshot was aimed at the enemy in the middle but bounces off towards the enemy on the right, where the projectile finally explodes. Meaning, if we keep firing, those projectiles will most likely bounce off not just one but eventually even three or four enemies, becoming a powerful long-range, multi-hit and area of effect attack. The big caveat, however, is her being very vulnerable during this chain of attacks. She stays stationary and can’t move. It’s a trade-off. Risk being hit but deal massive damage and chaos on the battlefield. As soon as she’s interrupted, I’m certain that we’ll have to start from the beginning with weak single-target projectiles.
I’m still wondering where she draws her magical attacks and abilities from. Are those innate Cetra abilities? Or is it just a product of her intimate connection to the Planet?
Combat UI leader icon
One interesting addition to the battle UI is that small yellow rectangle on Aerith’s status element. It first appeared in The Game Awards 2019 trailer about ex-SOLDIER Cloud and can be seen in all battle screenshots in this article. It’s not something entirely new, however, as we have already seen that icon before. Remember the main menu screen shown by Kitase-San in the Tokyo Game Show stage presentation? It’s part of the Battle Leader designator. This means that Aerith has been chosen as the battle leader, which is who we’ll be controlling at the start of each battle. We can witness this effect right at the start of the battle footage against Abzû, where control and camera switch to Tifa immediately after the UI has finished fading in.
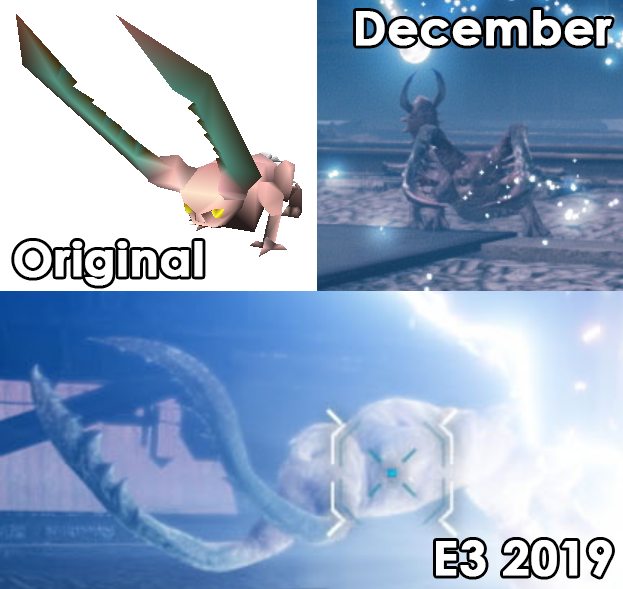
Enemy – Cripshay comparison
It was already visible in one of the Tokyo Game Show screenshots, but here, we get an even better view on this creepy enemy: the Cripshay. It has been faithfully recreated for the Remake, with one change for the better. Instead of that weird white tail stump, it now sports a scorpion-like tail ending in a pincer.
Regarding the location, it’s evident that this battle takes place in the Train Graveyard. The area and the enemies give it away. The dark shadow behind the upper end of Aerith’s staff looks to be reactor number 6, which makes the area between it and our location sector 6. That’s why we have such a great view on the sky and moon. Most of the sector 6 plate is still unfinished.
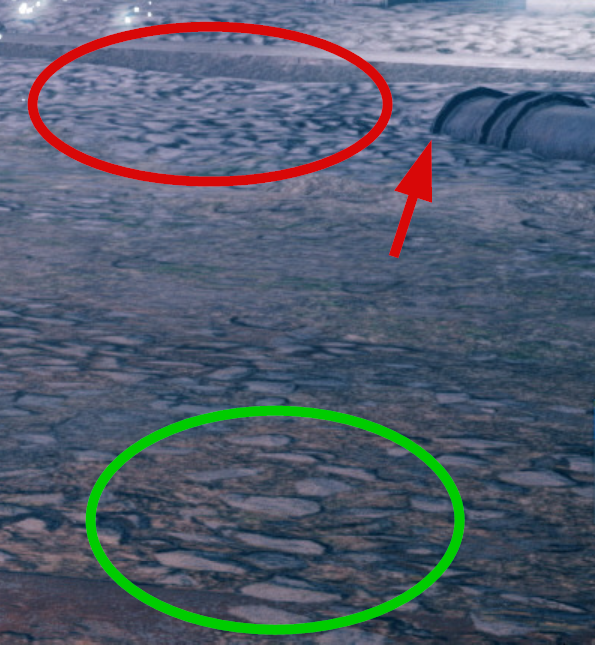
Train Graveyard rubble graphics
Speaking of unfinished, it’s a pity that they don’t use tessellation on the rubble texture as it looks like a sheet of paper with a photo of rubble printed on and it gets worse the farther away it is. And all those other 3D objects intersecting with it instead of organically merging with the ground don’t make it any better. I already noticed that in the E3 screenshots and it’s till bothering me. I hope they iterate and improve on this area before release as this is the worst looking of them all in my opinion.
Aerith’s Combat – Tempest
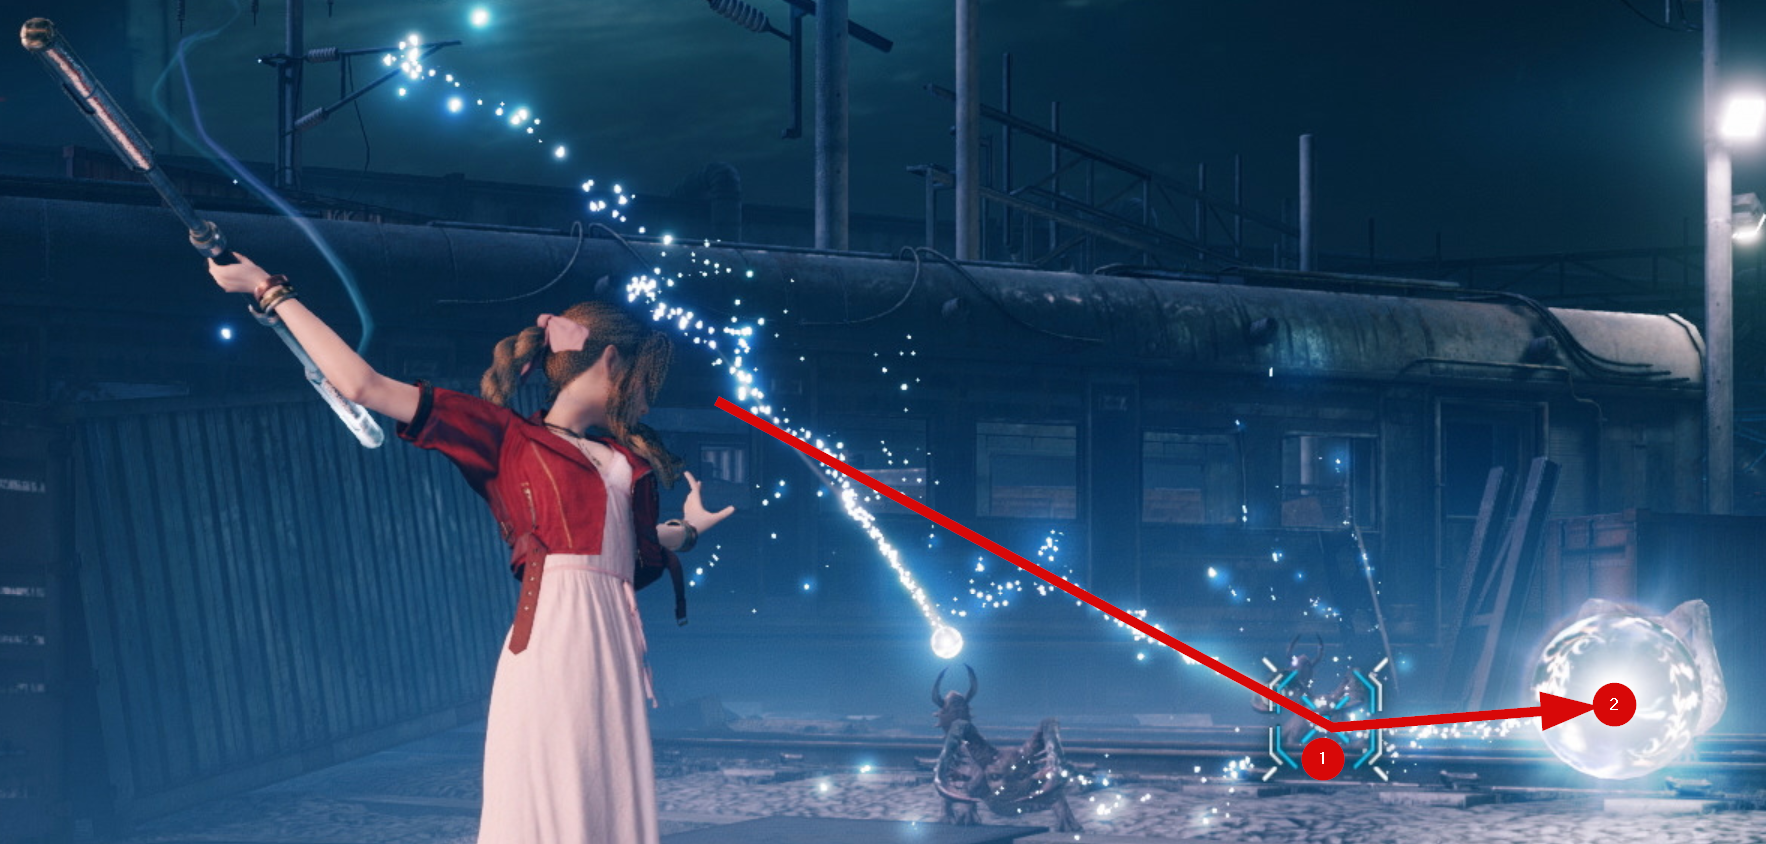
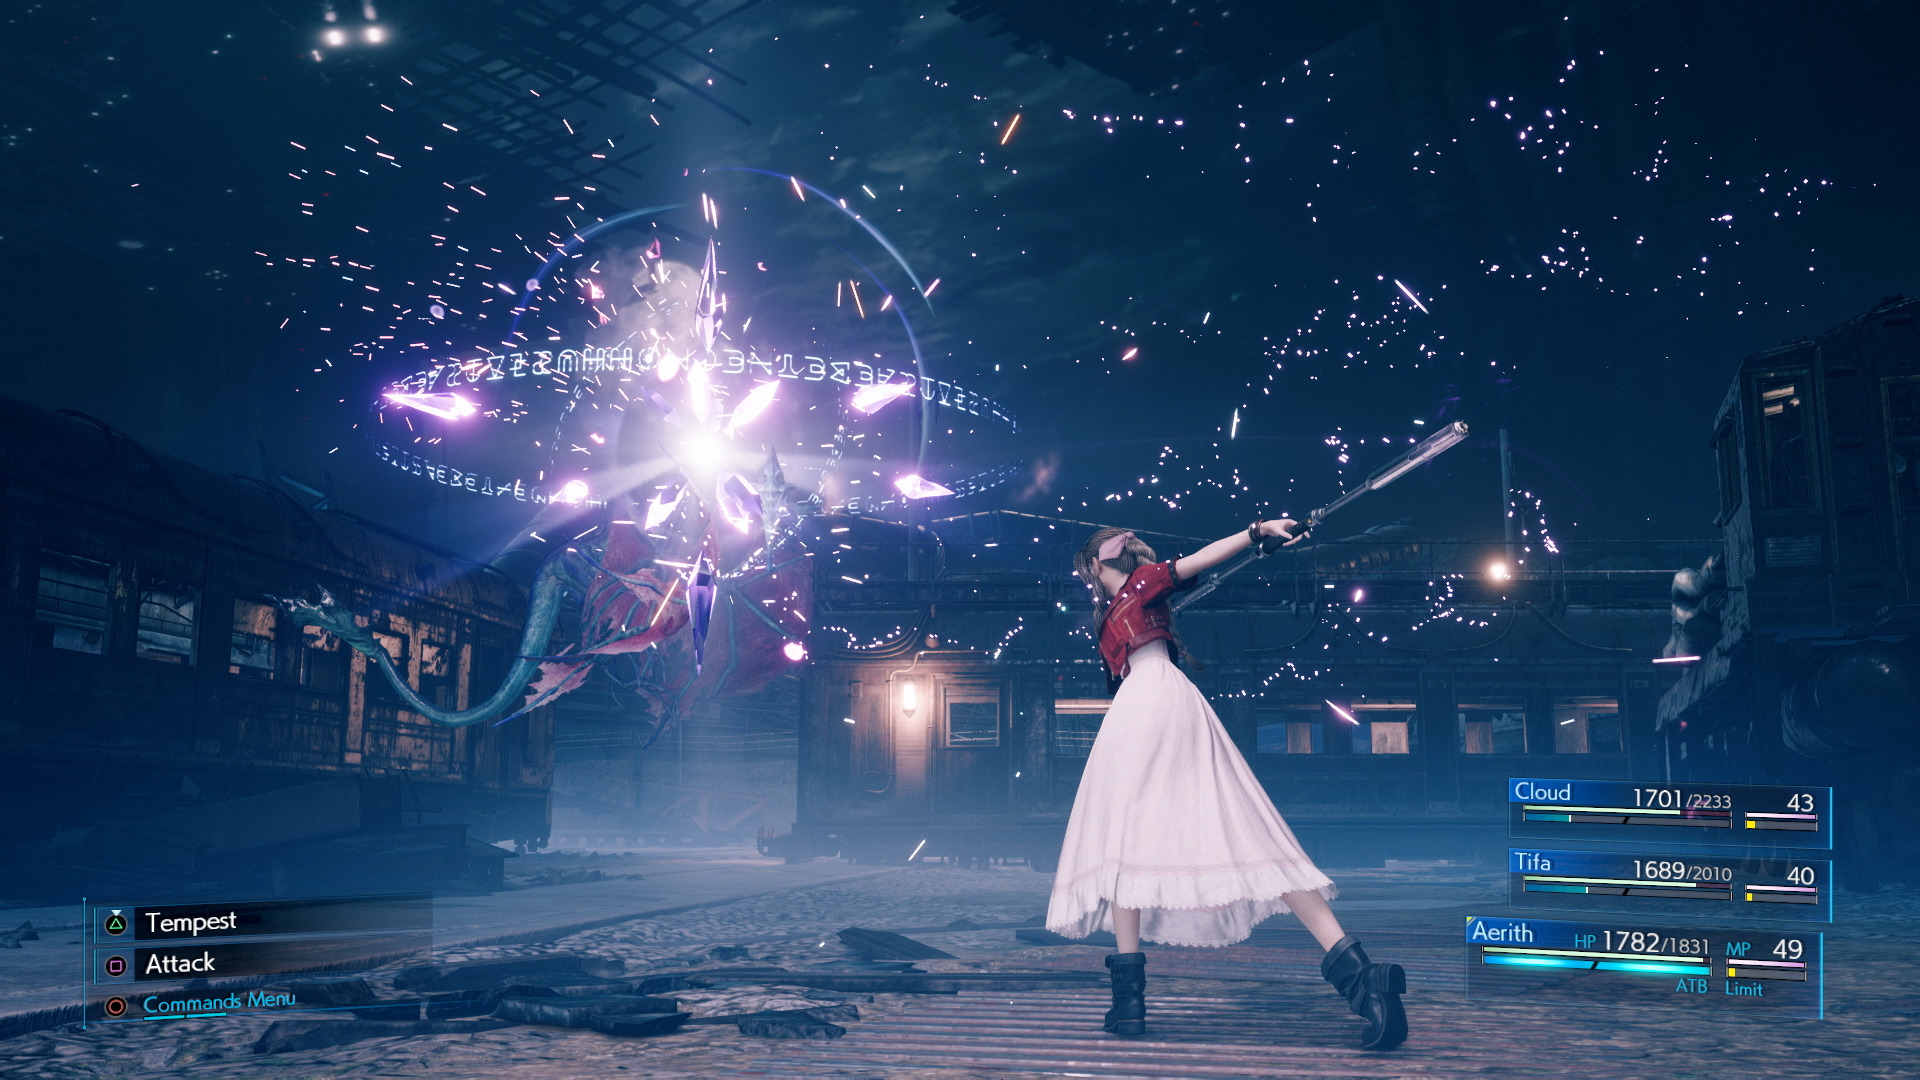
Tempest attack – crystal projectile
To get the full picture, Square Enix provided us with 2 whole screenshots for just one attack. Which makes sense, since it consists of two phases: charge-up and the actual hit. In the first screenshot, we see Aerith charge up her triangle attack called Tempest, which works as follows: press and release the triangle button to start the attack (1st screenshot), which launches a crystal projectile towards the enemy that expands upon impact (2nd screenshot).
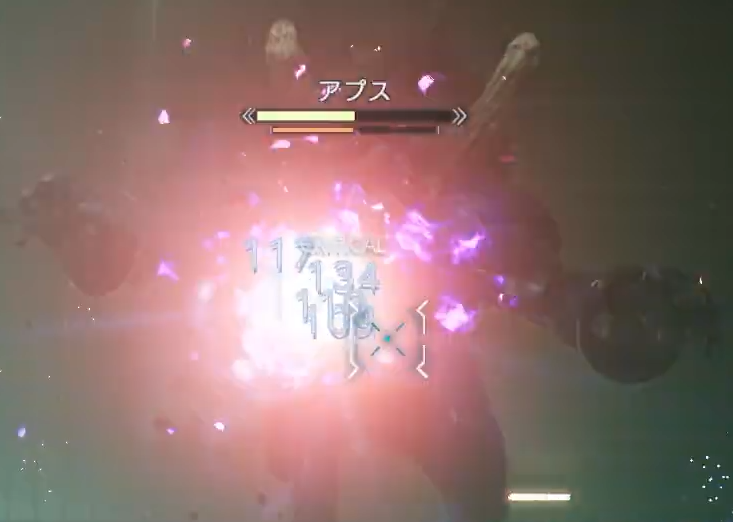
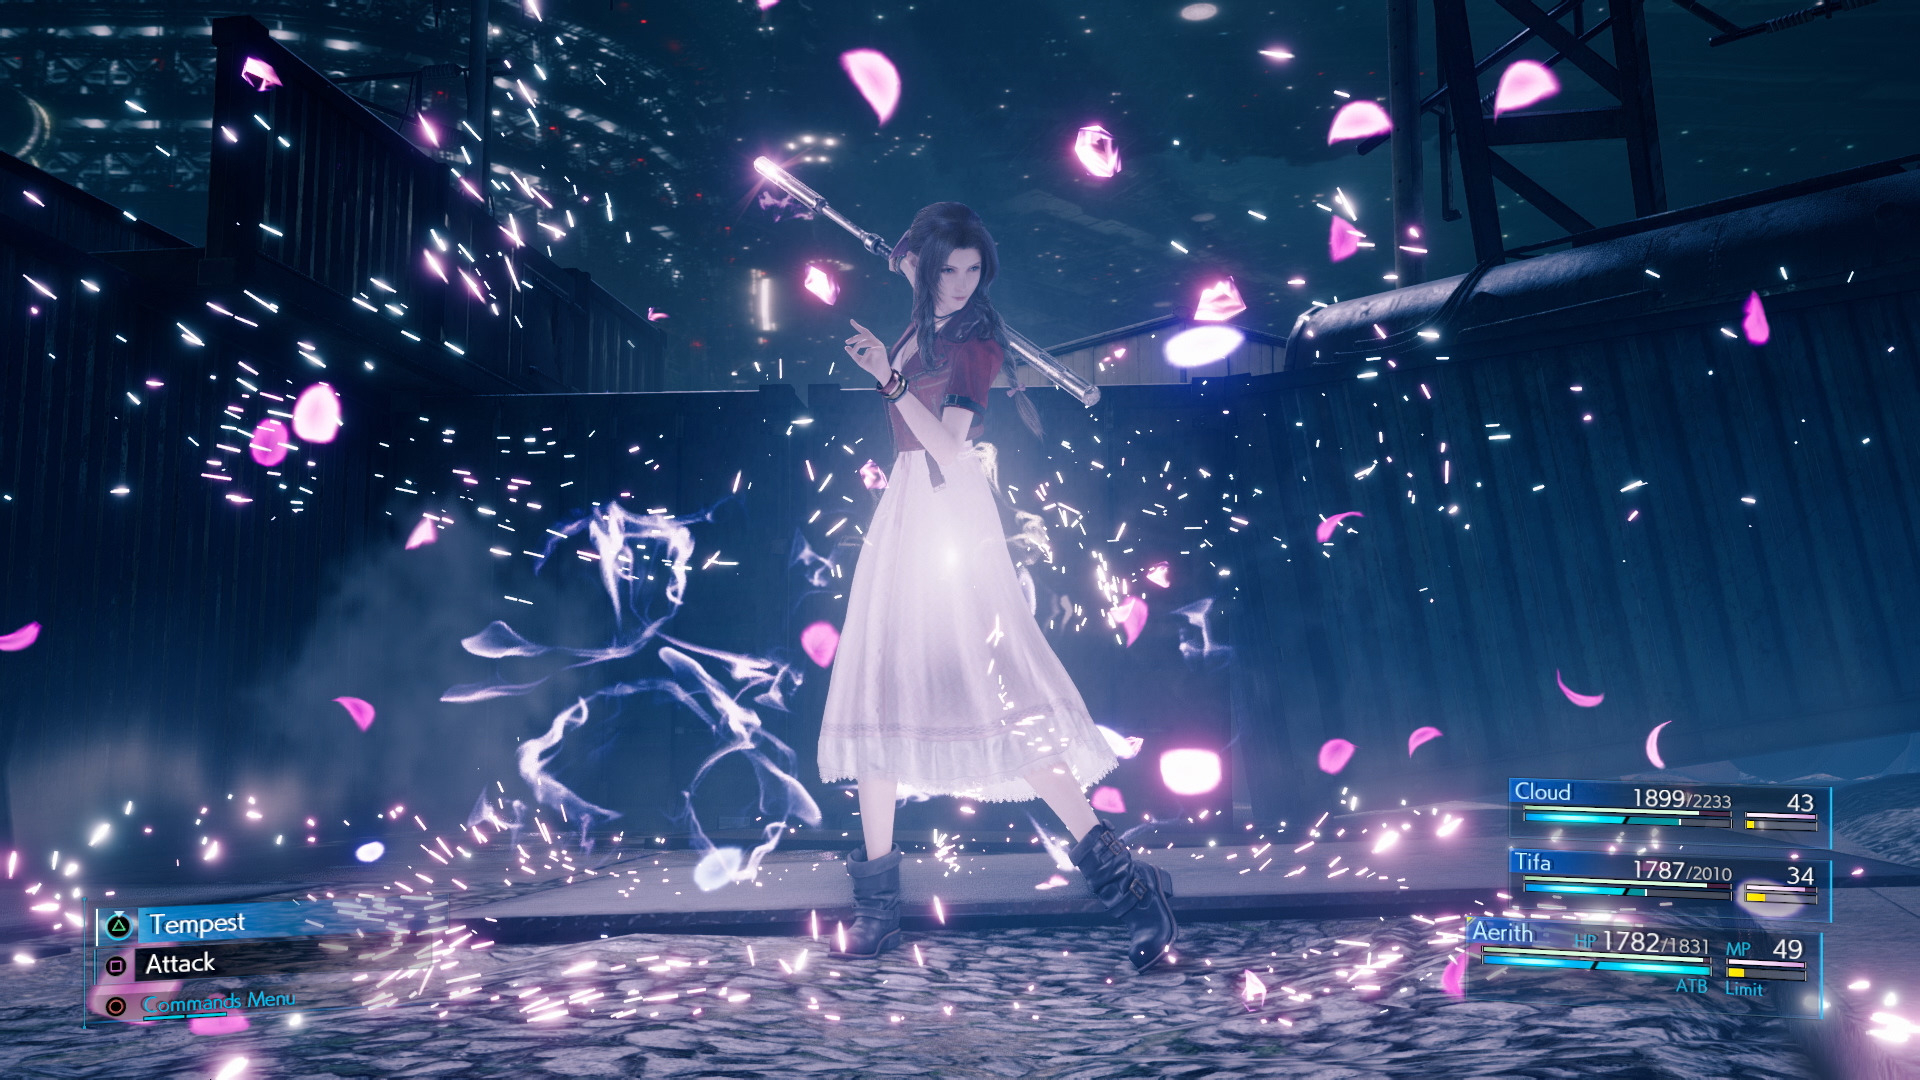
Tempest attack – multi-hit damage
After 3 seconds, it explodes from one up to five times, depending on how far we charged up the attack by holding triangle. Each explosion deals high damage and, according to the screenshot description, also affects other enemies close by, which makes this attack a long-range area of effect ability. And of course they had to integrate flower imagery into this attack with the addition of cherry blossom particle effects.

Tempest attack – charge-up
In the first screenshot, we see a completed green circle around the triangle button that’s usually not there. It’s the indicator for the charge-up time. In the Abzû battle footage, we see that charge-up effect in action. Ideally, you want to fully charge it up to reach maximum effectiveness. However, depending on the situation, you won’t be able to just stand around for 1.4 seconds without being interrupted, which is why you sometimes want to just tap triangle or let go of it halfway to get out of harm’s way or switch to a healing spell. However, we’re able to keep fighting immediately after deploying that crystal projectile, which should allow us to fully charge up Tempest most of the time.
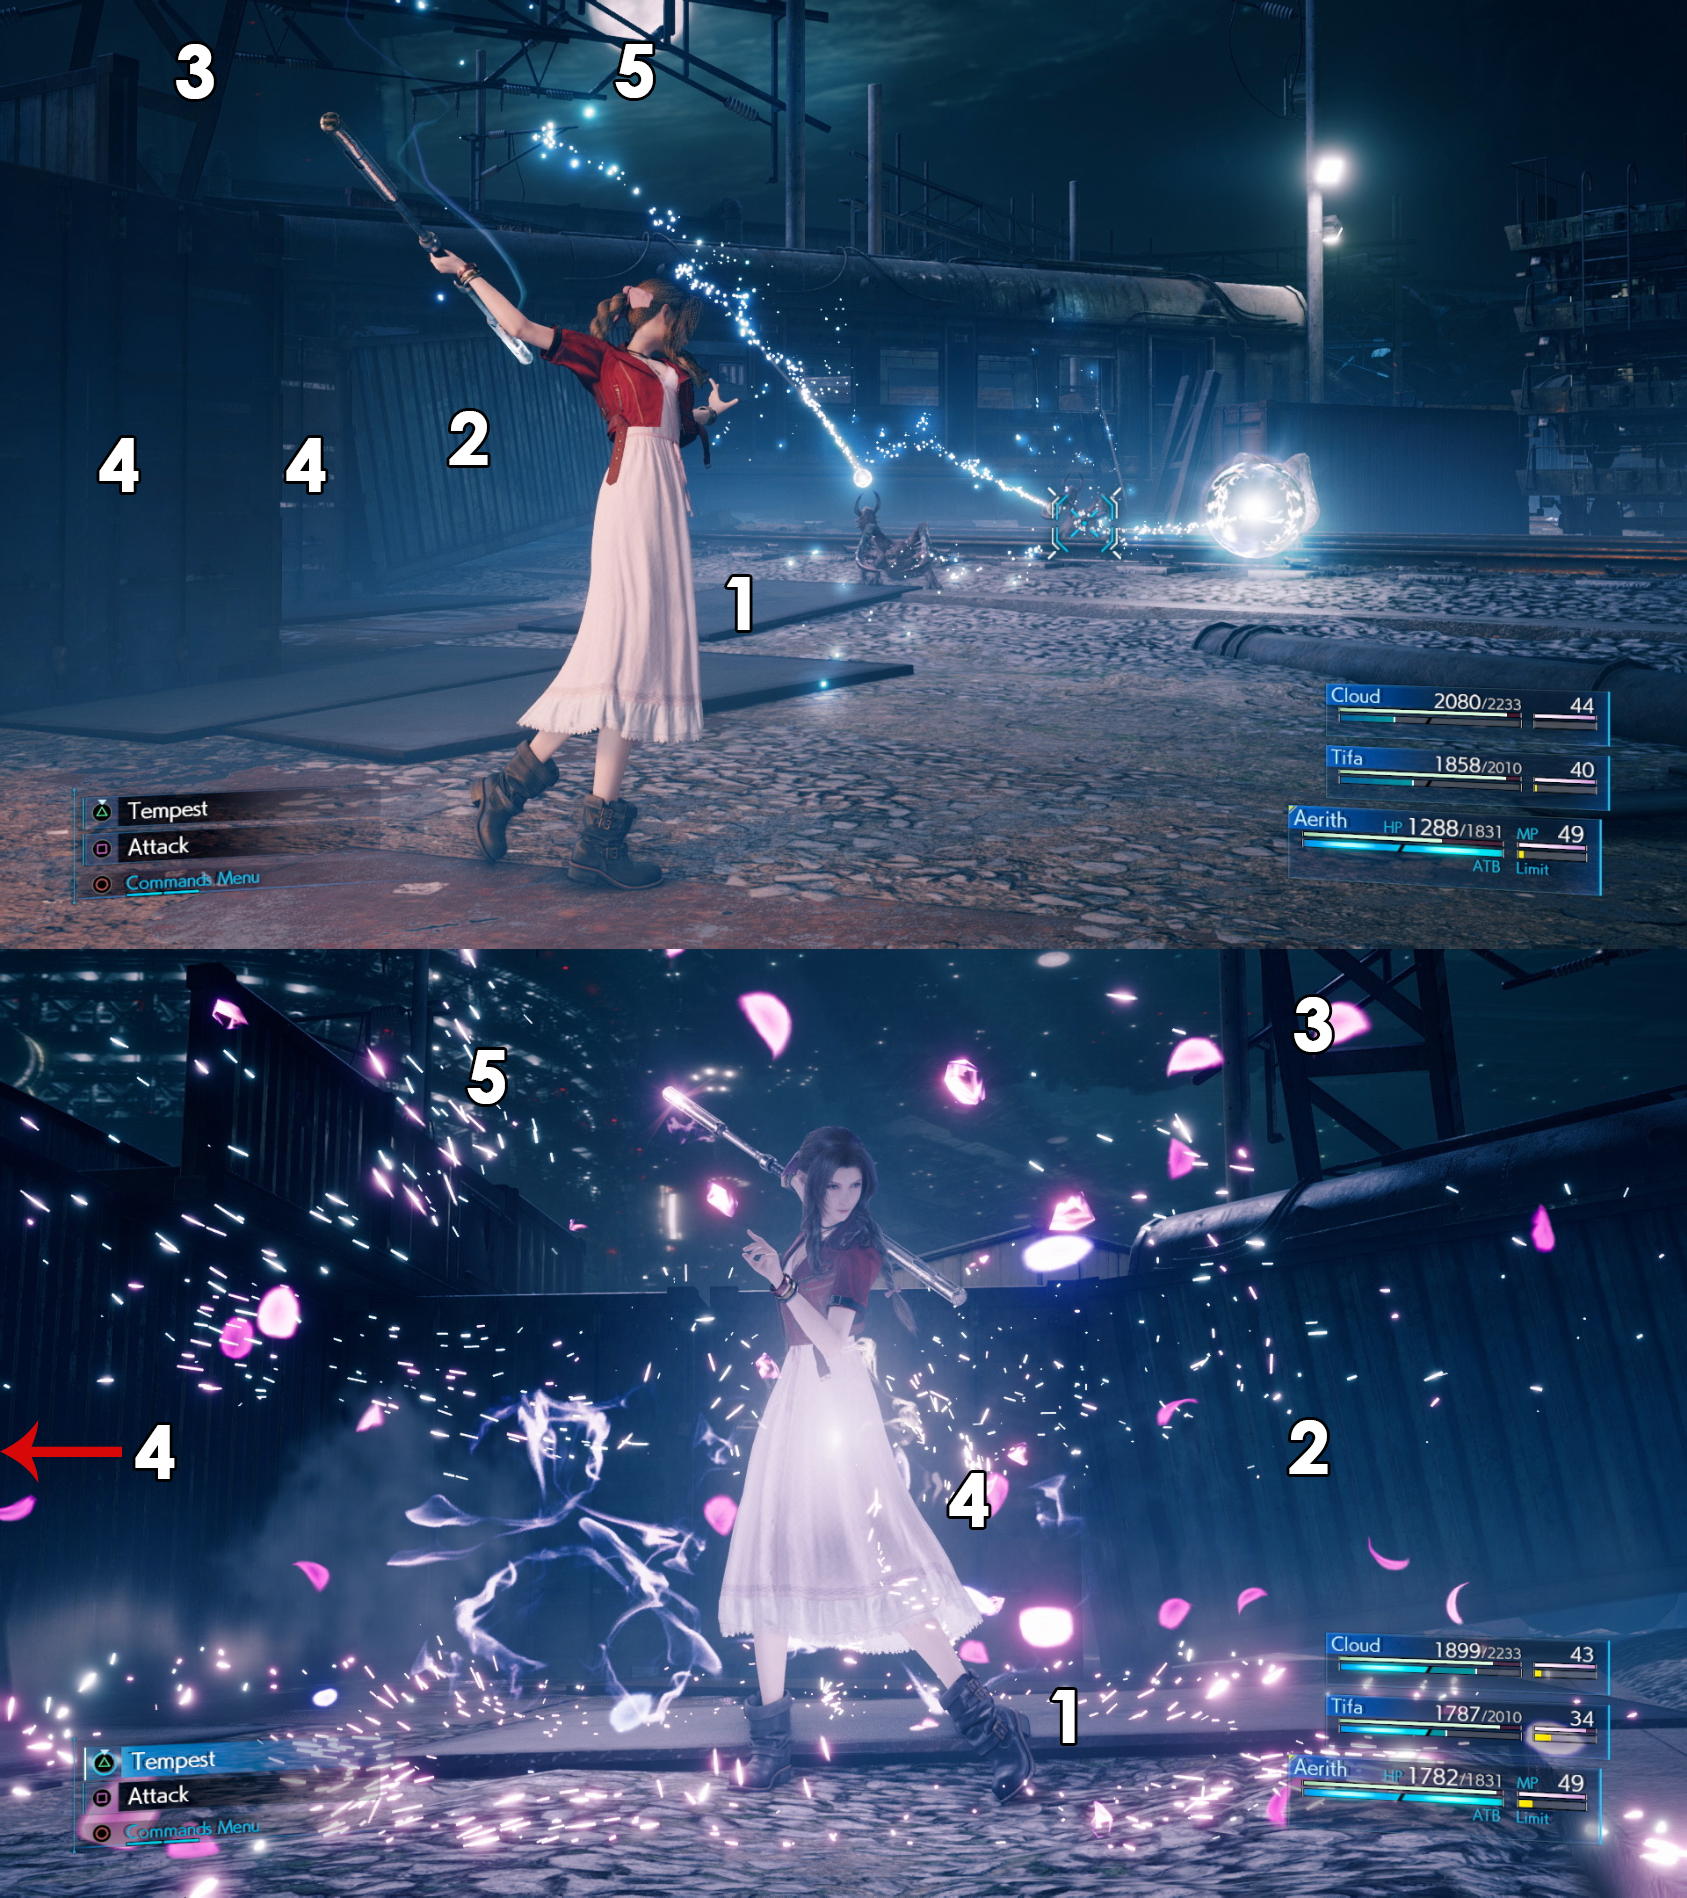
Train Graveyard comparison 1
This first screenshot takes place in the same area as the previous one, just from another position and angle. The following landmarks describe the evidence: large dark tiles (1), metal wall in front of a train coach (2), metal strut behind it (3), several cargo containers next to it (4) and a view on the central pillar instead of the moon (5). And again, at the bottom of the first screenshot, a low angle reveals the flat nature of the rubble texture. It’s bothering me every time I look at it.

Train Graveyard comparison 2
It’s important to note that the second screenshot showing the impact is located in another part of the Train Graveyard. The background and the ground on which Aerith is standing look completely different compared to the standard attack screenshot. We see an additional coach and a locomotive instead of a lamp and a stack of wheel carriages. There’s a also way through between the coaches instead of a barricade. Both screenshots provide us with a view on the night sky above sector 6. The second one looks familiar, however. It’s practically the same view direction as seen in the Halloween Special screenshot with Cloud being chased by Ghosts.
Enemy – Deenglow comparison
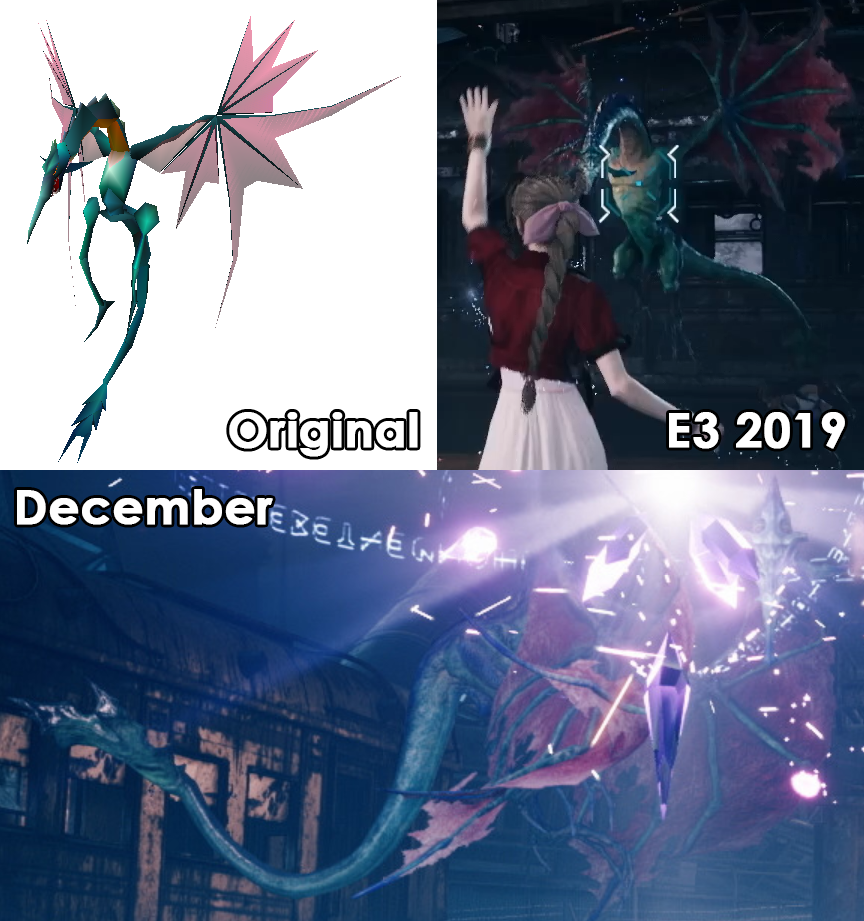
Let’s look at a few other interesting details. For one, Aerith is attacking a Deenglow, a small dragon-like creature also appearing in the Train Graveyard in the original game, which we already got a glimpse of in the E3 2019 trailer during Aerith’s limit break Healing Wind.
Ancient glyphs when summoning
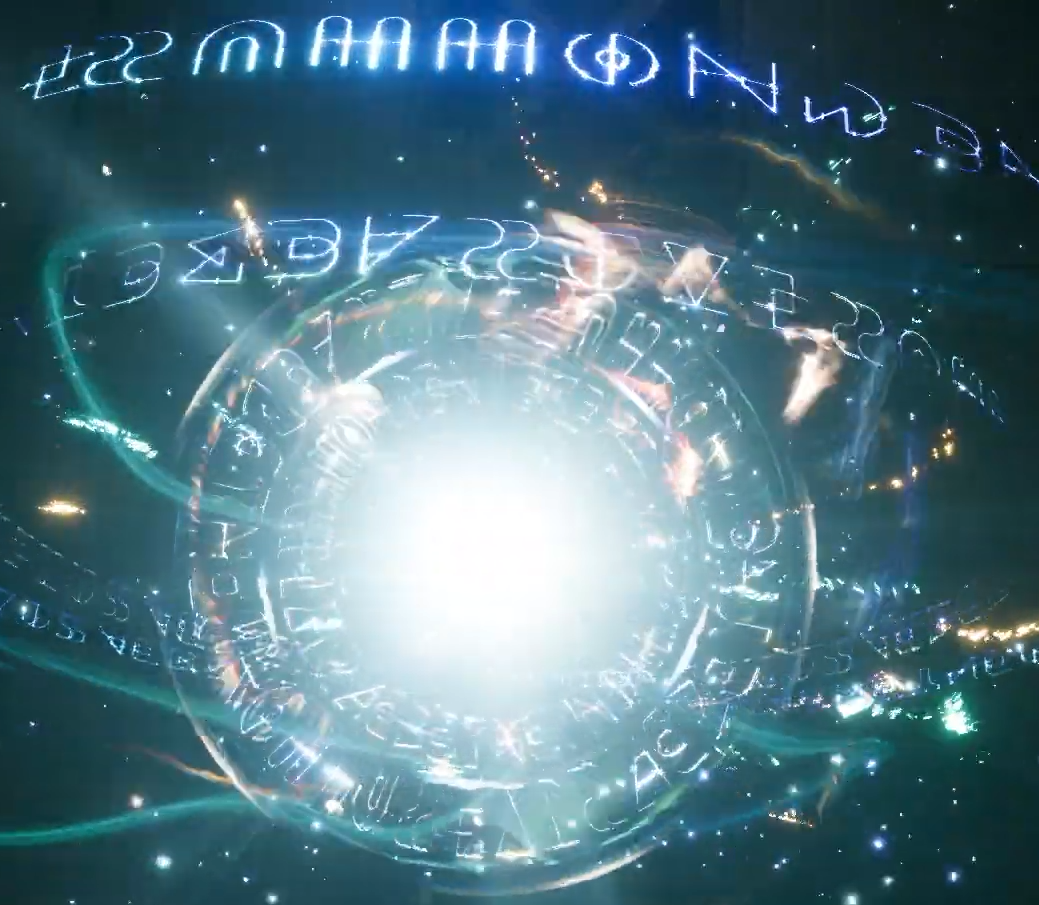
For another, there’s this glyph ring around the expanding crystal projectile. I’m pretty sure that those glyphs represent letters of the Ancient Cetra language. Why? Summons also stem from the time of the Cetra and when Cloud summons Ifrit, the same glyph rings appear! And lastly, I think coaches with the lights turned on can be entered, like the one in the back area in the second screenshot.
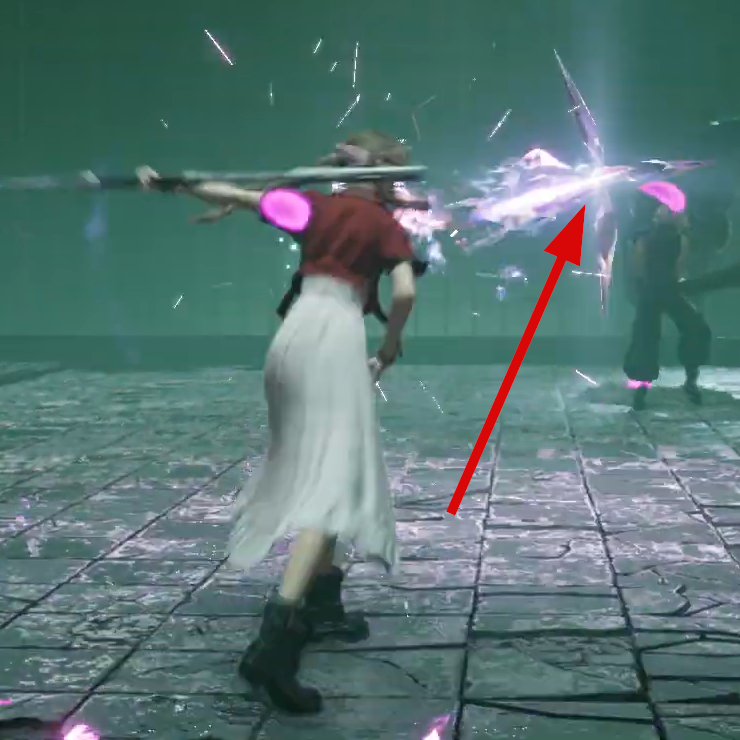
Guard Stick Materia slots
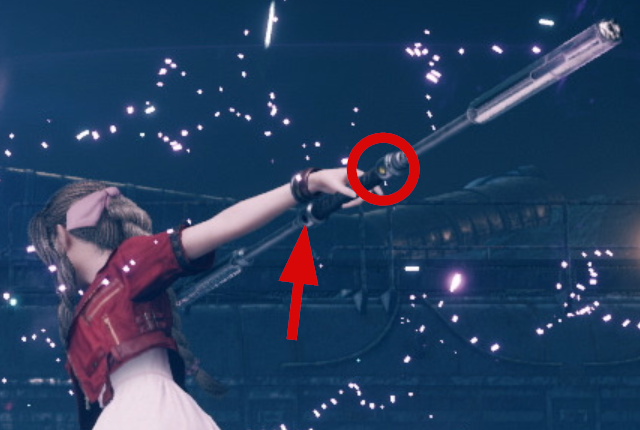
Finally, let’s have a gander at Aerith’s staff. Why? Materia slots, of course! To the right of the handle, there’s a yellow Command Materia equipped. The Assess Materia, maybe? On the other side, there’s an empty slot. Her Guard Stick, which her current weapon seems to be based on, only provides one single Materia slot, not two. Either they improved the Remake version in that regard, or the player has already upgraded her weapon to receive an additional Materia slot. The weapons of the other three characters contain the same Materia slots as their original counterpart, which is why I’m leaning more towards an upgraded Guard Stick.
Aerith’s Combat – Soul Drain
Aerith’s Soul Drain
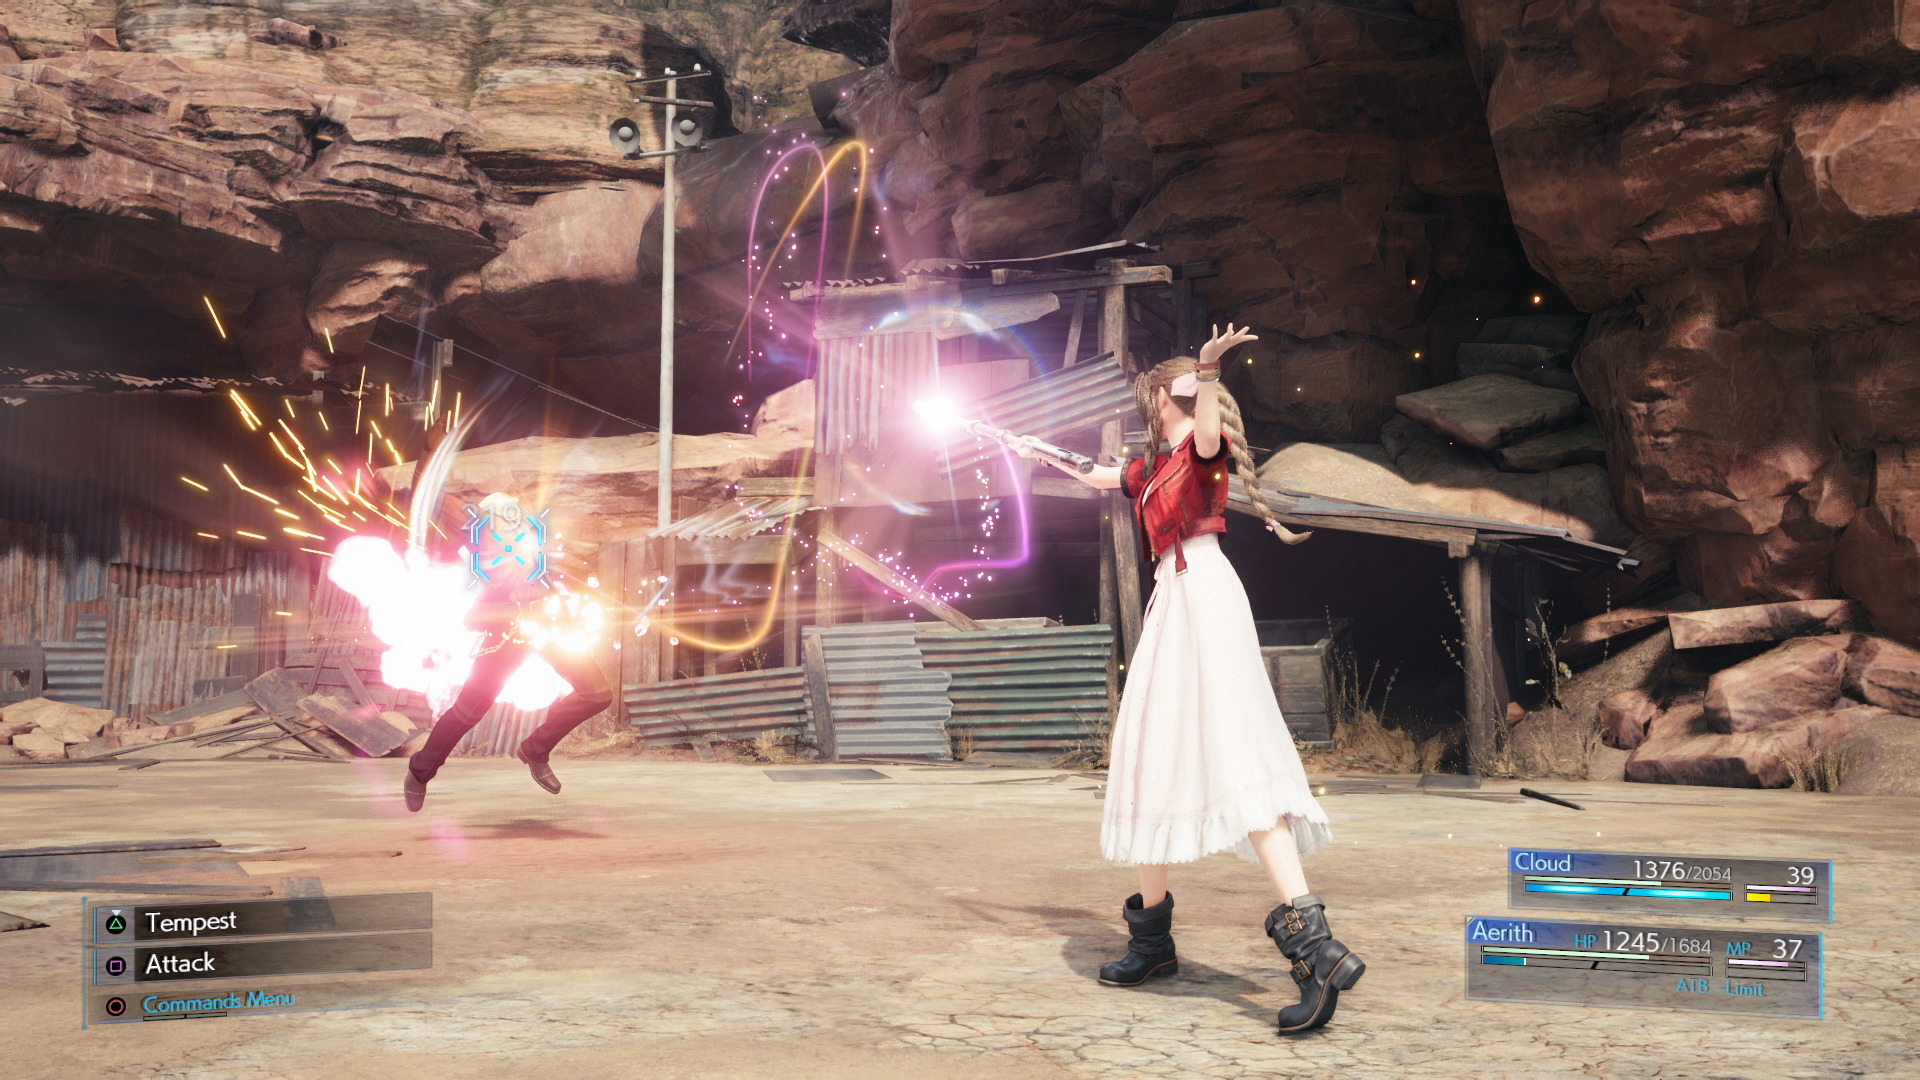
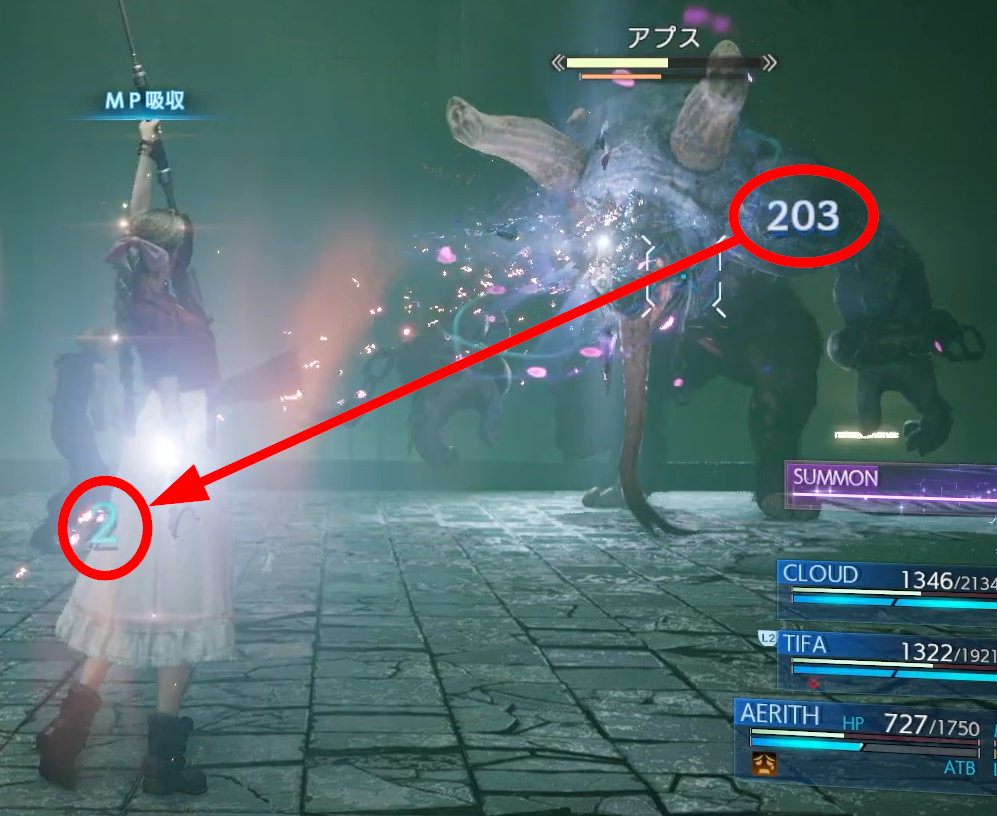
What a nice change of tapestry. Brown, barren and rocky landscape instead of a bleak and creepy train scrapping site. Here, Aerith uses an ability called Soul Drain, which damages the enemy and regenerates Aerith’s MP pool a little. On top of that, its special effects look very pretty. We could already witness this ability being used in the Abzû battle footage. There, Aerith inflicts 203 points of damage and heals 2 MP, which brings the MP healing rate to 1% of the damage dealt. It also seems to have hitstun properties as Rude gets knocked back when hit.
Another interesting observation is that Aerith always stands on her toes with one foot whenever she’s performing an attack. It’s so prevalent that I have to point this out specifically. Speaking of, we get a very good view on her shoes in this screenshot and I must say I vastly prefer these over her original design. Really well made and appropriately detailed. Quite the contrast to her pretty dress, accentuating her character.
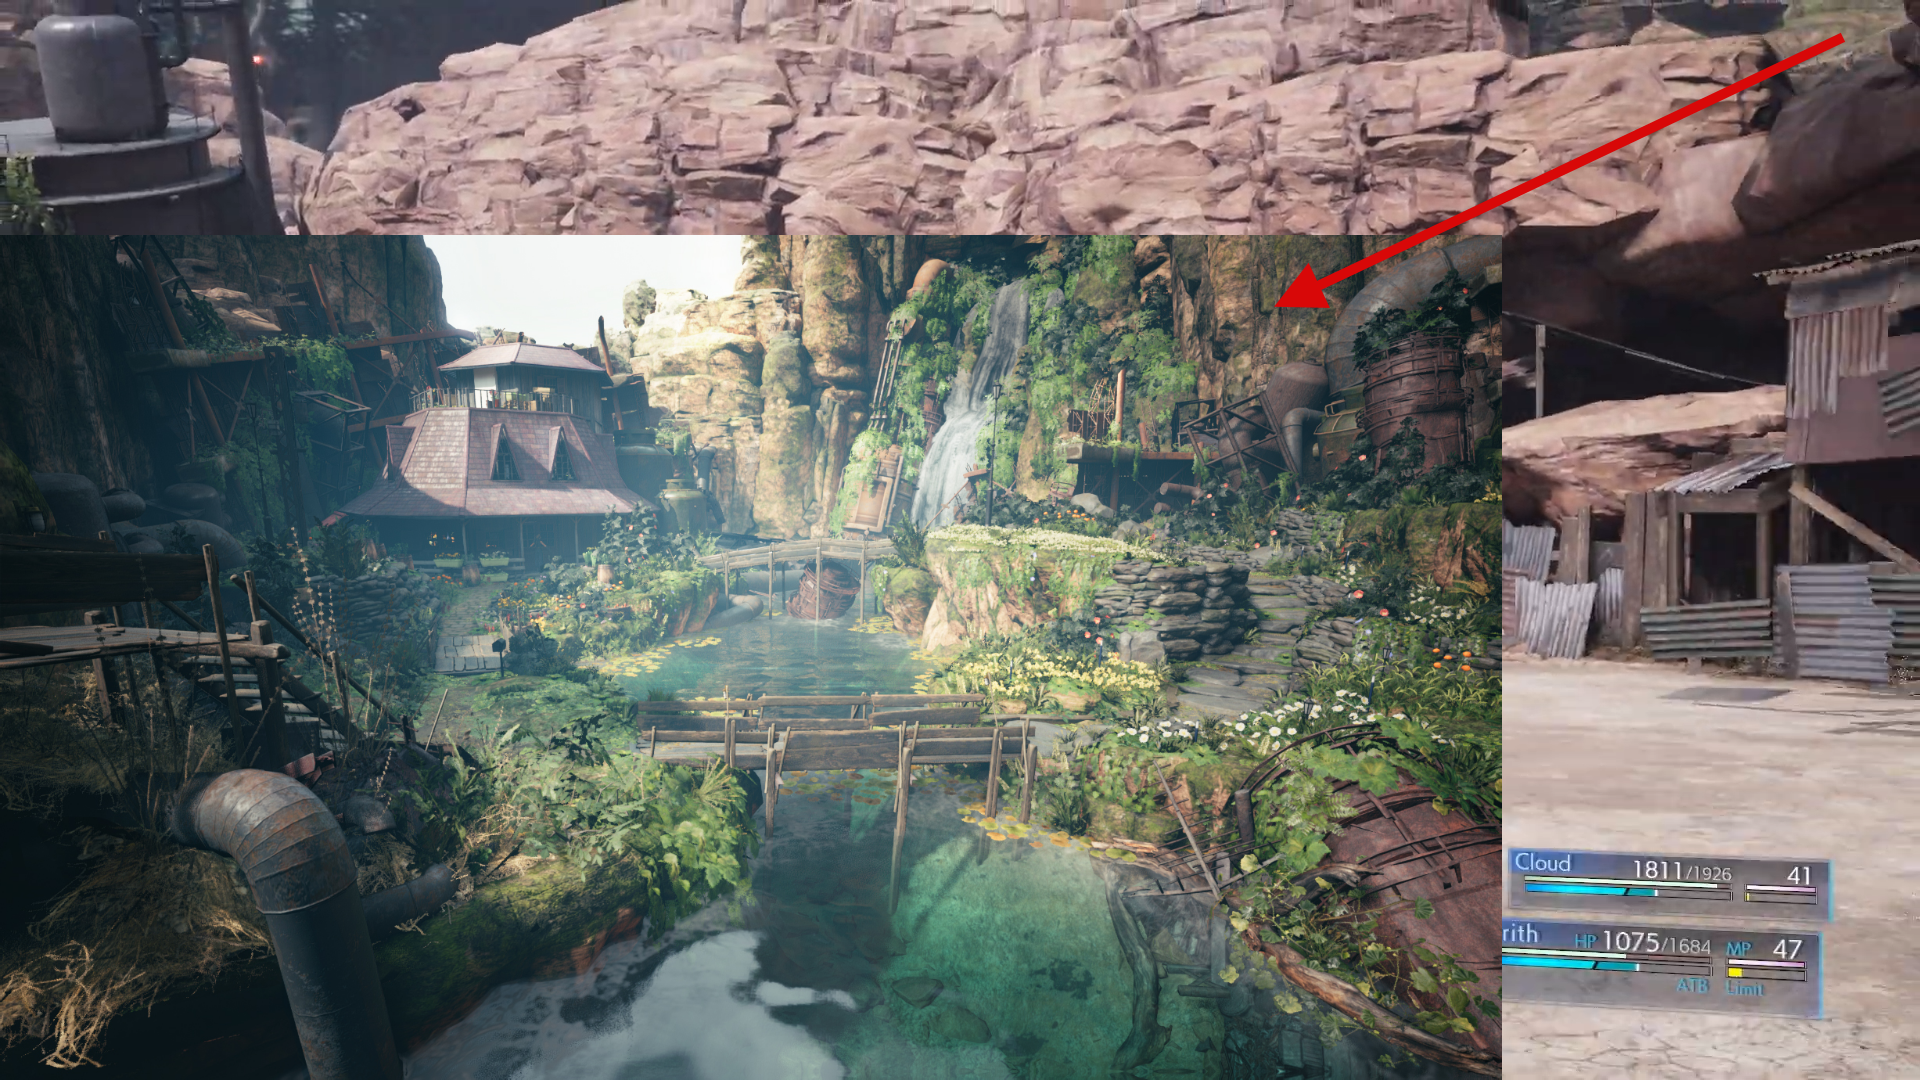
Rude battle happens near Aerith’s home
There’s not much to say about the environment as we’ve already seen it in the Tokyo Game Show 2019 trailer, but there’s something I noticed when re-watching that trailer for this analysis. In the last few frames of the Rude battle segment, we can see through an opening in the stone wall to the other side where there are more rocks, some overgrown, which heavily reminds me of Aerith’s home and garden. If that’s true, we’ll encounter Rude after jumping and shimmying across the heaps of scrap but before entering the sector 5 slums village. And if my guess is right, I’m pretty sure we can see the central pillar of Midgar from Aerith’s house.
Aerith’s Combat – Lustrous Shield
This is a completely new ability we’ve never seen before. According to the description, it keeps enemies at bay and blocks projectiles. Furthermore, it deals damage to any enemy coming into contact with the shield. This can become very useful, especially when Aerith needs time to charge up an attack, heal or otherwise prevent interruption. And again, another flower themed ability. They seem to be going all in with the Flower Girl theme. At least it looks beautiful.
That’s all we know so far about this ability, but I’m curious. Is it time-based or damage-based? Does it stay up for a certain amount of time or does it disappear when a certain damage threshold by projectiles and collisions is reached? Is it stationary or does it follow the target around? Can it even be cast in front of other characters? Does it target an enemy and use its direction relative to the caster (only Aerith in that case) to orient itself?
Sewers reference (State of Play trailer)
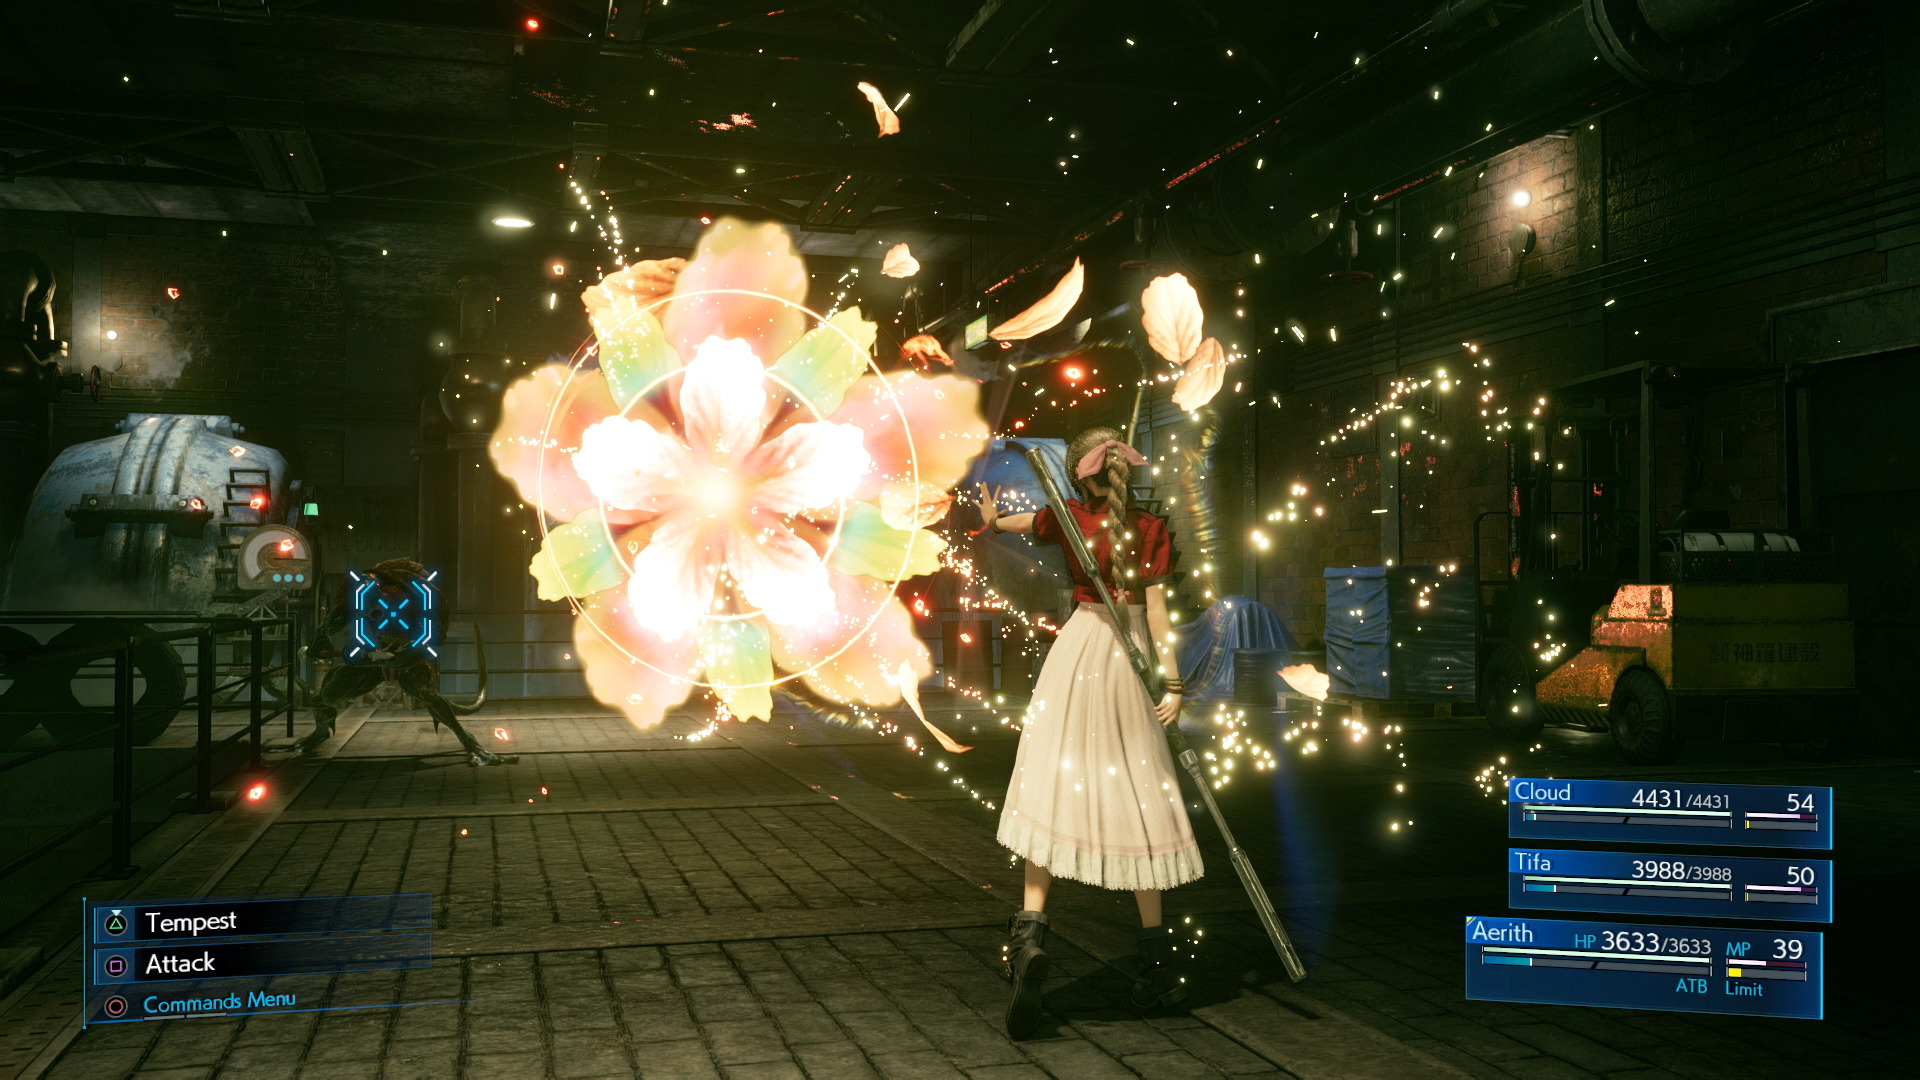
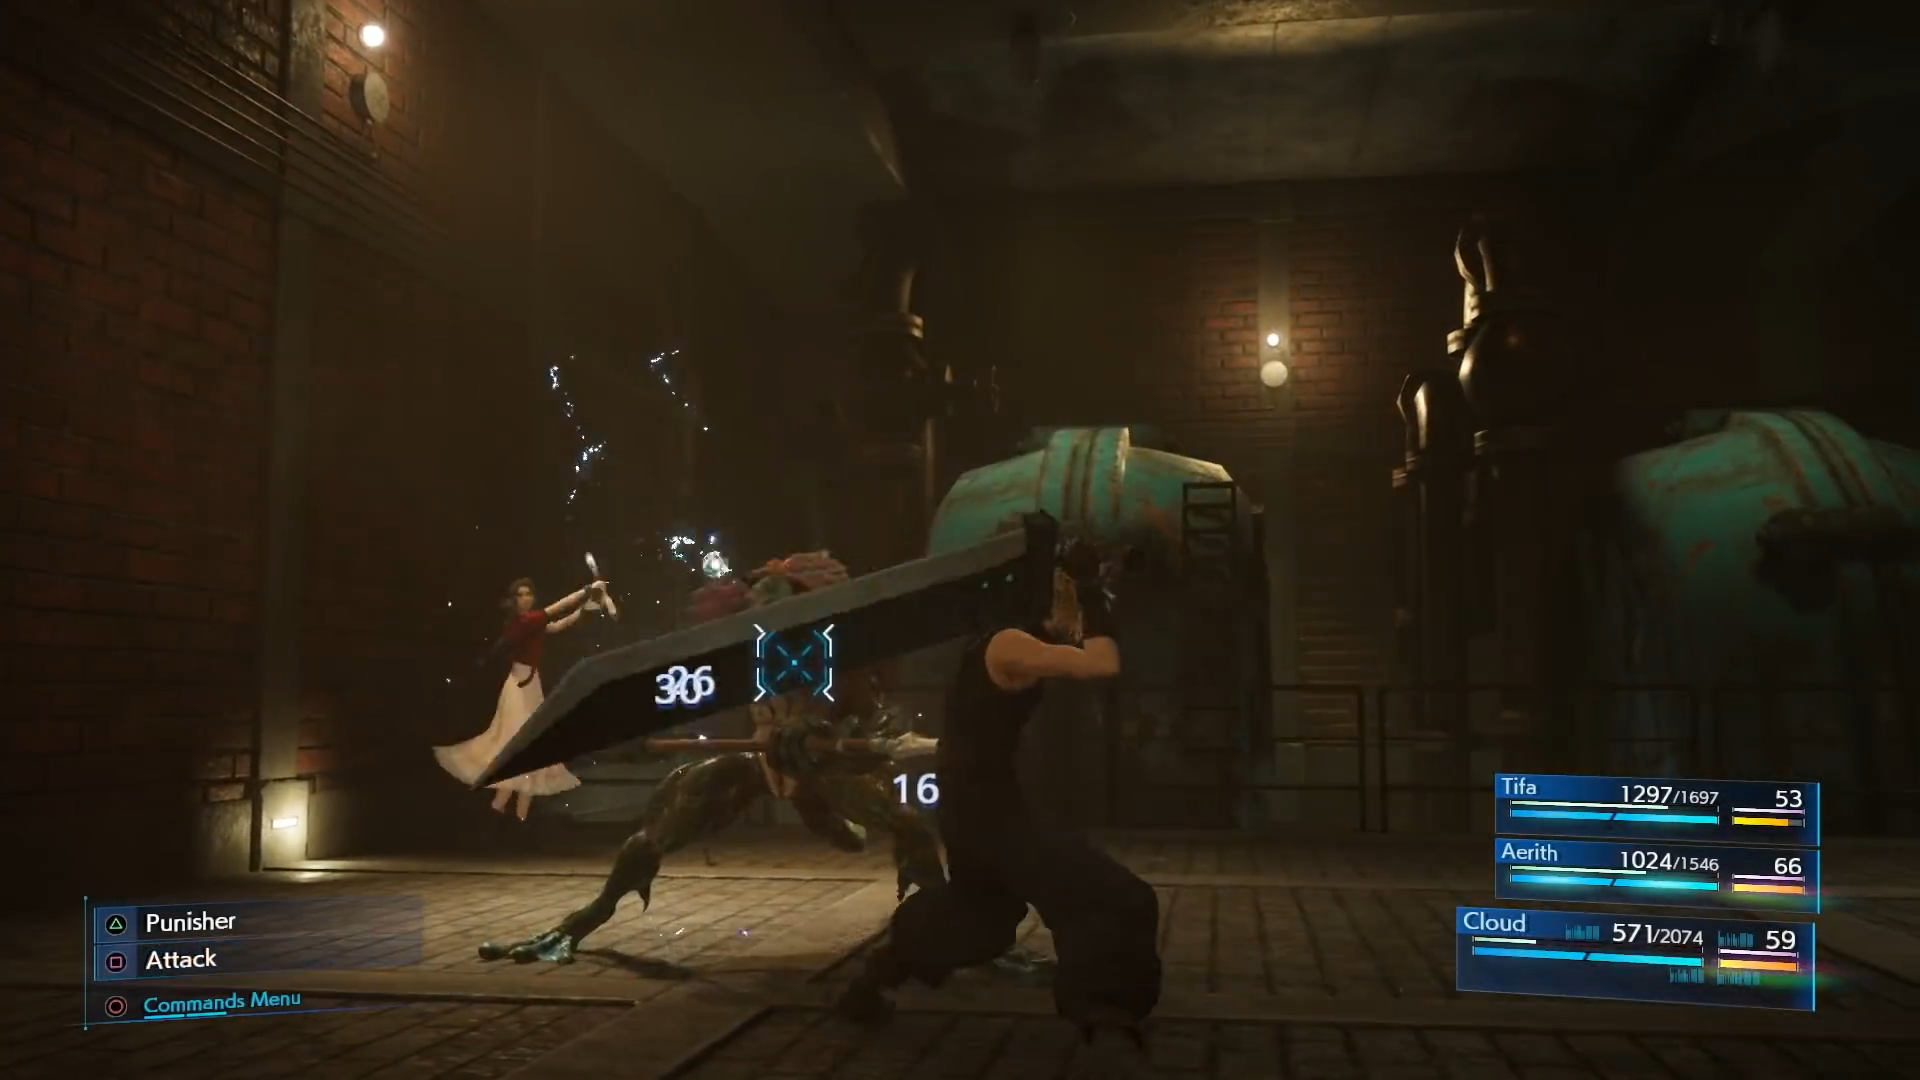
The location of this screenshot is obvious. We’re in the sewers that connects Wall Market to the Train Graveyard. The textures and architecture are the same as other footage and screenshots of this area, we’re fighting against the same Sahagin type enemies and we have Cloud, Tifa and Aerith in the party, which doesn’t happen anymore after they part ways before Plate Fall.
The only point that could confuse people is the very high HP and MP values, which are almost twice as high as in other footage from the sewers. In the E3 screenshot where Aerith casts Fire on a Sahagin, Cloud has only 2457 HP compared to the 4431 HP here.
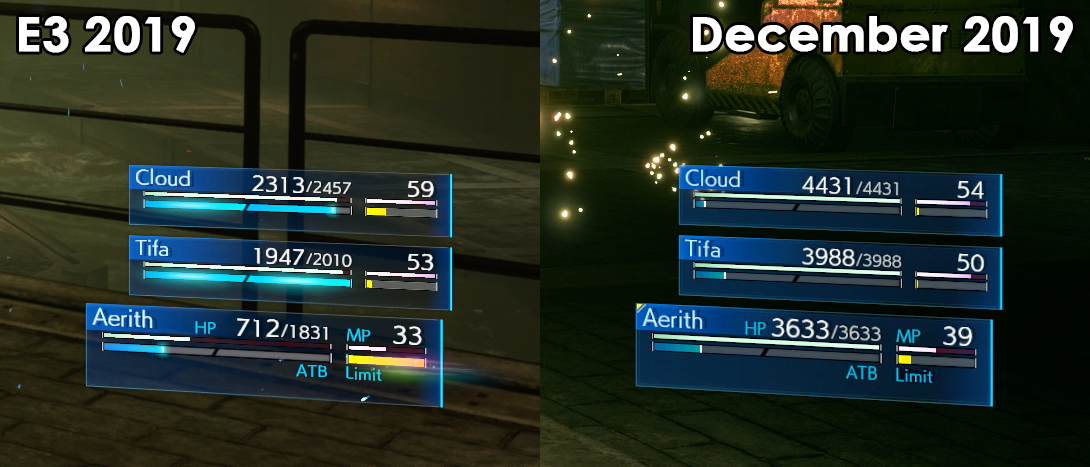
HP comparison (sewers)
It’s also much higher than all other screenshots and footage of battles in the Train Graveyard, even those in this same batch of screenshots. Either they performed a huge re-balancing or over-leveled the characters through test play or debugging save states. In the end, HP values don’t mean much during the development phase.
There’s one takeaway from this, however, which is a soft confirmation that we’ll indeed be able to reach HP values close to 9999, like in the original game. MP values on the other hand are still low and most likely cap at 99. Some might cry heresy at this low number but when you think about it, it’s most likely an advantage for balancing. With a narrower range of spell costs, low-cost spells stay relatively relevant while high-cost spells drain your MP much faster and therefore can’t be spammed as much. This forces the player to think more strategically when casting spells as the necessary resources aren’t abundant. Unless you buy 99 Ethers or farm 99 Turbo Ethers.
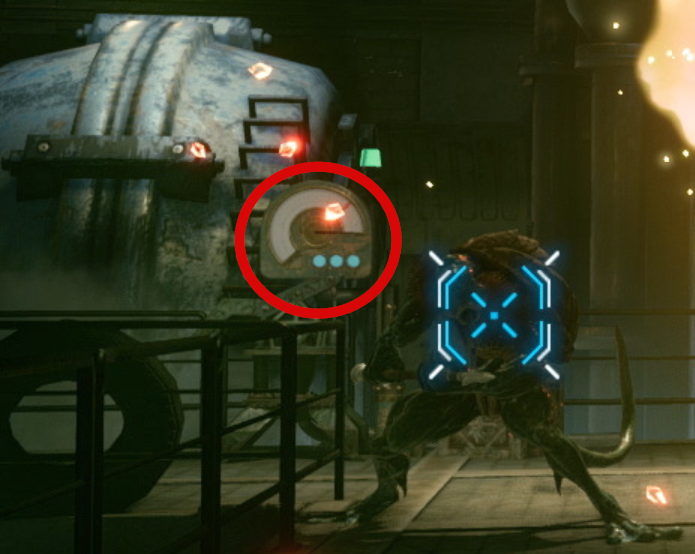
Control panel (sewers)
There’s one last detail I’d like to mention in this screenshot and that’s this control panel behind the Sahagin. It contains 3 buttons and a circular pressure meter, presumably. There’s also a green light indicator which could either indicate pressure health or whether the mechanism it’s supposed to operate is on or off. The contraption in front of it and the cylindrical object to the right below the Sahagin’s fist also look like they’re a part of a pressure-based mechanism. My conclusion is therefore that we’re dealing with a switch puzzle which we need to solve in order to progress through the sewers.
Shiva’s Heavenly Strike
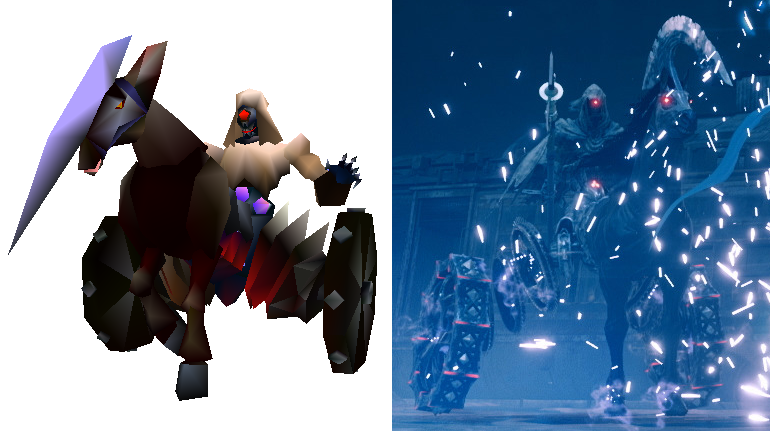
Enemy – Eligor comparison
We’ve already seen Shiva and Eligor in action in the Tokyo Game Show 2019 trailer but not as detailed due to YouTube’s video compression. Anyway, Eligor looks awesome and quite accurate and faithful to his original design. Naturally, several details are different or heavily updated like the horse’s blade, but the main elements remain. He does possess a spear as his new weapon of choice, however, which he was using in the aforementioned trailer segment to rain countless copies of it towards our heroes. Maybe that’s a new weapon for Aerith we obtain upon defeating him. Though it would be a new weapon as it doesn’t look like any of Aerith’s weapons from the original game.
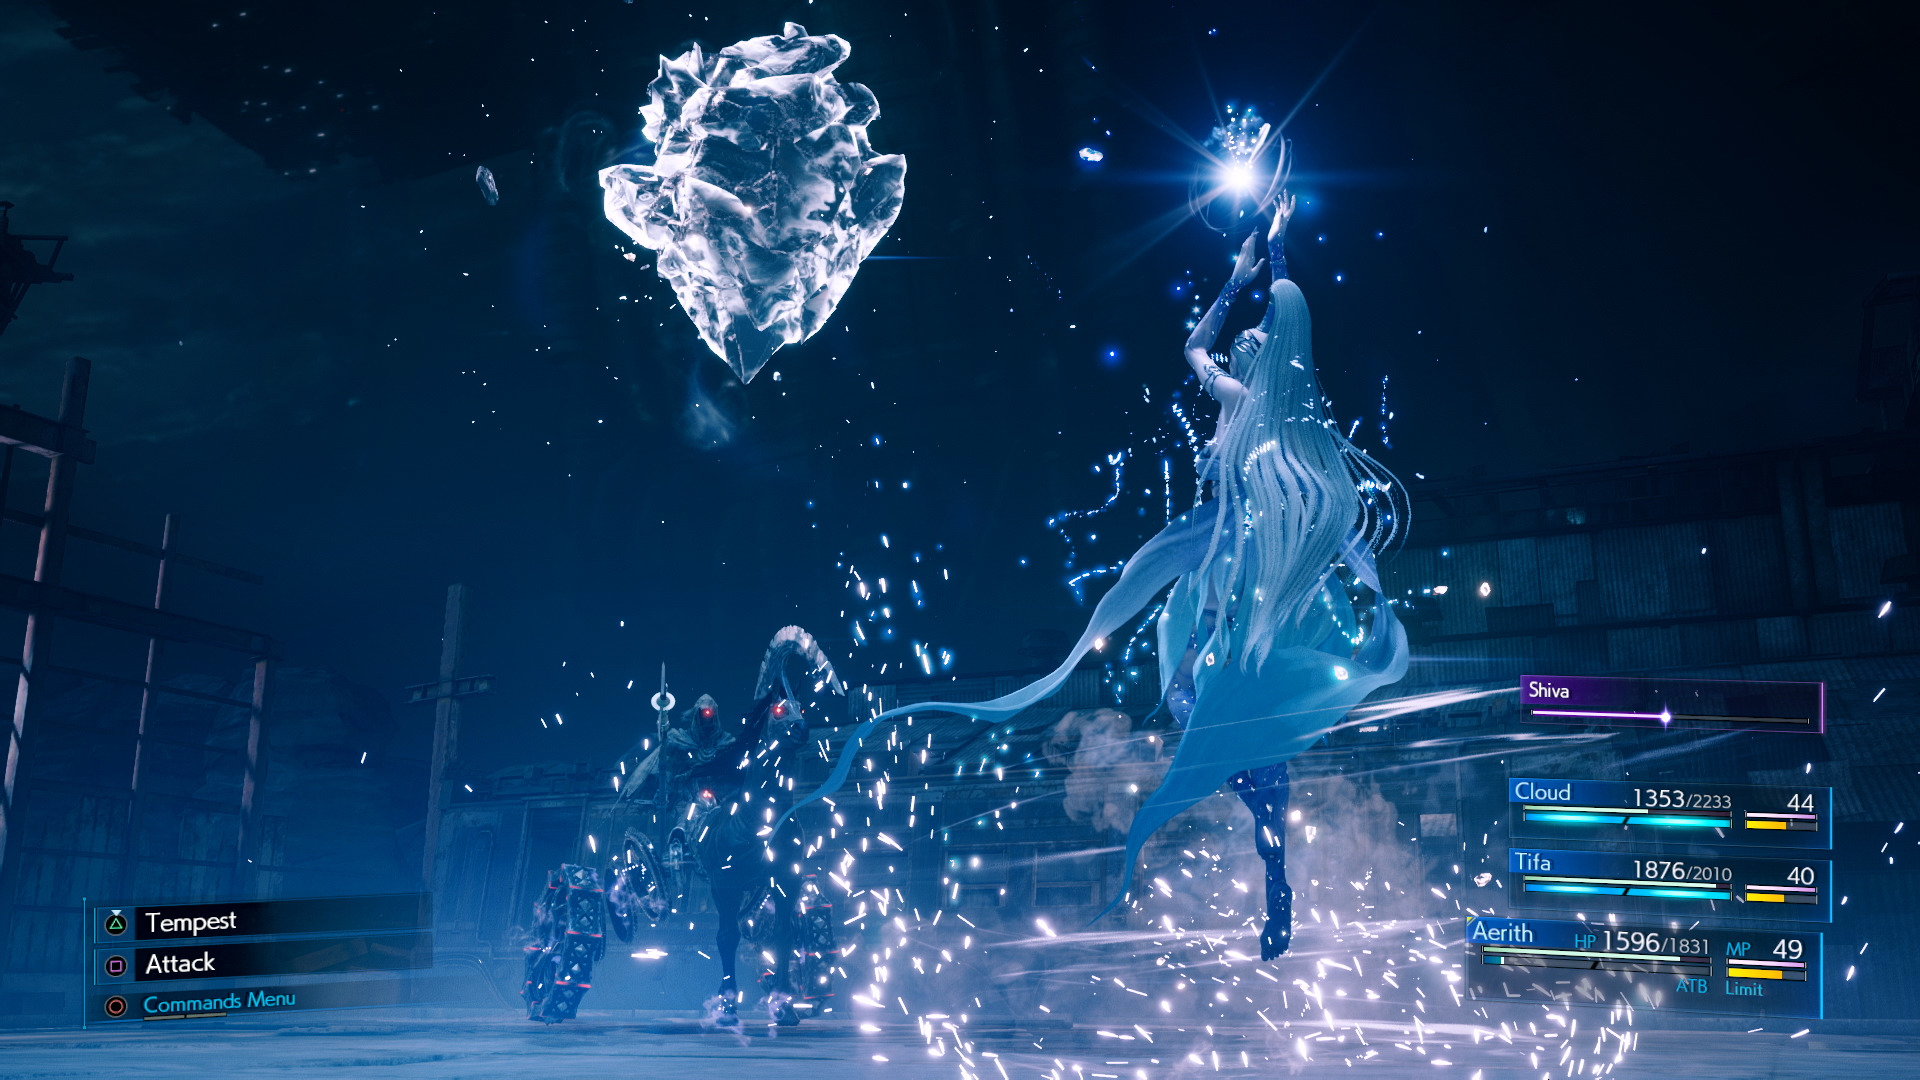
Shiva is using an ATB ability called Heavenly Strike, which should sound and look familiar to most of you out there. Besides certain spinoff Final Fantasy games, it was one of Shiva’s attacks in Final Fantasy X. Same name and same animation. Shiva conjures a heavy block of ice above the target’s head and lets it crash down onto the enemy.

Reactor number 7
We see the slightly illuminated night sky to the left and an intact plate above. It’s very hard to make out, but the reactor number 7 can be seen behind and above Eligor. Next to familiar elements like the fence, masts and another passenger coach behind Shiva and Eligor, we can see something new and that’s the side of this huge shack-like building. It contains an array of windows at the top to illuminate the interior and an extension along the side wall with a sloped roof.
Shiva’s Diamond Dust
Building entrance behind Shiva
Same area, different angle. The huge shack can be seen again on the left here with the same windows up top and the low roofed extension on its side. It’s hard to see anything in the background, but since we saw the outside in the previous one as well as reactor number 7, I’m pretty sure the central pillar of Midgar lies somewhere behind Shiva and her icy effects. What we can make out, however, is an interesting detail on the building farther back, close to Shiva’s legs. There seems to be an entrance or exit to the big warehouse or factory. The spotlights above help support this notion.
Anyway, this exact frame is also found in the Tokyo Game Show 2019 trailer where Shiva performs her famous Diamond Dust finisher attack. Compared to the crisp image quality here, the YouTube video compression in the trailer turns the whole background into a mess of bland colors. I love how all those ice particles stream towards her, charging up her final attack. In addition to those and other colorful effects, a beautiful Aurora Borealis (Northern Lights) spreads all across the sky behind Shiva. Nice touch!

Train Graveyard Exploration
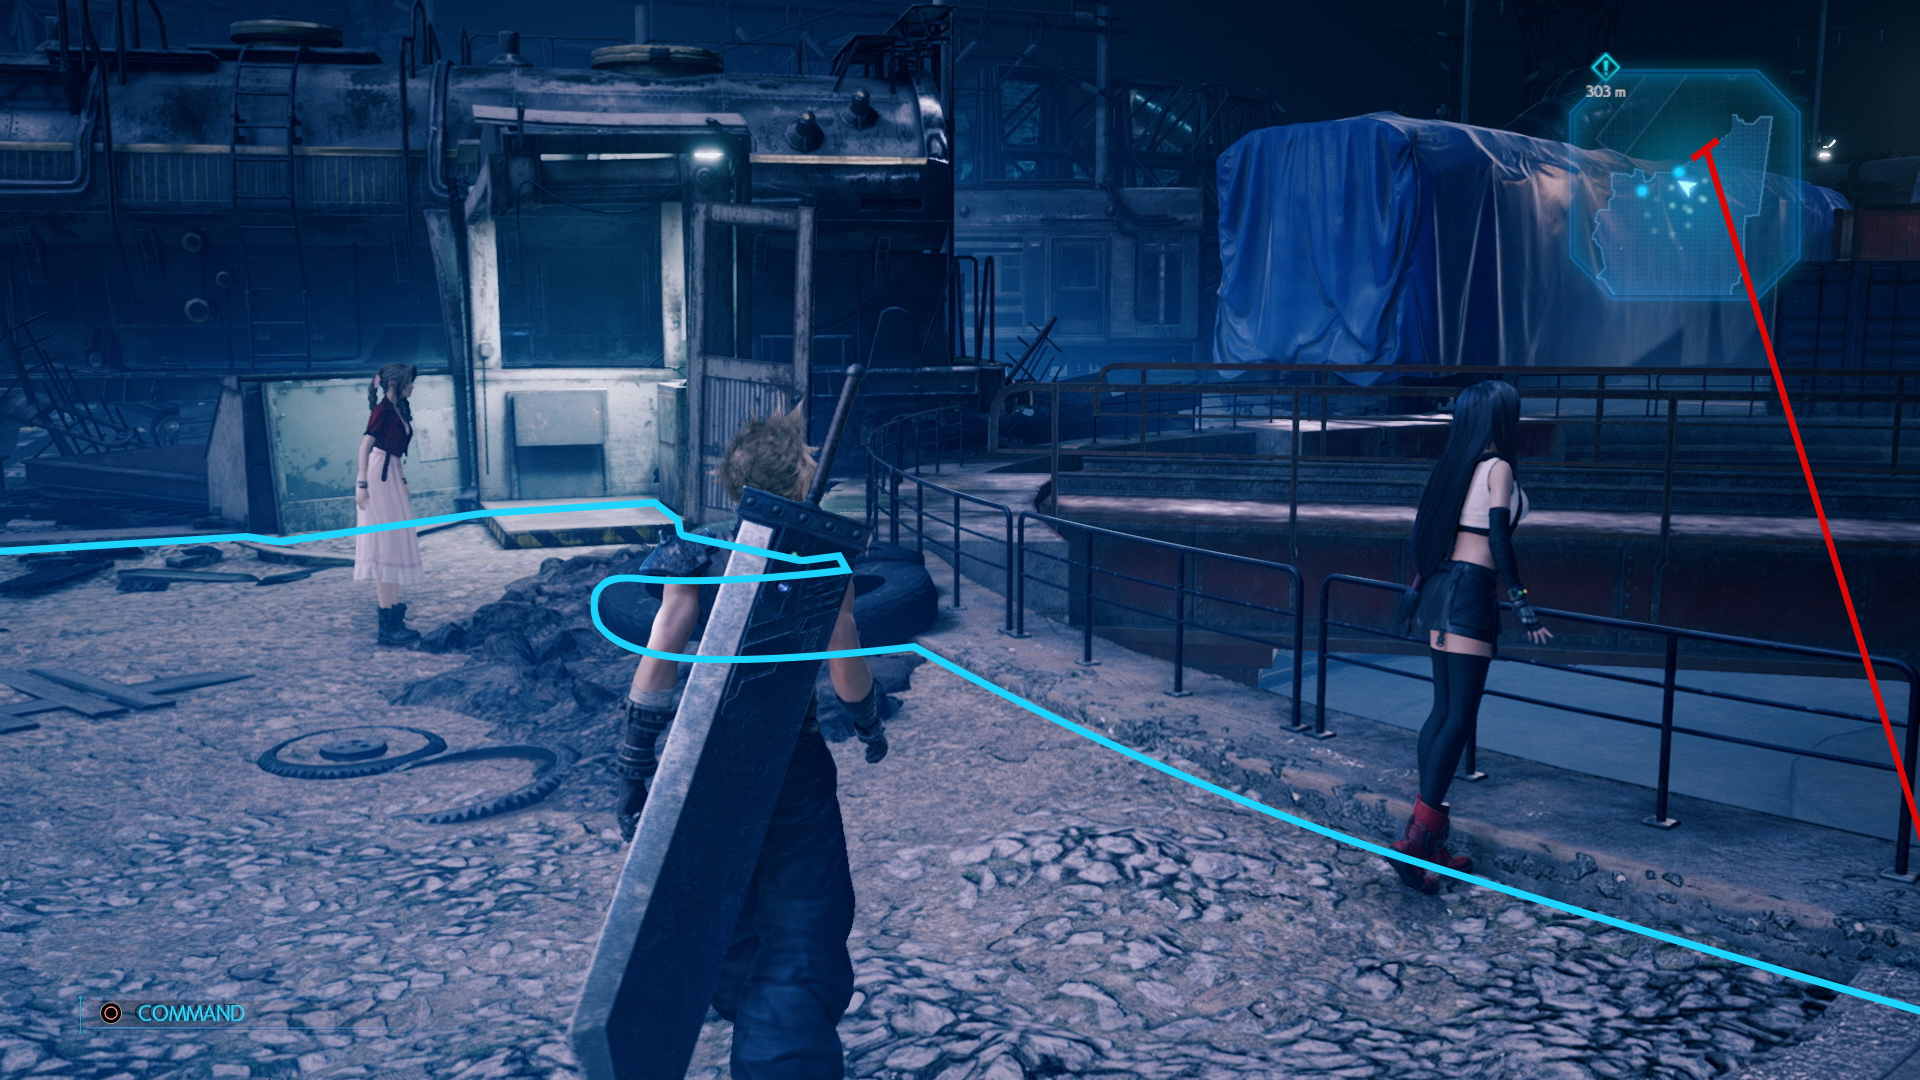
The last screenshot in today’s article is a very interesting one. It features Cloud being controlled by the player while Aerith and Tifa are up and about on their own devices. They aren’t following Cloud like party members usually do (see Barret in the playable demo for an example), which leads me to believe that we can talk to them as if they were NPCs. This area here also seems to inhibit some sort of puzzle (more on that in a bit), for which the girls might drop a hint or two when talked to. I also hope that affection points are still a thing in some way and that it matters who we talk to first.
Freight Wagon comparison
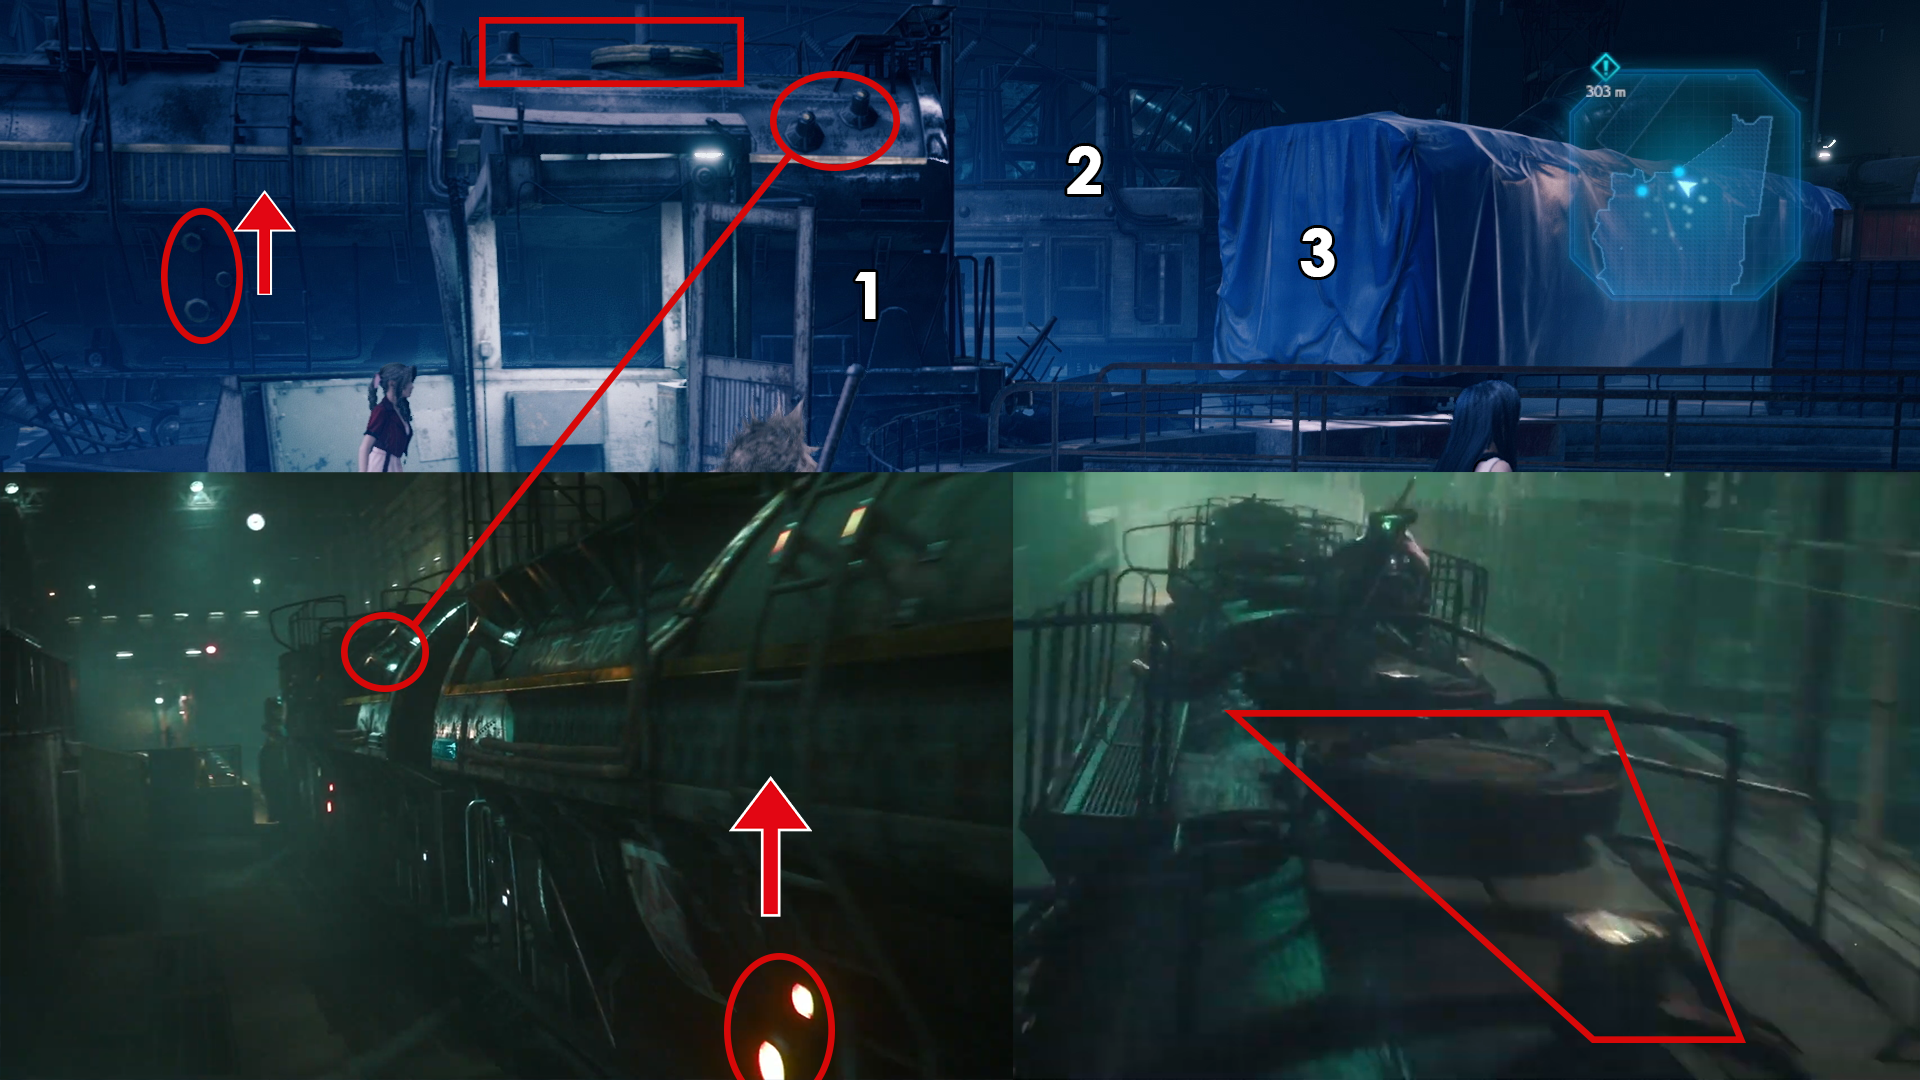
The background has a lot to say. The closest freight wagon (1) represents the same cargo type Cloud is crouching on when travelling to sector 1 in the beginning of the game. It is rounded, has ladders, bears the same strange knobs and possesses 2 round hatches on its roof for inserting and extracting whatever is being transported. Most likely liquid Mako. There’s a passenger coach in the far back (2) and another one to the right covered in the all-present blue tarp (3).

Railway turntable
Let’s now switch our attention to the potential puzzle in this area. On the right beyond the railing Tifa is standing close to, an eight-point railway turntable, used to direct locomotives, freight wagons and coaches to different parts of this old, decrepit train yard, is making advancement difficult. The rotatable bridge element stands on wheels affixed to both ends in addition to the central axis to ensure a smooth rotation and balanced weight distribution.
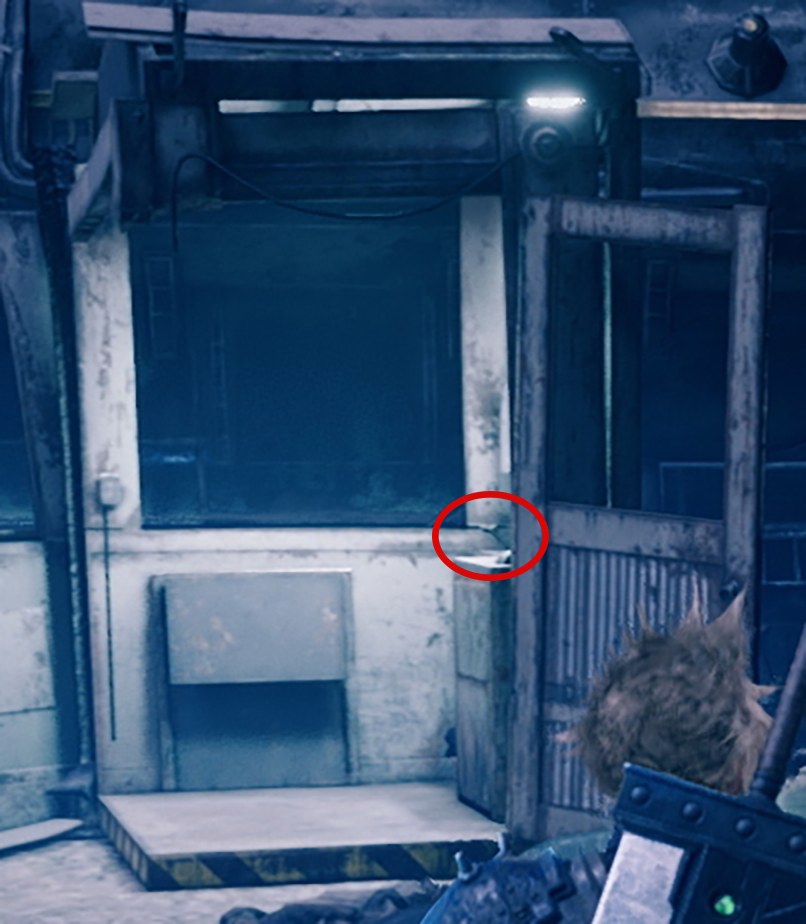
Railway turntable switch
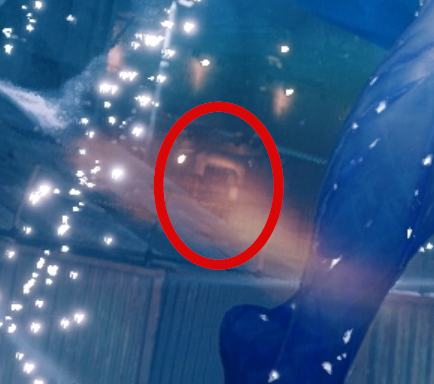
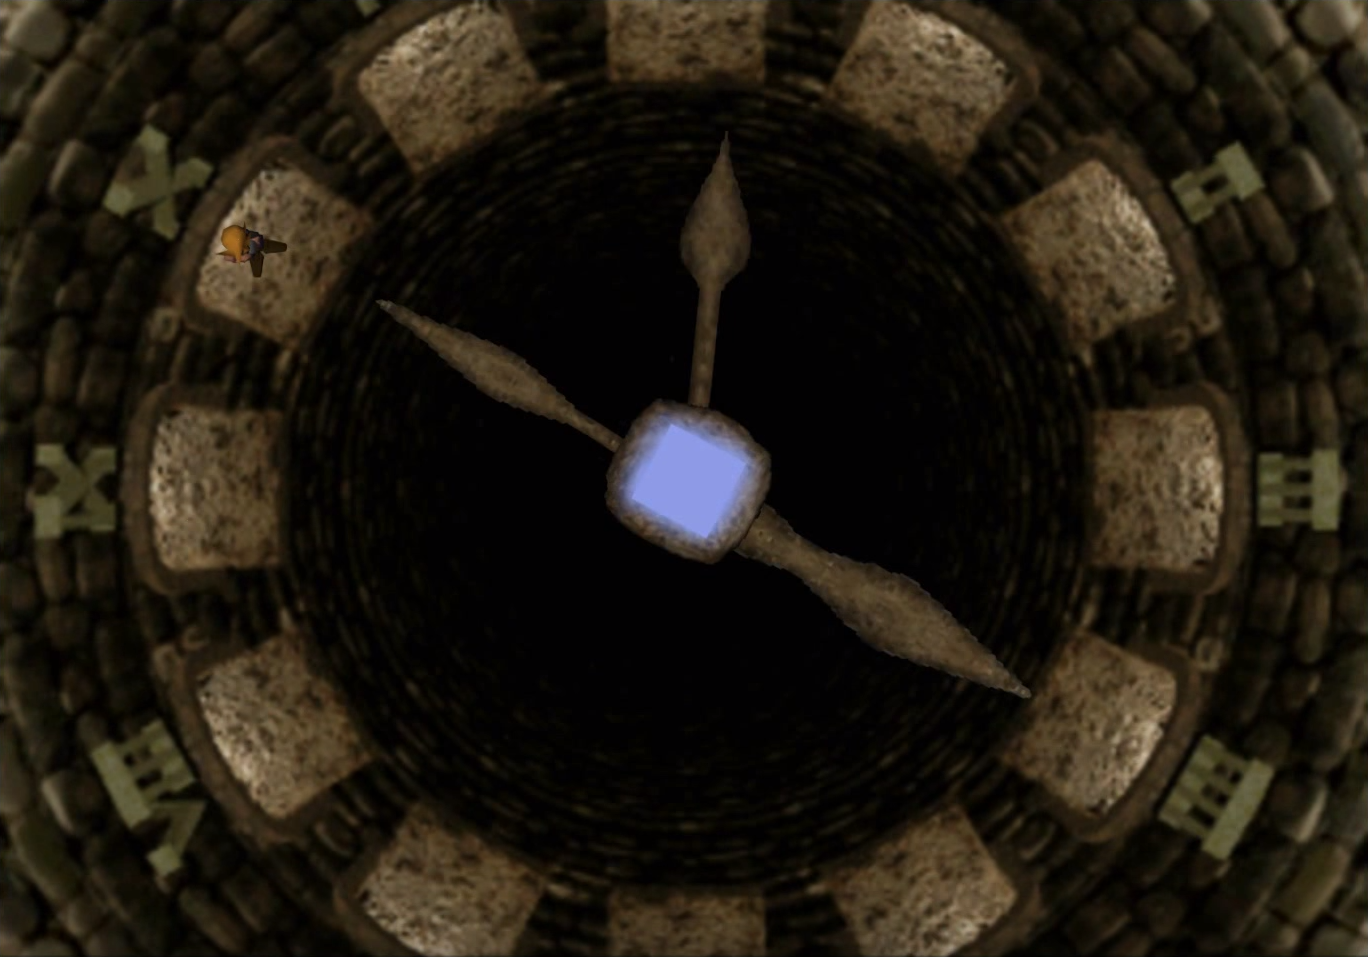
Between Aerith and Cloud’s head, we see a halfway broken cabin, which fits right into the theme of abandonment in this area which is emphasized by uneven terrain, cogwheels and planks lying around as well as the general chaos that is omnipresent. Anyway, that cabin seems to contain the lever for rotating the railway turntable bridge. We either need to pilot a locomotive or push a wagon or coach over this turntable or just turn the bridge to create a path to other parts of this area, maybe even a dead end harboring a secret or otherwise awesome loot. This reminds me of the clock room in the Temple of the Ancients.

Turntable vs Ghost screenshots link
Another very interesting point is the connection to the Halloween Special screenshot with two Ghost enemies chasing Cloud. We do see one of the elements connecting the rails to the turntable bridge in the Ghost screenshot along with part of the railings around the circular pit (1). In addition to that, the covered train coach is prominently featured (2), the brown-red looking cargo container appears next to it in both screenshots (3, 4) as well as powerline support constructions in the back (5) and to the left of the tarp-covered coach (6). This supports my theory where Cloud needs to cross the railway turntable alone first, then gets chased down by those Ghosts which eventually get stopped and soothed by Aerith (see part 1 of this analysis article series). I’m still not sure why the Ghost touched by Aerith has or receives those neon graffiti symbols. It may have something to do with Aerith’s touch, which could very well cause the shell to crack and disappear, releasing the lost soul, hence the red glowing stitching. In any case, I think those two Ghosts chasing Cloud are the same ones as in that Aerith cutscene screenshot.
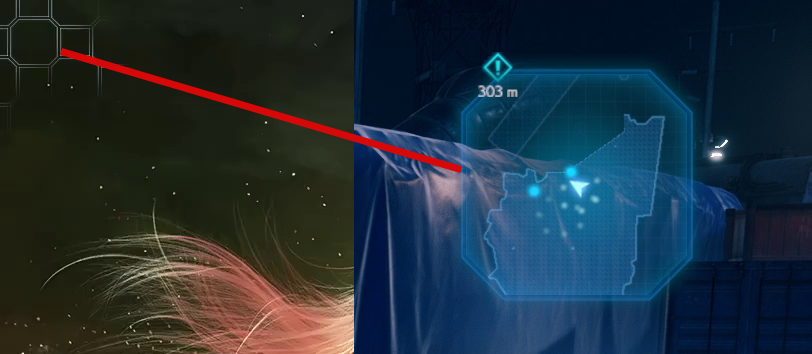
Minimap shape comparison
Another very cool element on this screenshot is the minimap. We finally get to see a proper display of it. I already showed you a glimpse of it in Game Analysis #9, where it briefly pops up for a few frames when the Scorpion Sentinel boss battle starts and ends. The minimap is presented in the same shape as the octagons contained in that genetics pattern already discussed in Game Analysis #17 and #18. It has been a recurring pattern throughout the whole Final Fantasy VII compilation and most likely represents Jenova cells or genetic engineering in general.
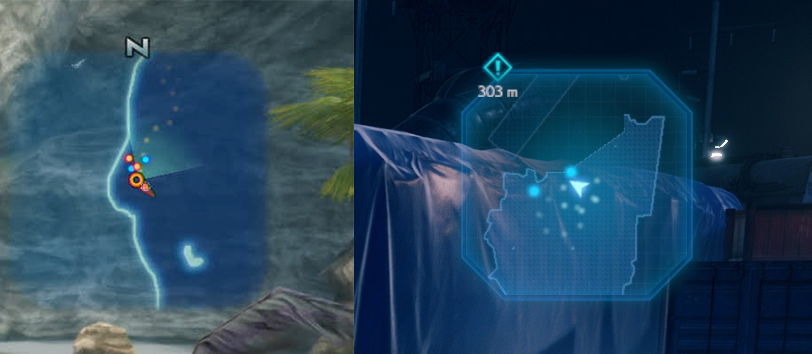
Minimap FFXII comparison
Anyway, contained within is, as expected, a simple representation of the explorable part of the area. Additionally, we see Cloud being represented as an arrow indicating his view direction, and the other party members as simple light-blue dots. Lastly, Clouds last 15 steps or so are displayed as an array of tiny dots, fading out soon after appearing, similar to other games, like Final Fantasy XII for example. There, enemies were displayed as red and orange dots, which is what I expect to happen here as well.
Minimap area mapping
The turntable bridge is also visible, and I believe we need to rotate it towards the dock which is barely visible in the lower right corner of this screenshot. This also directly leads to the opposite dock seen in the screenshot with Cloud being chased by Ghosts. Everything falls into place!
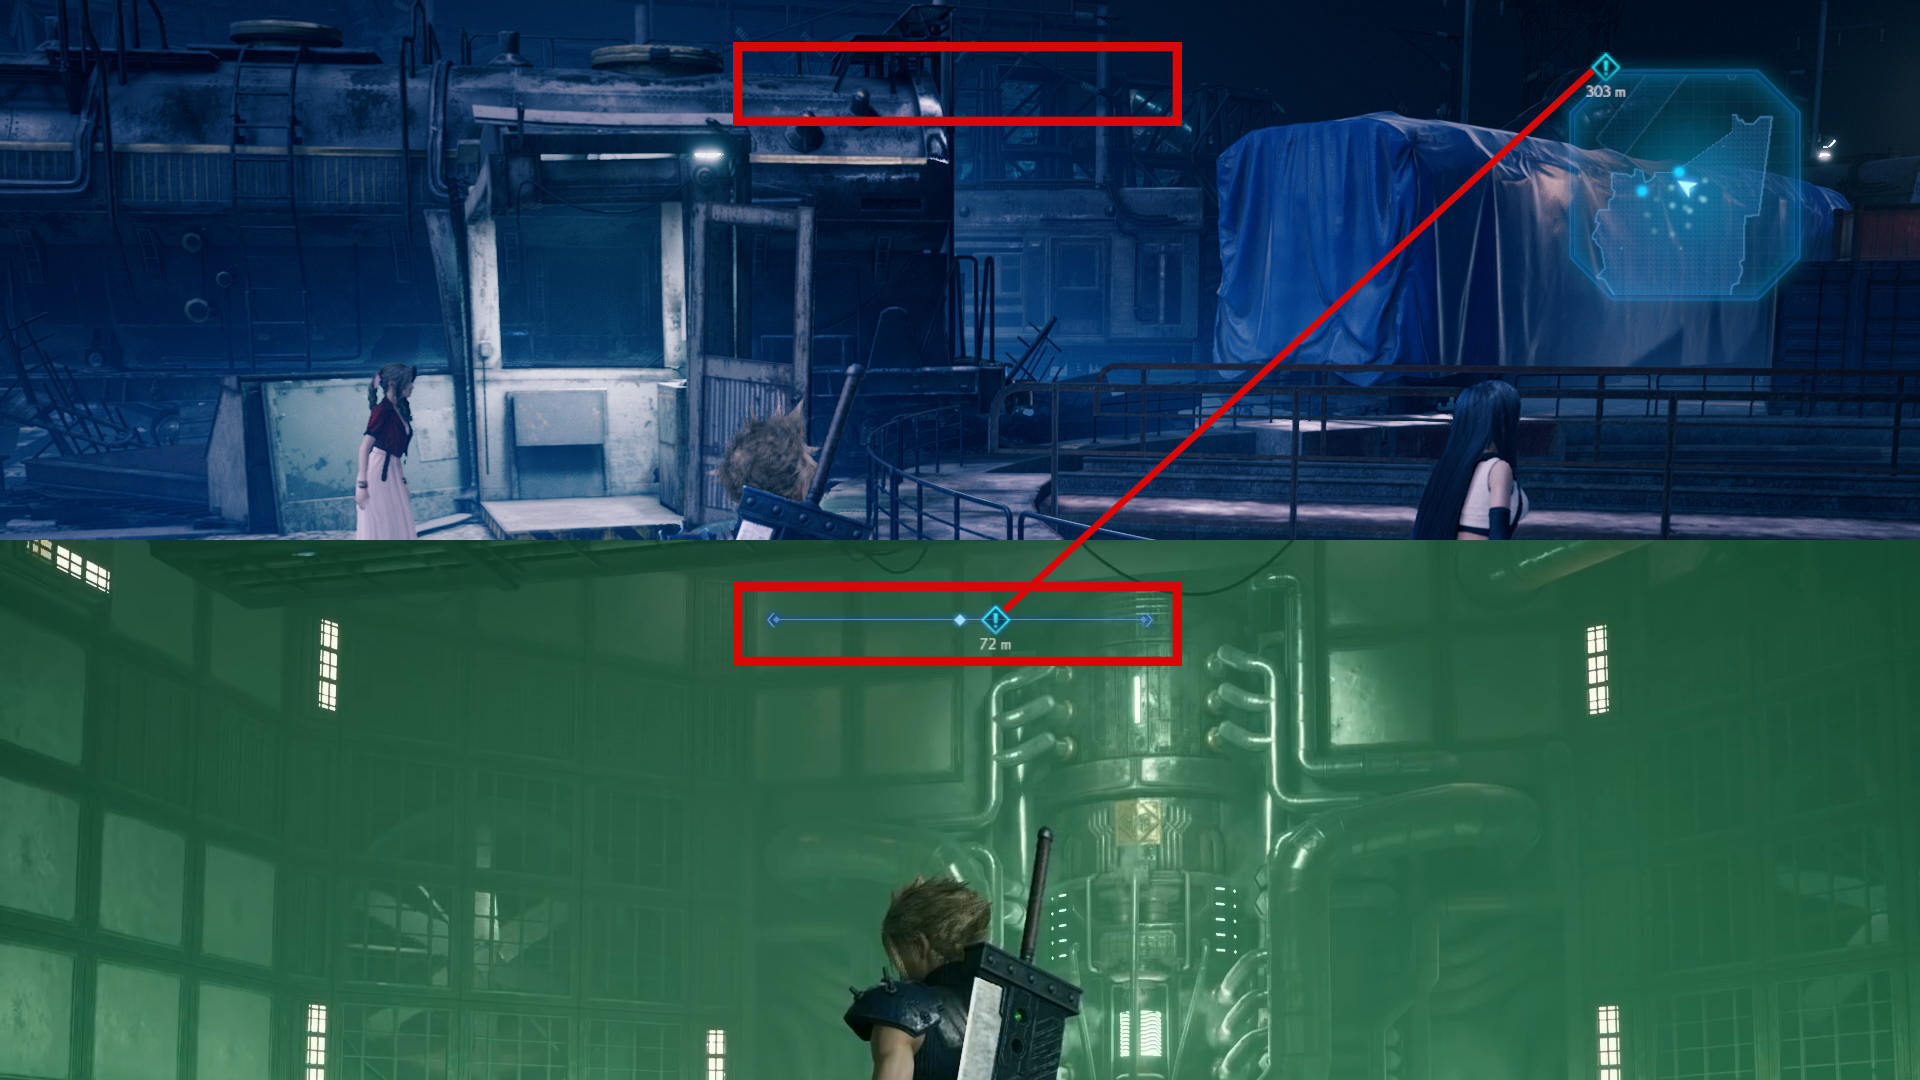
Minimap vs compass
Another interesting fact is that the compass line on the top is missing, which is probably why the current main quest target indicator is now part of the minimap. It says 303m (Meters) and points towards the middle of the sector 7 slums when comparing the view direction to the Ghosts screenshot where we see the unfinished sector 6 plate. I’m fairly certain that this target represents the sector 7 plate support pillar where the inevitable battle takes place, part of which we’ve already seen in the Tokyo Game Show 2019 trailer. We can also see all three characters looking into that direction. They know exactly where to go, but not how to get there. Time to figure out a way out of this maze, and fast!

Equipped Materia
Before we conclude this article, let’s quickly talk about Materia. Again, the equipped Materia is visible on the weapons our characters are carrying. Cloud’s Buster Sword has one Magic and one Support Materia linked up. Maybe Elemental and Blizzard? Tifa still has the same setup as she already had against the Abzû boss battle: one Magic and one Command Materia. Possibly Fire and Steal.
We don’t see any Materia on Aerith’s staff because she doesn’t have it on her. Where the heck does she put her staff when outside of battle? Let it disappear like Noctis and his retinue in Final Fantasy XV? I highly doubt she has it shoved up her…
And that concludes part 2 of this extensive and in-depth analysis of the latest screenshots for the Final Fantasy VII Remake. Part 3 will cover the remaining four location screenshots as well as the last two key arts depicting Tifa and Sephiroth. See you again in a few days!
Huge thanks to Master tier supporter Dachdagger, who had the privilege to help me analyze those screenshots and managed to find a few details before I could. Thank you, my friend!
Did you notice something we didn’t? Let us know on the board or hit us up on our discord! Keep an eye out for upcoming in-depth analysis videos on our YouTube.
Also, check out Vyzzuvazzadth’s YouTube channel – the Cosmo Canyon Observatory, and associated Discord!

)
No comments yet
Log in or Register
Shoved up her… Dress of course! Shame on readers who thought you would say anything different! LOL! Well done sir! I look forward to the next one ?
Thank you! 3rd and last part is up since yesterday. Enjoy 🙂