

New FFVII Remake Screenshots, an In-Depth Analysis (Part 3)
by Vyzzuvazzadth December 27, 2019 0 commentsGreetings everyone and welcome to the third and last part of my in-depth screenshot analysis where I cover the screenshots depicting locations and the two new key arts of Tifa and Sephiroth!
Part 1 and Part 2 of this analysis cover screenshots of cutscenes and gameplay moments respectively. Please check those out, too, if you haven’t already.
The analysis in this article is based on those Final Fantasy VII Remake screenshots released on Monday December 16th, so if you haven’t seen them yet, please check out the official article on the British Square Enix website first.
Additional render images of President Shinra, Heidegger, Roche and Shiva can be viewed and downloaded from the Square Enix NA press website (under Artwork).
I decided against creating one or more analysis videos on those images because there’s so much in my backlog already and with the newly released Cloud trailer from The Game Awards, which I still haven’t finished yet, there’s just not enough room to create even more videos. That’s how this article series came to life.
For anyone who hasn’t played the original Final Fantasy VII yet and wants to go in fresh, I urge you to stop reading right now as we won’t shy away from spoilers in here.
With that being said, let’s stop the dillydallying and get to work!
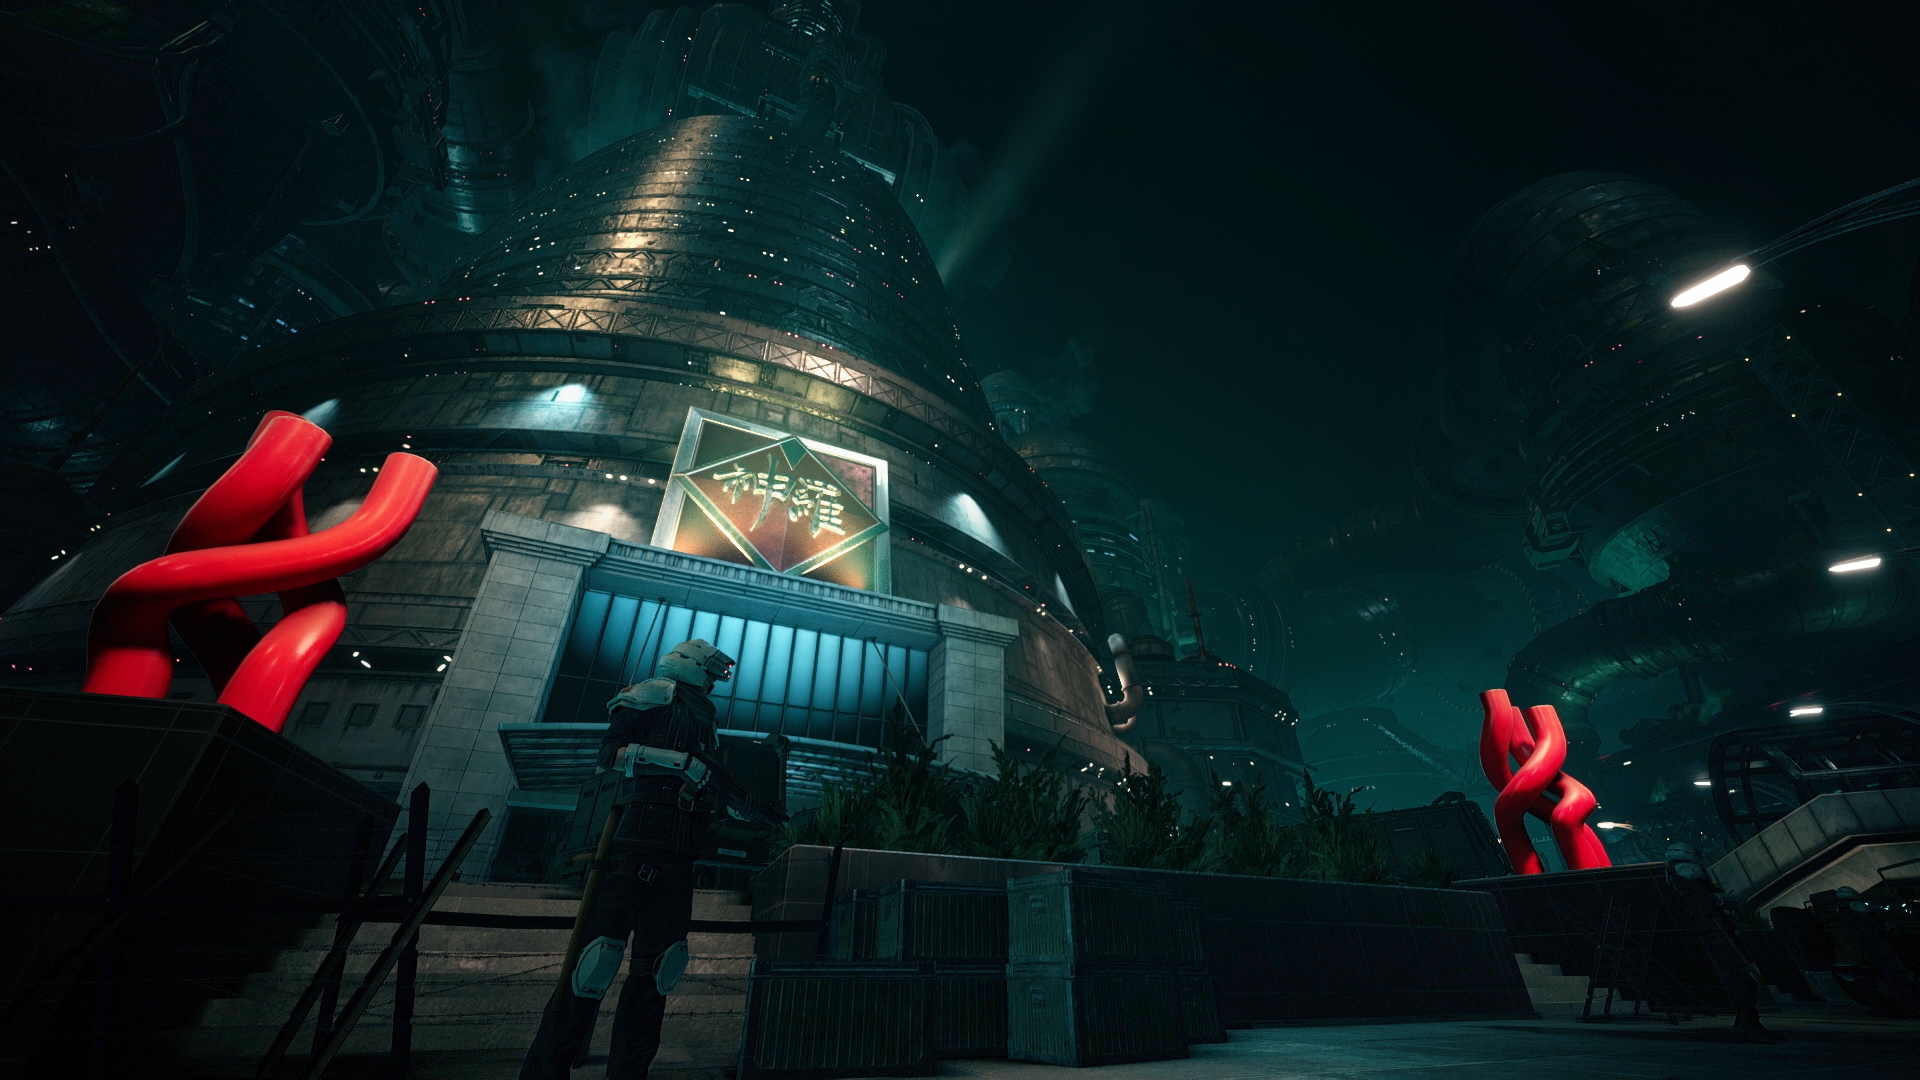
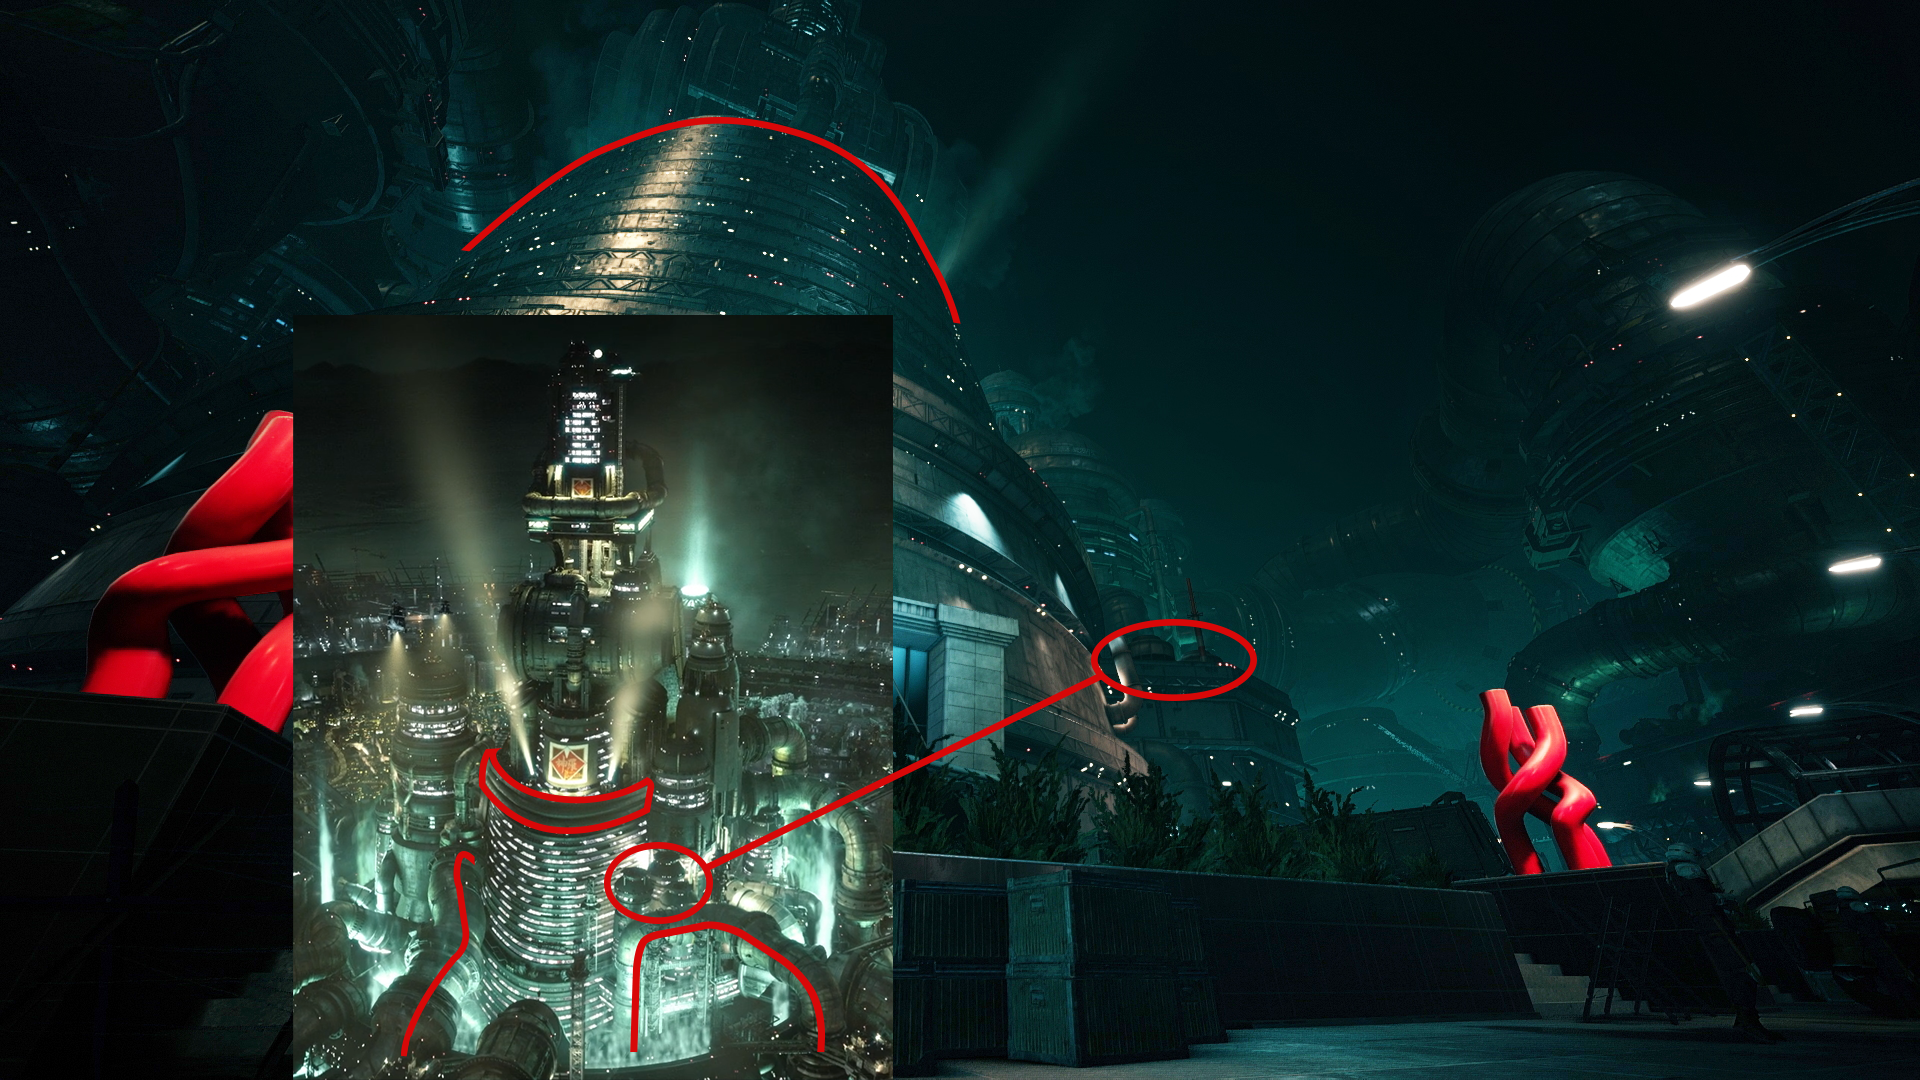
Shinra Tower Exterior
Shinra HQ entrance original
Let’s kick things off with the Shinra HQ tower exterior, close to the entrance. This one feels imposing, menacing and somewhat claustrophobic with all those pipes and the smog covering the night sky overhead. Unlike the original render, this view makes the Shinra HQ look more industrial than corporate. Speaking of the original render, let’s look at the similarities first.
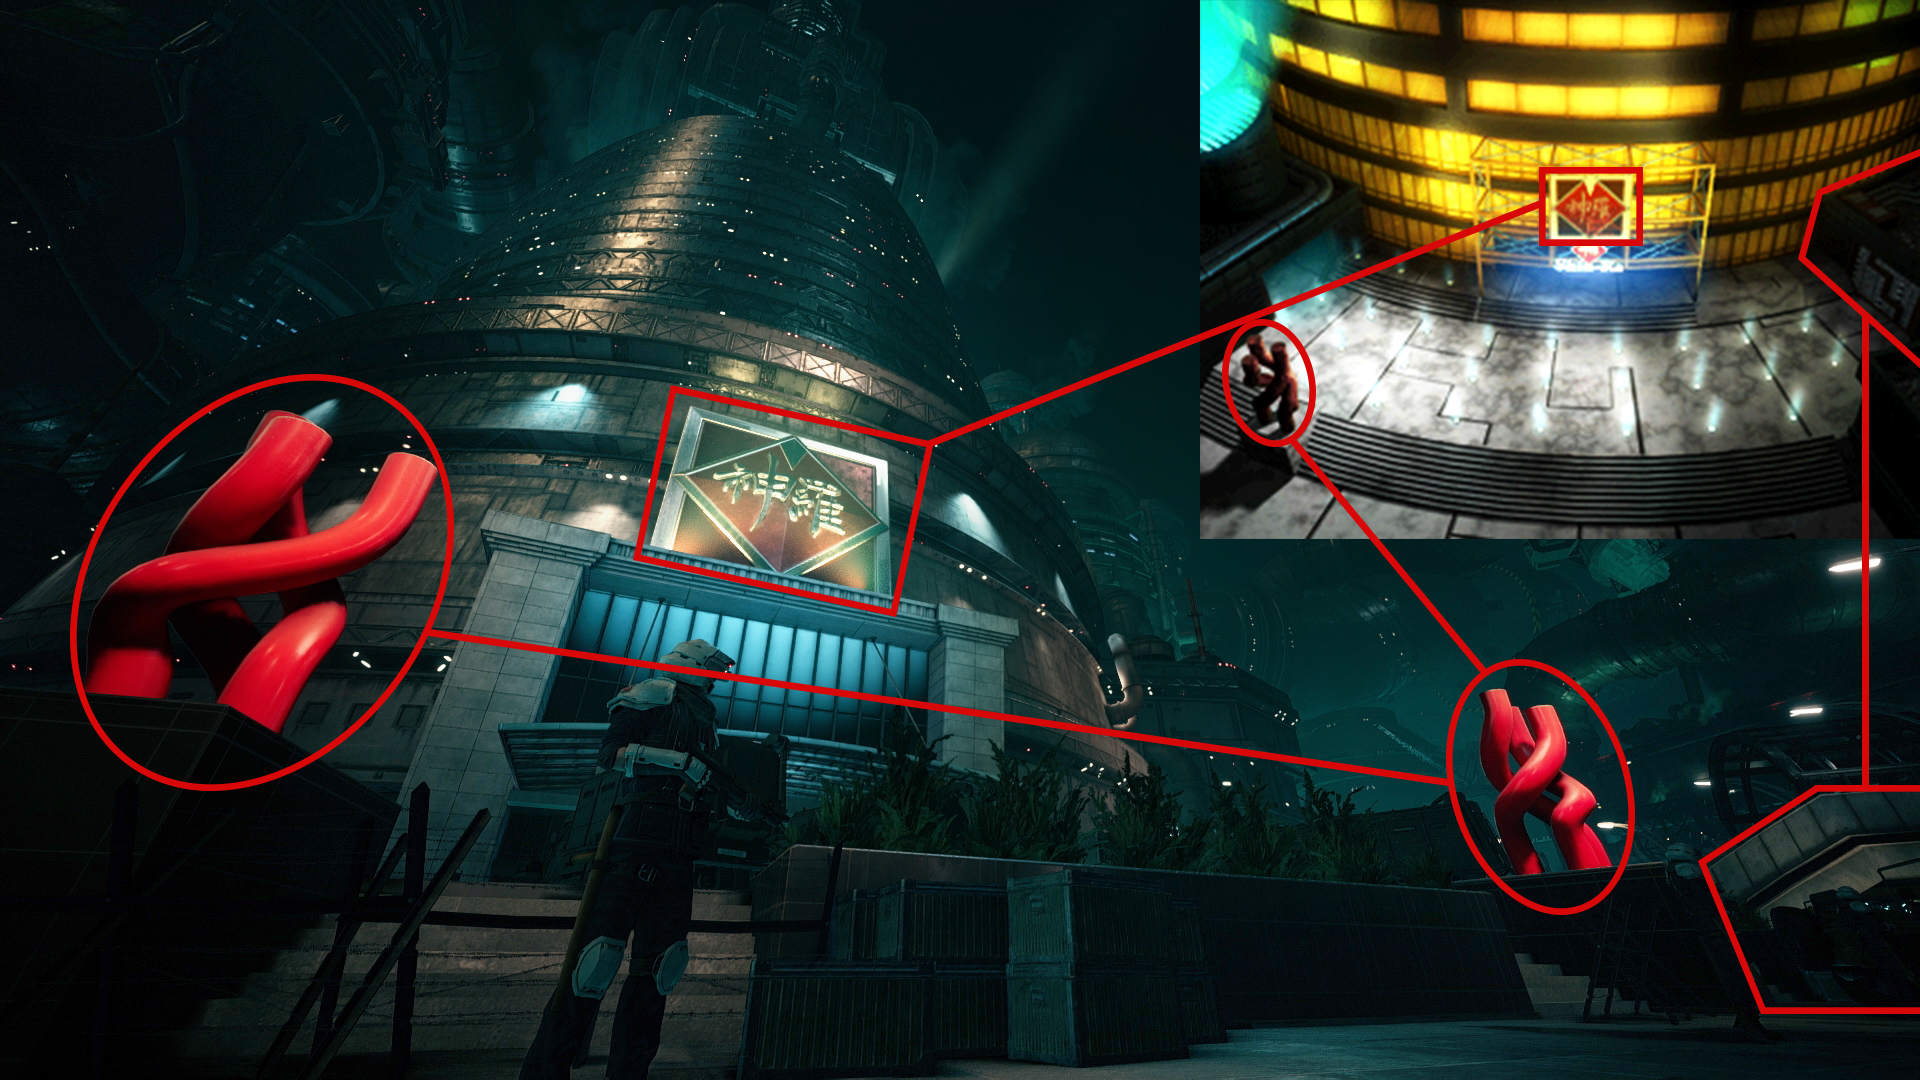
Comparison to original: logo & sculptures
The most obvious element is, of course, the logo above the entrance, which looks much more majestic in the Remake. The other plainly visible element is this red DNA strand lookalike sculpture, which can be found in the original render, too, standing on an identical pedestal. There exists only one unit in the original instead of the two seen in the Remake version, however. Thanks to the wide angle, a small building with an arched roof made of metal struts and glass can be seen in the lower right corner. I imagine we’re going to enter this outer entrance area from there and either sneak around the guards or confront them head on. The original render also contains a similar small block adjacent to the main building on either side, the left one leading to the infamous infinite staircase and the right one closed off. Though it’s also possible we’ll arrive in the middle of the entrance plaza and battles are inevitable. Personally, I’d like to have a choice in my approach.

Comparison to original: stairs
Of course, there are also many differences in the details. Here we have an additional element covering the stairs between the sculptures which even bears some greenery. Each of the remaining flights of stairs are blocked off by a barbed wire fence and guarded by a ShinRa Security Officer, of which there are three in total on this image. For some reason, several metal crates are lying around as well. Spare weapons and ammunition perhaps? On the upper plaza right in front of the entrance as well as on the lower one closer to the side building, we see a ShinRa truck and a Jeep standing around, being used to bring in the reinforcement patrolling the area. Side note: I’m glad they include guards and resistance this time instead of leaving this place completely unguarded.

Comparison to original: entrance
It’s most likely just the angle, but we see neither the left side entrance leading to the staircase nor the Mako vents on top of if giving off a familiar green steam and glow, though they could be farther away to the side and out of view. Even though we don’t have a direct view on the upper part of the plaza, I’m pretty sure those floor lights are missing. We would be able to make out at least a shimmer of light hovering above the area.
The entrance element has been completely reworked. It is comprised of two concrete pillars on either side and sports a new slightly arched canopy made of metal struts and glass, just like that small side building. It’s also missing the smaller second logo and the company name, unless they’re just hidden by the truck and greenery. At least the vertically oriented window front took some inspiration from the original render. The first 10 floors or so don’t have any windows anymore, unless we count those small square ones on the second floor. The welcoming hall seems to be several stories tall, which could explain the lack of windows.
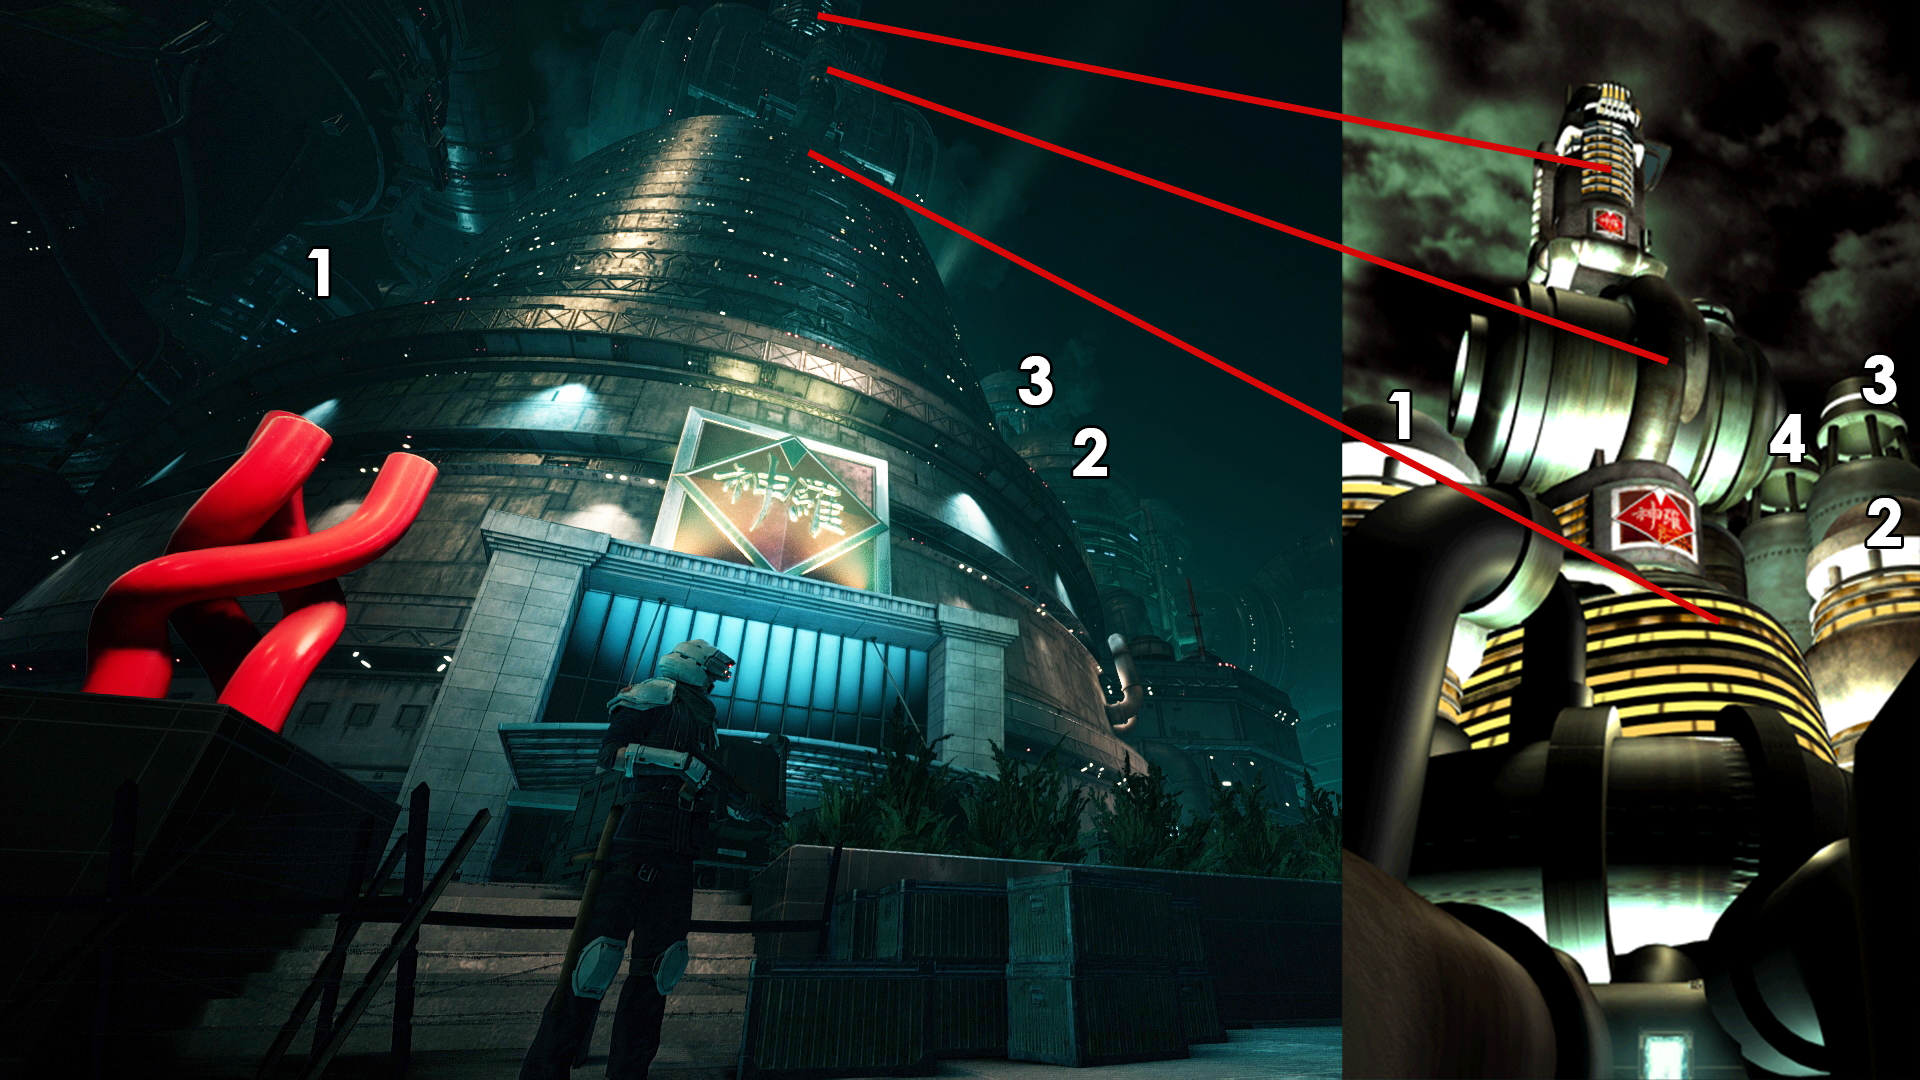
Comparison to original: pipes & buildings
Regarding the pipes and larger side towers, I found similarities as well as inconsistencies compared to the background render which shows a similar view but from outside of the compound. While the pipes don’t really match up, the towers on either side are still there. One on the left and two of the three on the right. The rear one of the large towers is hidden behind the main building. Lastly, the lower segment in the original version contains fully windowed stories, unlike here, were the windows seem to be missing on each story below the middle ShinRa logo (not visible in the screenshot). Either it has small window in the inset rings, or the lack of windows is deliberate to keep the workers focused on their work and the ShinRa lifestyle.
Now, the Remake’s intro cinematic already shows discrepancies when comparing it to in-game areas, such as the Loveless corner, so it’s not too surprising this screenshot here also displays certain differences to that intro cinematic shown in the E3 trailer.
Comparison to intro cinematic
Contrary to the screenshot, the intro cinematic displays windows on each floor illuminated from within. The building segment below the middle ShinRa logo ends abruptly in the screenshot, whereas the intro cinematic bears a bulky multi-layered finish on top. Most pipes are laid out practically the same, but two of them are missing entirely. One coming from the right and ending in the ground next to the building, the other snuggling against the main building on its left side. The towers on the sides seem identical, but I think the positioning of the small trio on the right is either different or the perspective plays mind tricks.
In the end, the differences and similarities don’t really matter as long as the general visuals and atmosphere are still intact, which they certainly are.
I’m looking forward to reaching this part of the game!
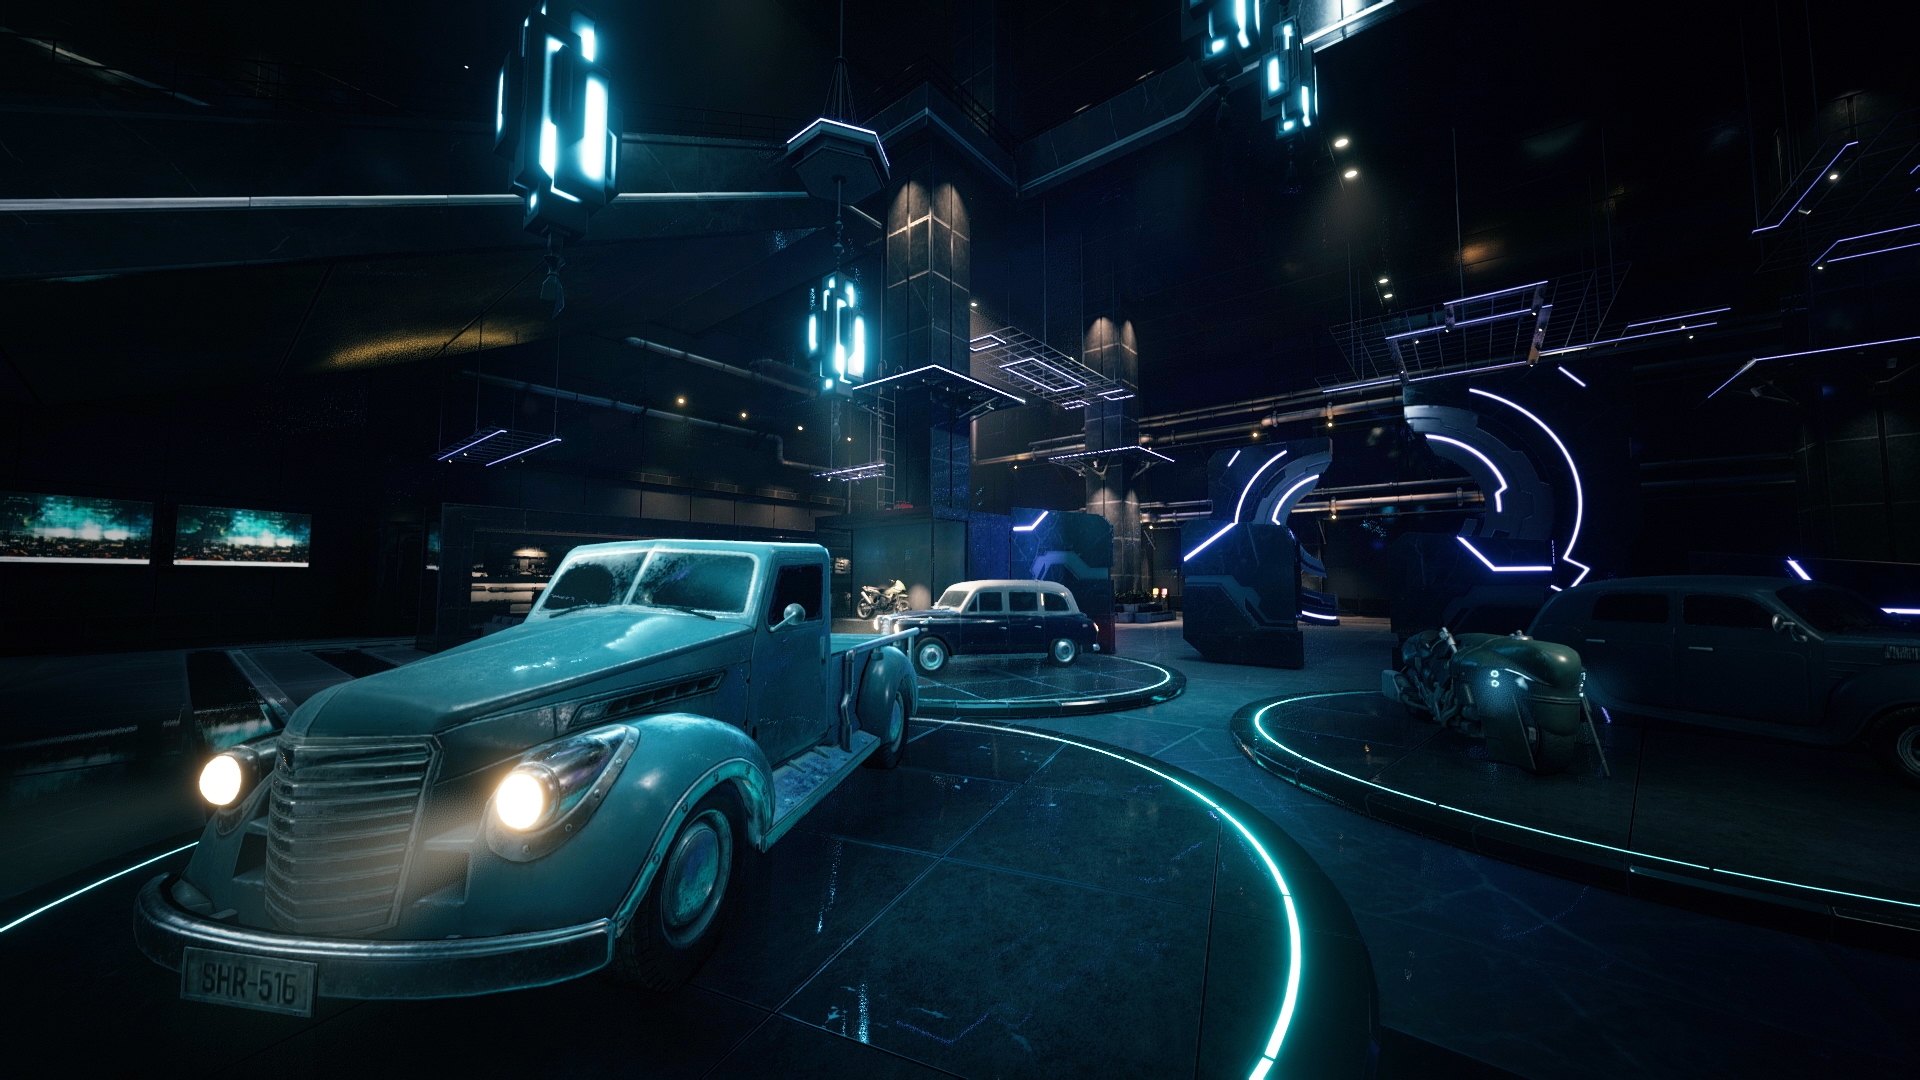
Car Exhibition
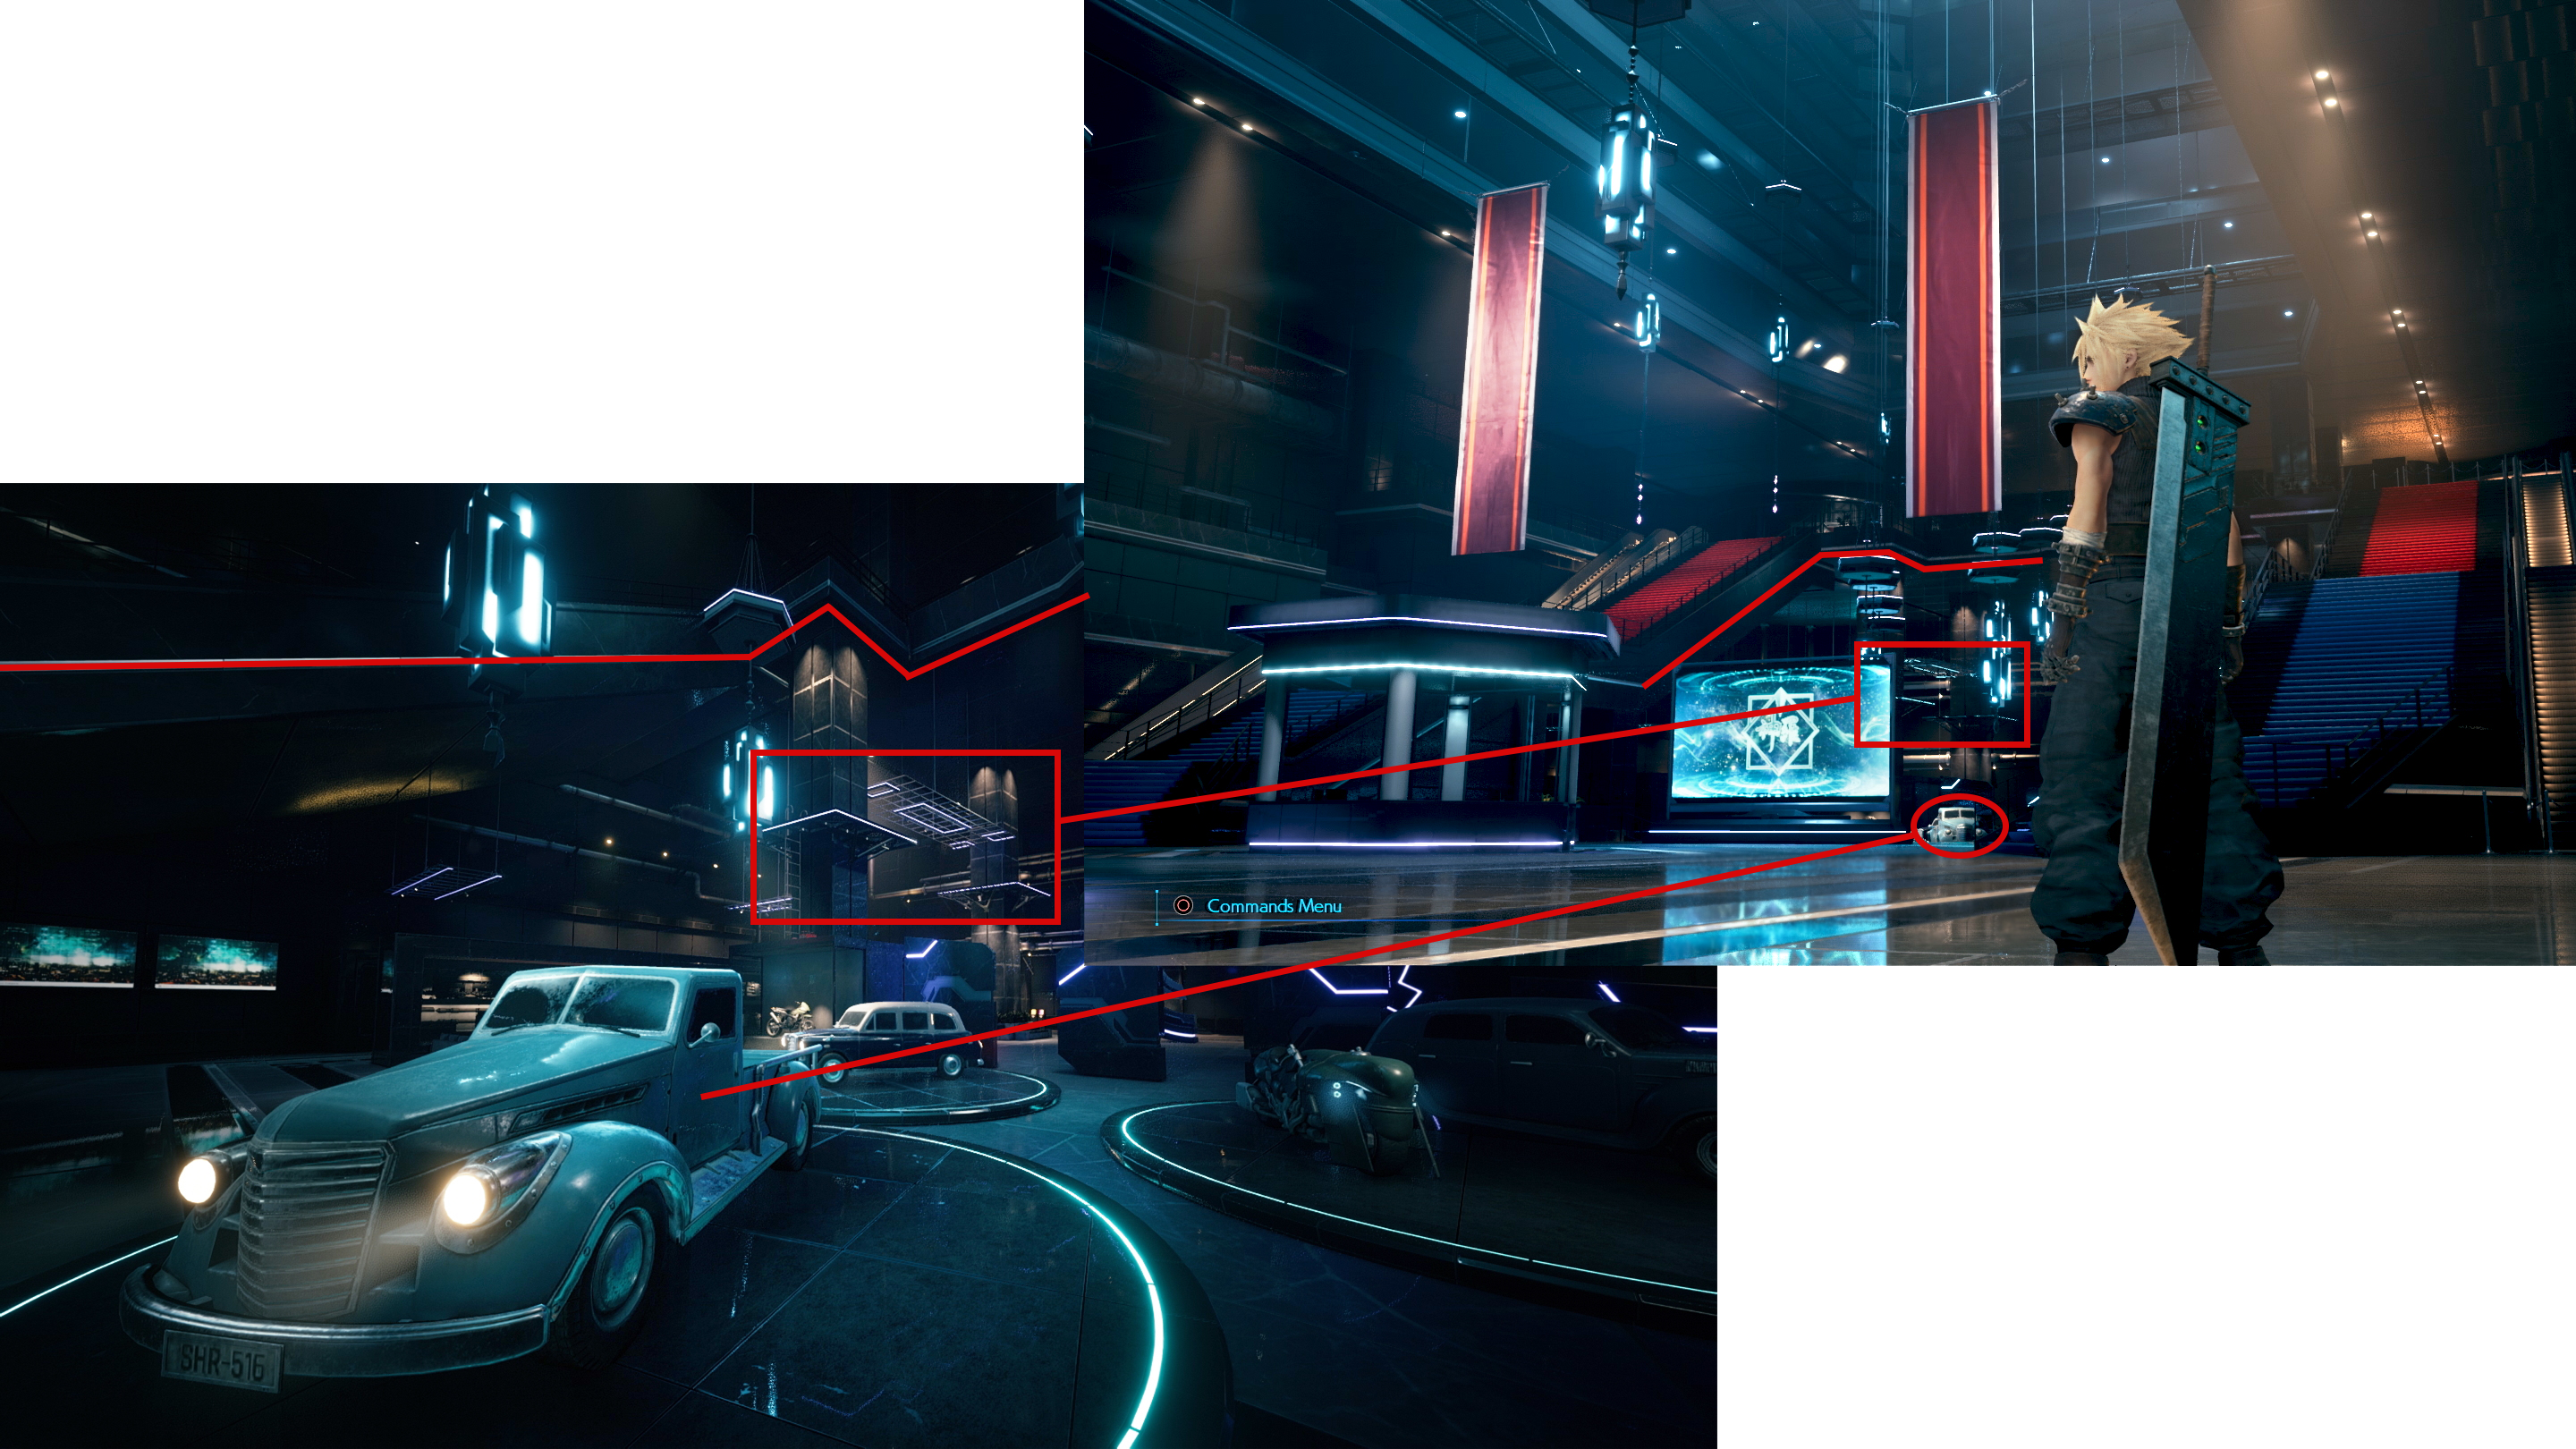
Elements visible from the lobby
This screenshot shows us the vehicle exhibition situated in the rear area of the Shinra HQ’s first floor. In the E3 2019 trailer and one of the screenshots released shortly after, where Cloud stands in the lobby, we can already see the blue pickup truck, the climbing contraption farther back between the two pillars and some other details. The staircase and the upper floor it leads to can also be seen here behind the abstract art lamps.
The original render of this floor also contains the same vehicle exhibition, though there are different cars and motorcycles put on display and the blue pickup truck looks rather turquoise and only possesses one rear wheel.
Comparison to Original
The placement of the individual exhibition pieces also differs greatly, and the other elements found in the Remake’s version have also been created from scratch without much regard for the source material, Additionally, the original renders of the ShinRa HQ interior was presented in rather bright colors. Here, the main color is black or otherwise of darker colors, while only accents and light sources, many of them neon stripes, stand out and provide visual context. Regarding the elevators, I have a feeling that the elevators in the back don’t exist anymore, at least not on the first floor. They might just be covered by those futuristic abstract sculptures, however.
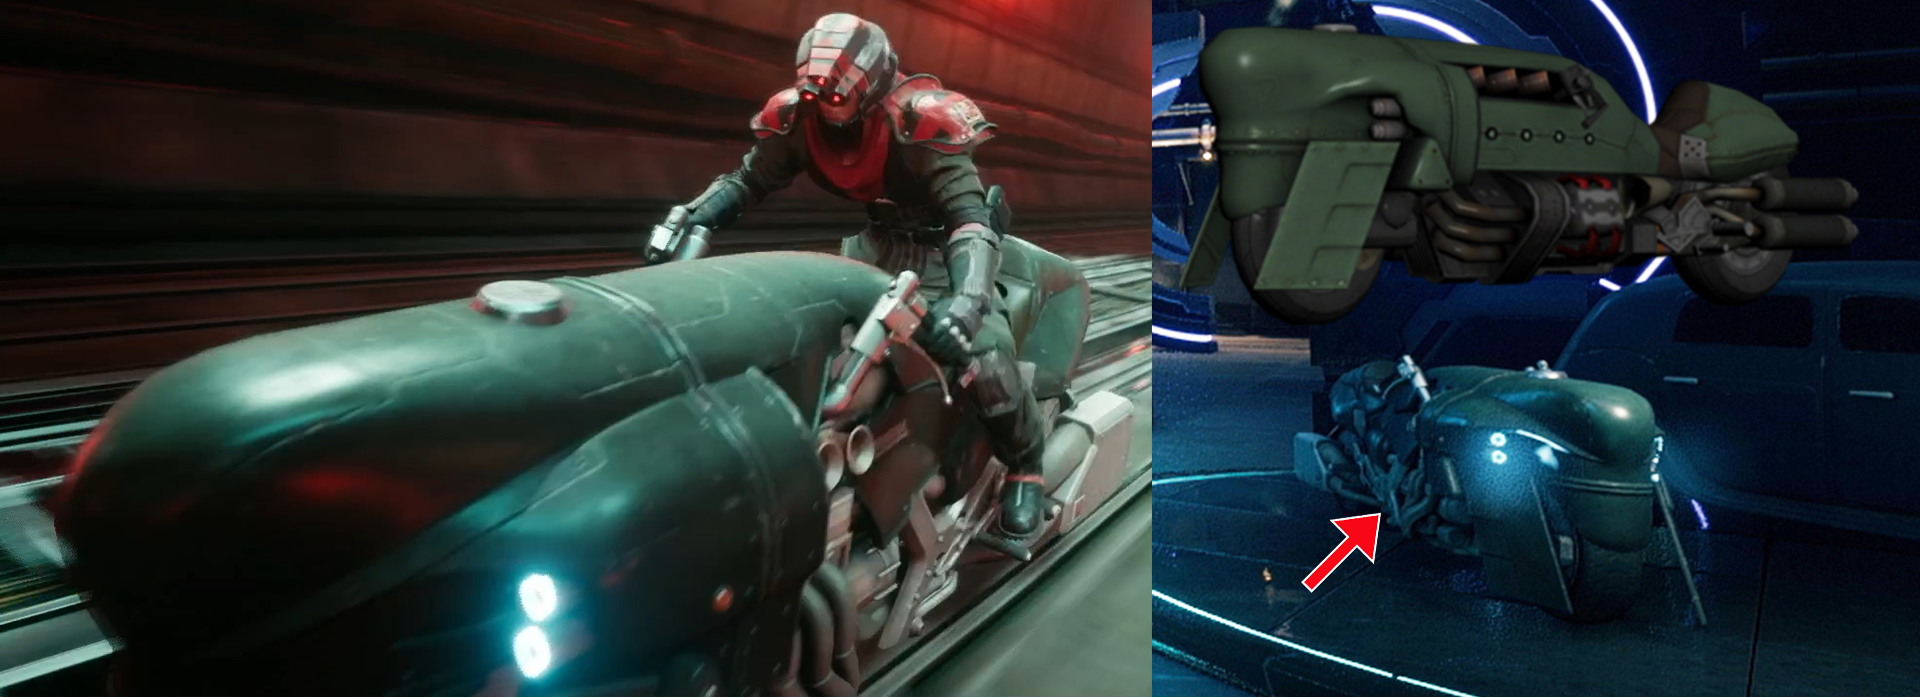
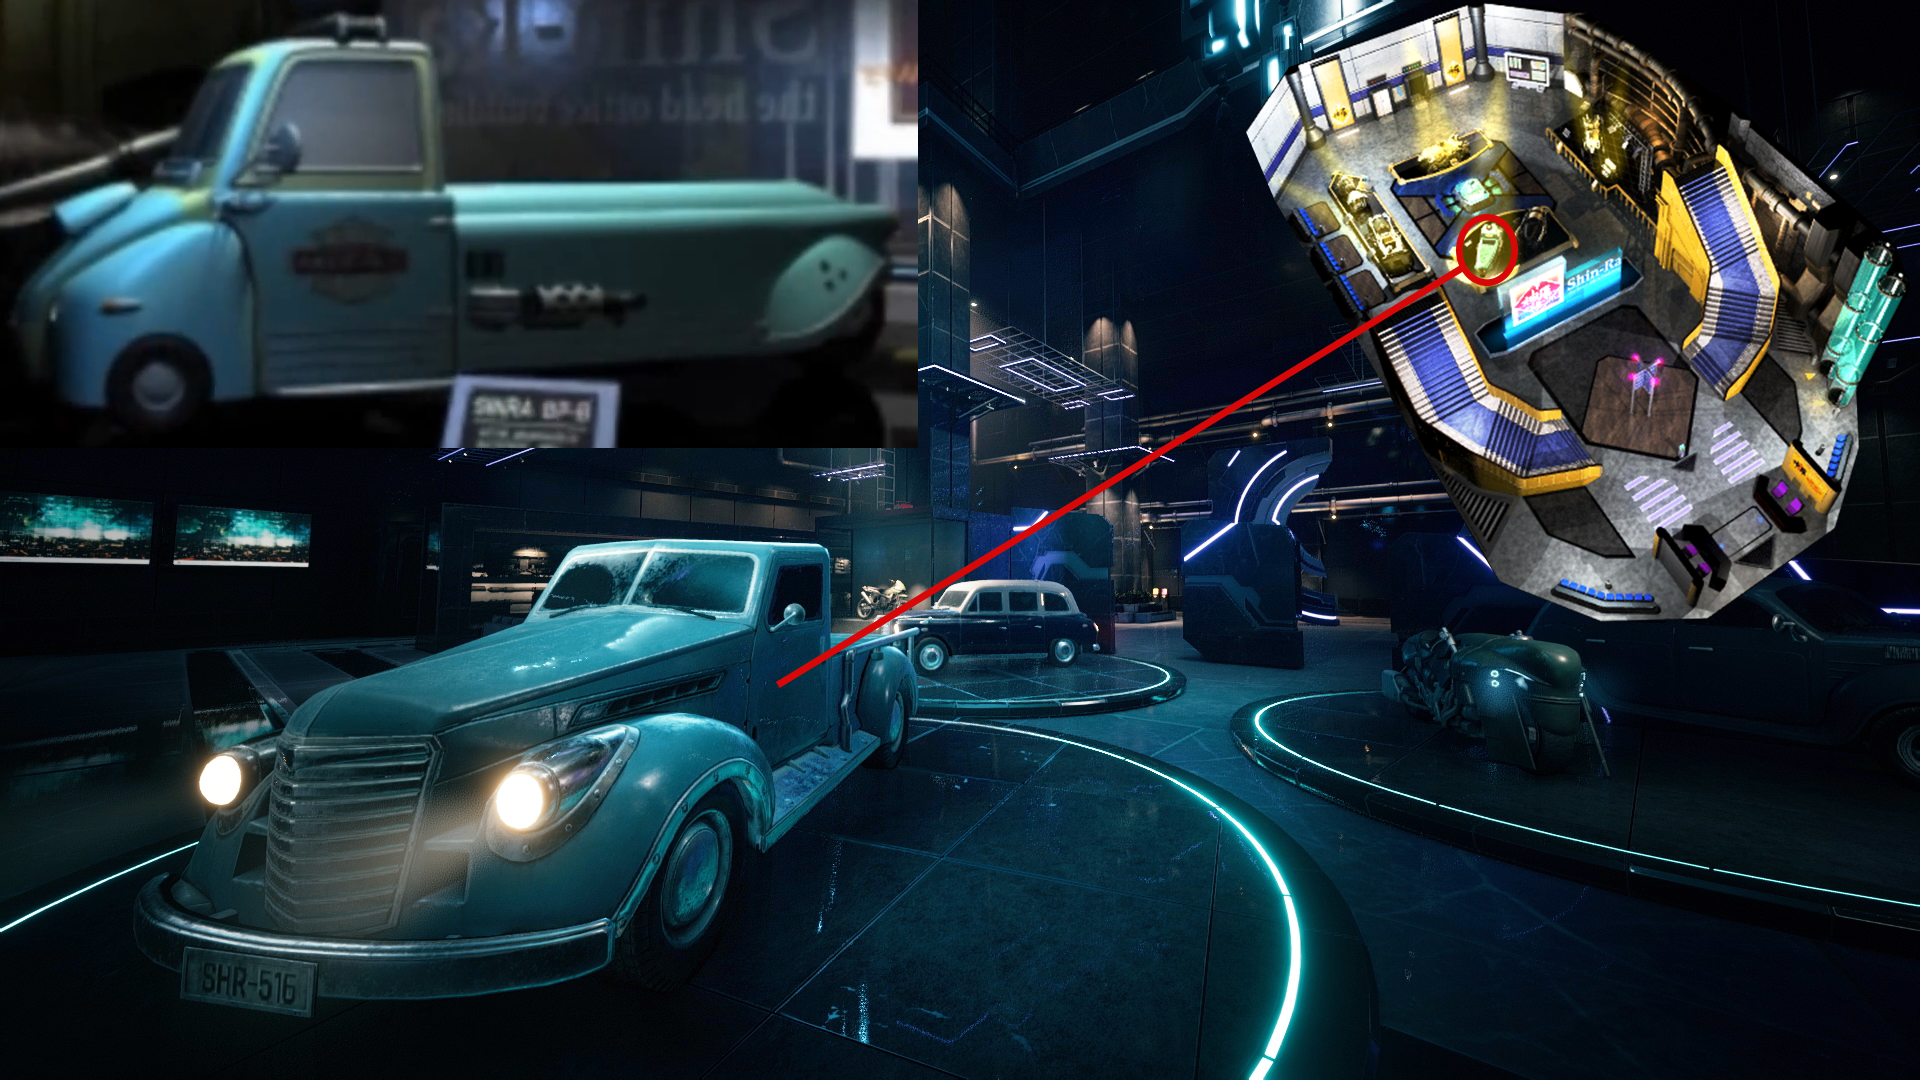
ShinRa motor bike
Next to the presumable escape vehicle in the front, there are a couple more vehicles on display. two of them I don’t recognize: the blue old-timer in the middle with the white upper half and a barely visible small limousine on the far right. In front of that limousine, however, stands a bike we’ve all seen before: the bulky olive motorcycle the ShinRa elite units use when chasing Cloud and co. through the railway tunnels in the E3 2019 trailer. The model of which was taken from the discontinued mobile game G-Bike.
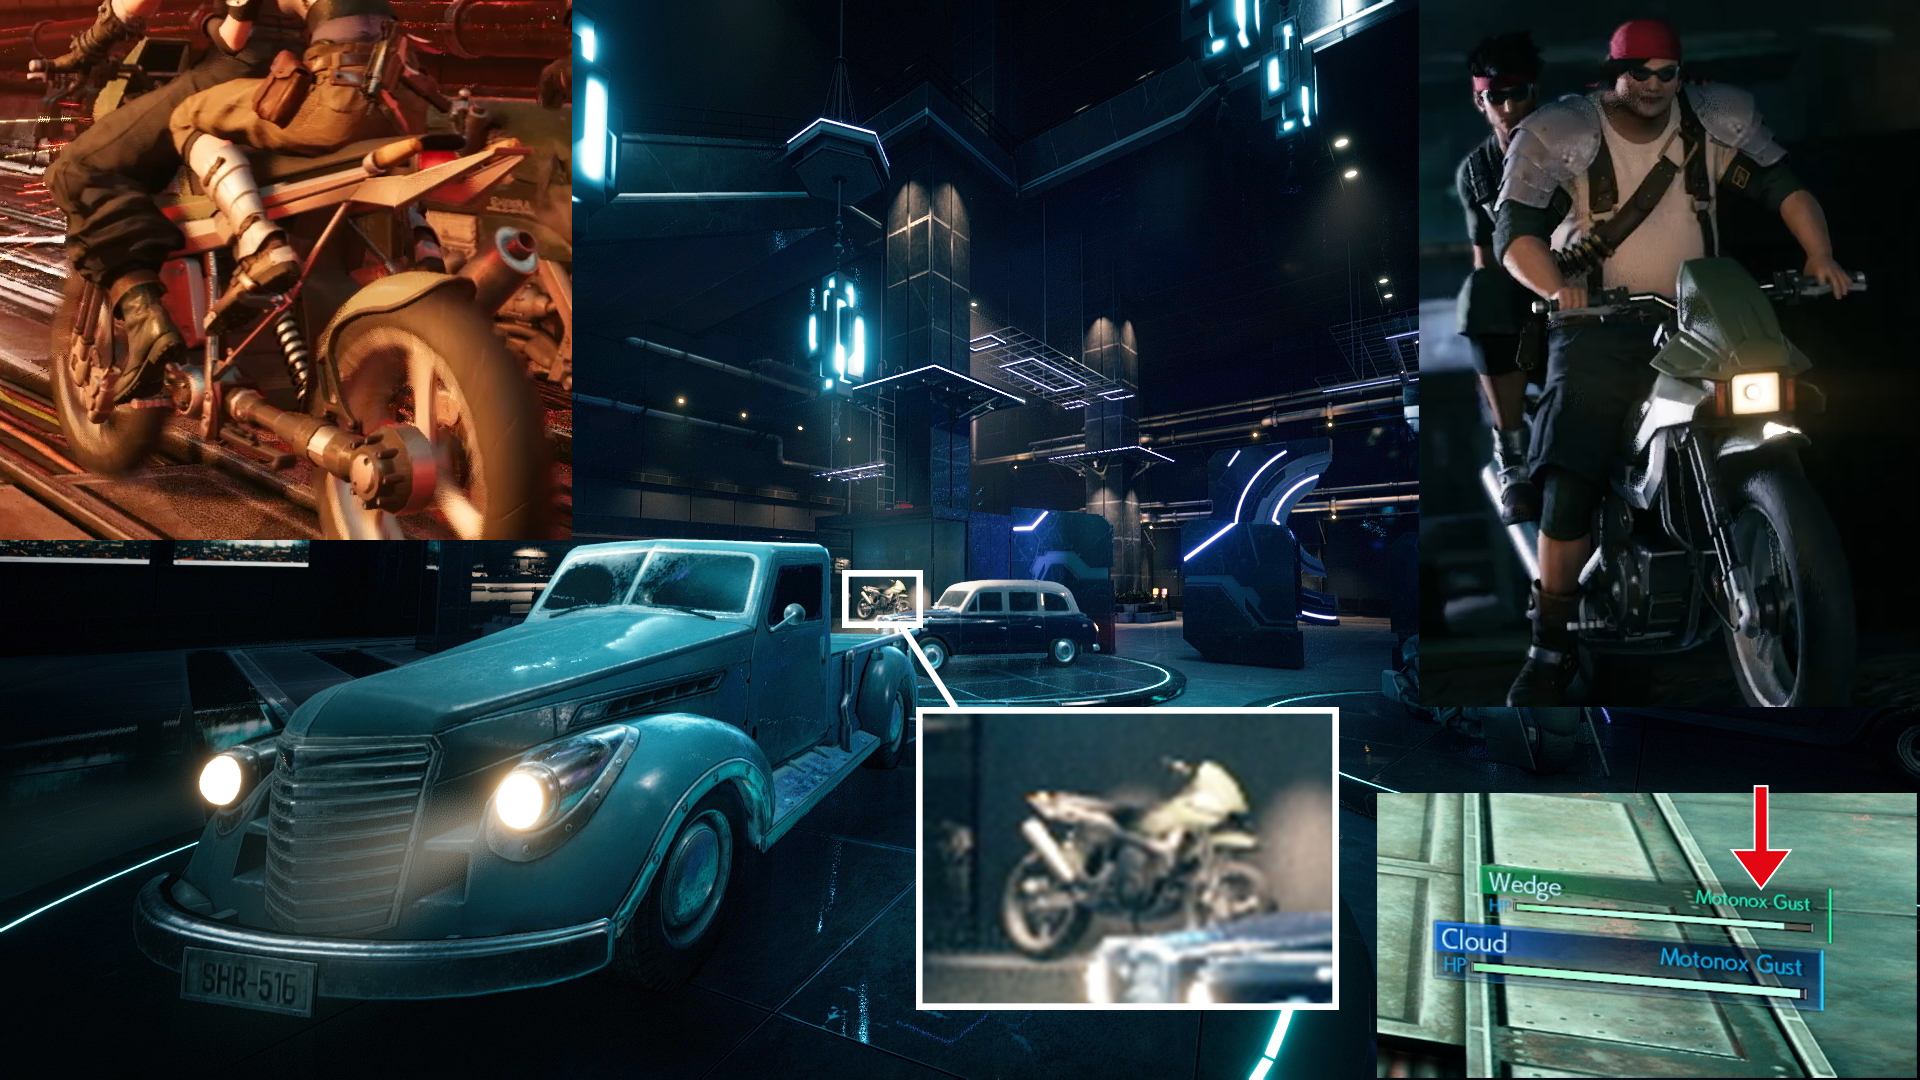
Motonox Gust – our first vehicle!
Further back, there’s a large vitrine built into the base of the first support pillar which contains the Motonox Gust motorbike, the one Jessie, Biggs and Wedge use on their mission with Cloud. The colors are completely off due to the direct and strong lighting, but the form factor is the same, complete with the 45 degrees exhaust angle and the windshield. This effectively means that Avalanche themselves or someone else stole those from ShinRa and removed the logos, as we don’t see it in any of the footage in the trailers.
TV screens & lounge
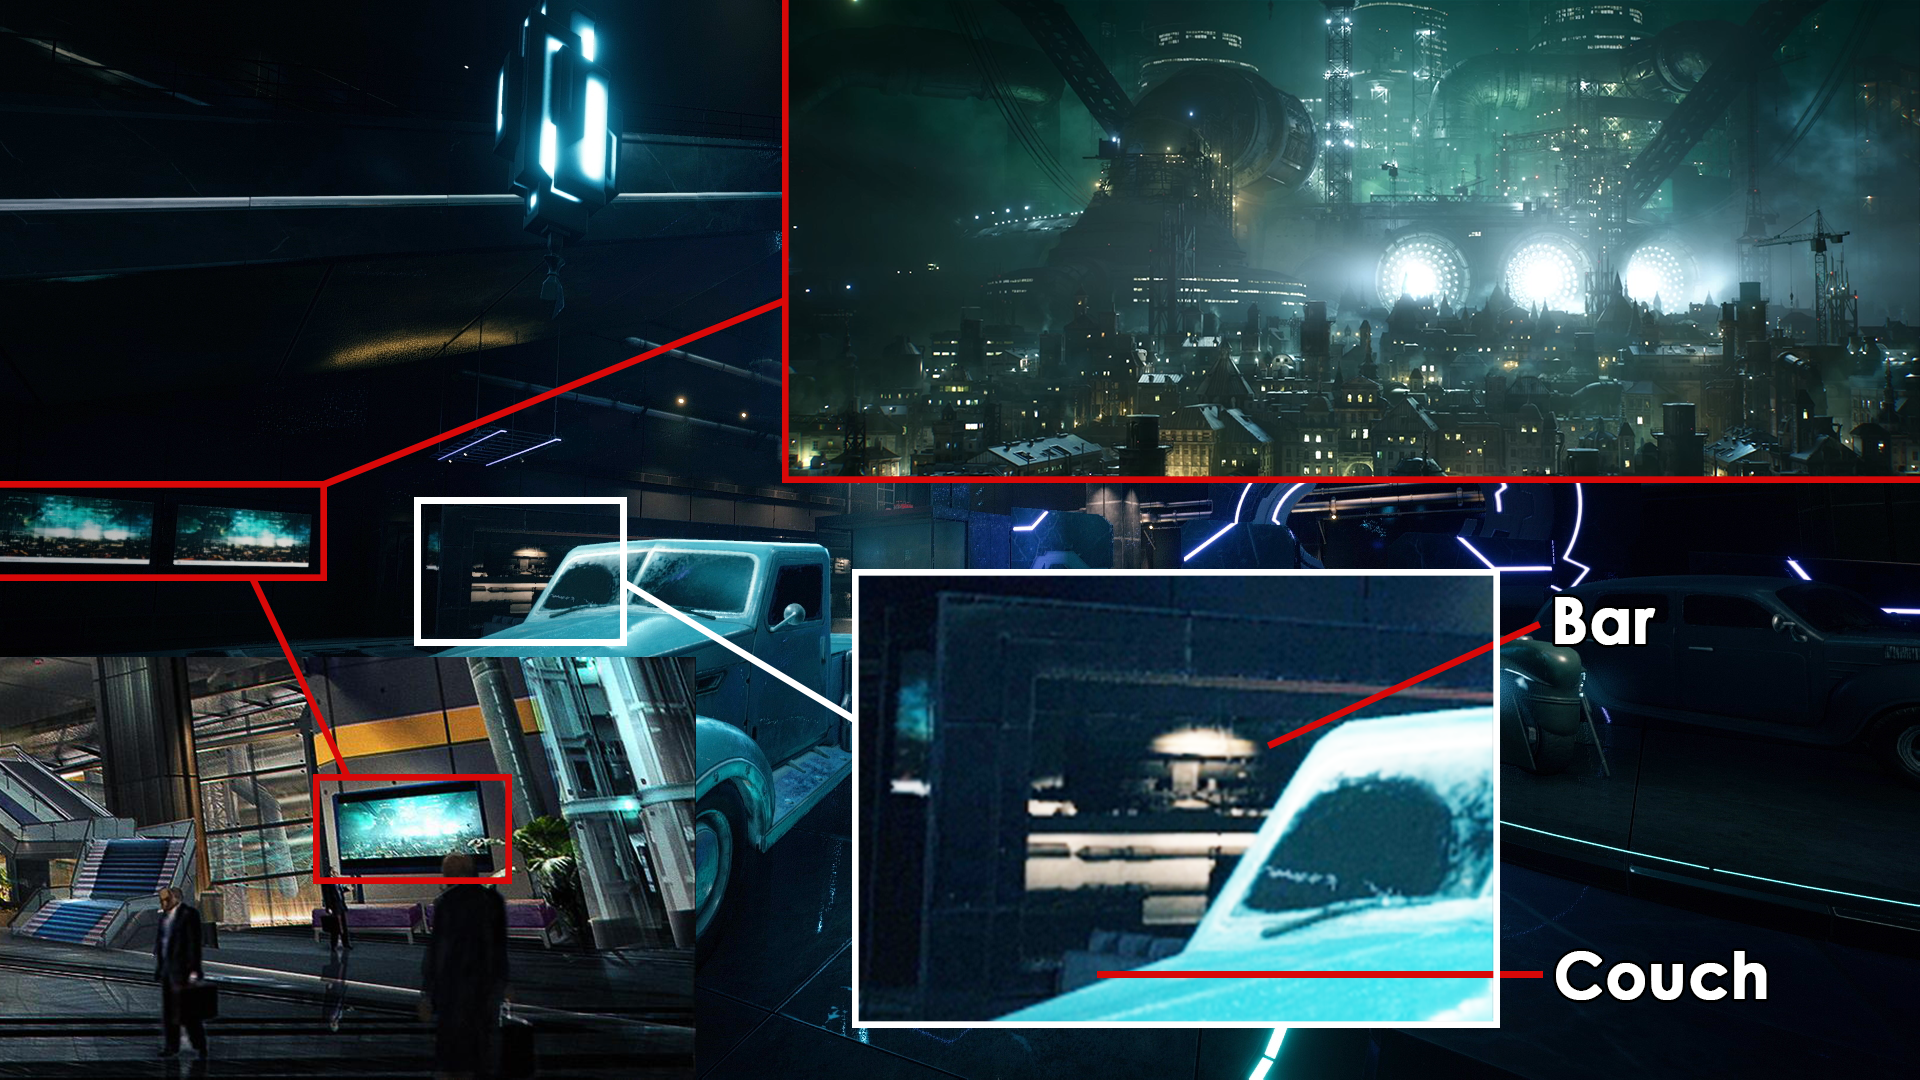
Next to the vehicles, there are a few other details worth mentioning, like the flat screens on the wall farther back on the left side, which show the same scene from the E3 2015 reveal teaser where we can see Midgar up close, with sector 4 below, the floodlights in the middle and the Shinra tower above. Those screens were already included in the artwork version of this floor on the right next to the elevator tubes. Furthermore, there seems to be a small café or bar behind the pickup truck with several couches in the front, which are barely visible from this angle. Visitors can relax and refill their bellies while marveling at ShinRa’s accomplishments.
Unlike the original renders, the ShinRa HQ seems to contain more plants on more floors this time. The rear support pillar in the middle is surrounded by seats and a batch of small bushes. We’ll see similar seating accommodation in the next screenshot.
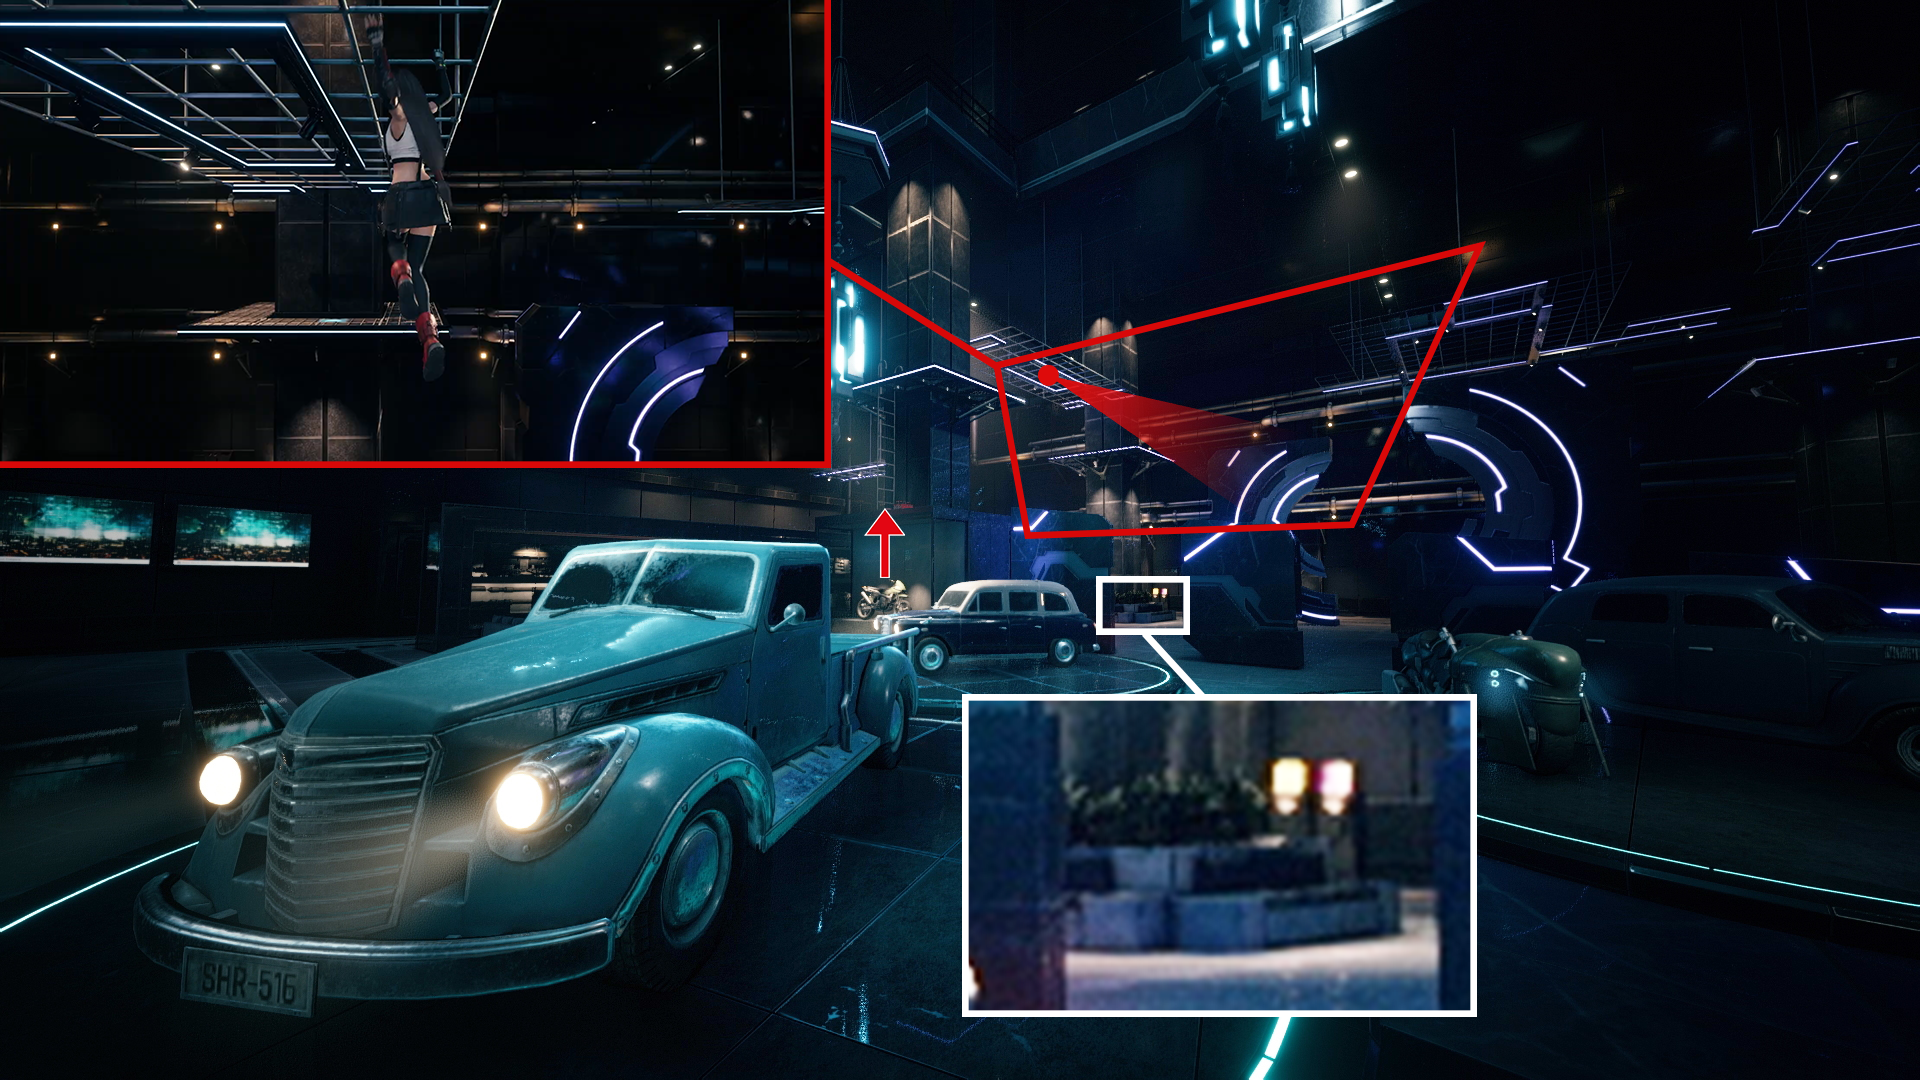
Tifa’s climbing scene located
The last thing I’d like to share with you is the path Tifa is most likely going to take while sneaking around to get to their escape vehicle. We already see Tifa climbing along one of those horizontal neon light carrier grids of which there are more to the right. The front pillar also has a ladder attached to the platform which we’ll be using to climb down. It’s interesting that Tifa is climbing towards the rear in the trailer but that would mean moving away from their escape vehicle. I think they were intentionally directing her into the wrong direction to reveal as little as possible about the location. Looking into the other direction would have granted a perfect view on the ShinRa HQ’s lobby. That’s also why I believe we will come into this area from the right.

Tifa’s full sneaking path found?
Prediction: when Tifa joins up with the others downstairs, they need to sneak past the guards by moving along the right side of this entrance hall until they reach the support pillars seen on the right here. Tifa then needs to climb up ladders to reach the platform above, from where she can climb over, using another one of those neon lights grids to reach the big sculptures with the circular neon lines. Walking and jumping across, she then reaches the platform of the rear pillar on the left, from where the climb from the trailer happens, just into the other direction. Reaching the other pillar platform, she then is able to climb down, hop down to the ground and hide behind the smaller flat sculptures. Maybe she needs to quietly dispatch some of the guards to ensure their escape route to the escape vehicle. I know that’s all conjecture, but I’m fairly certain that Tifa has to take that route above ground in one way or another.
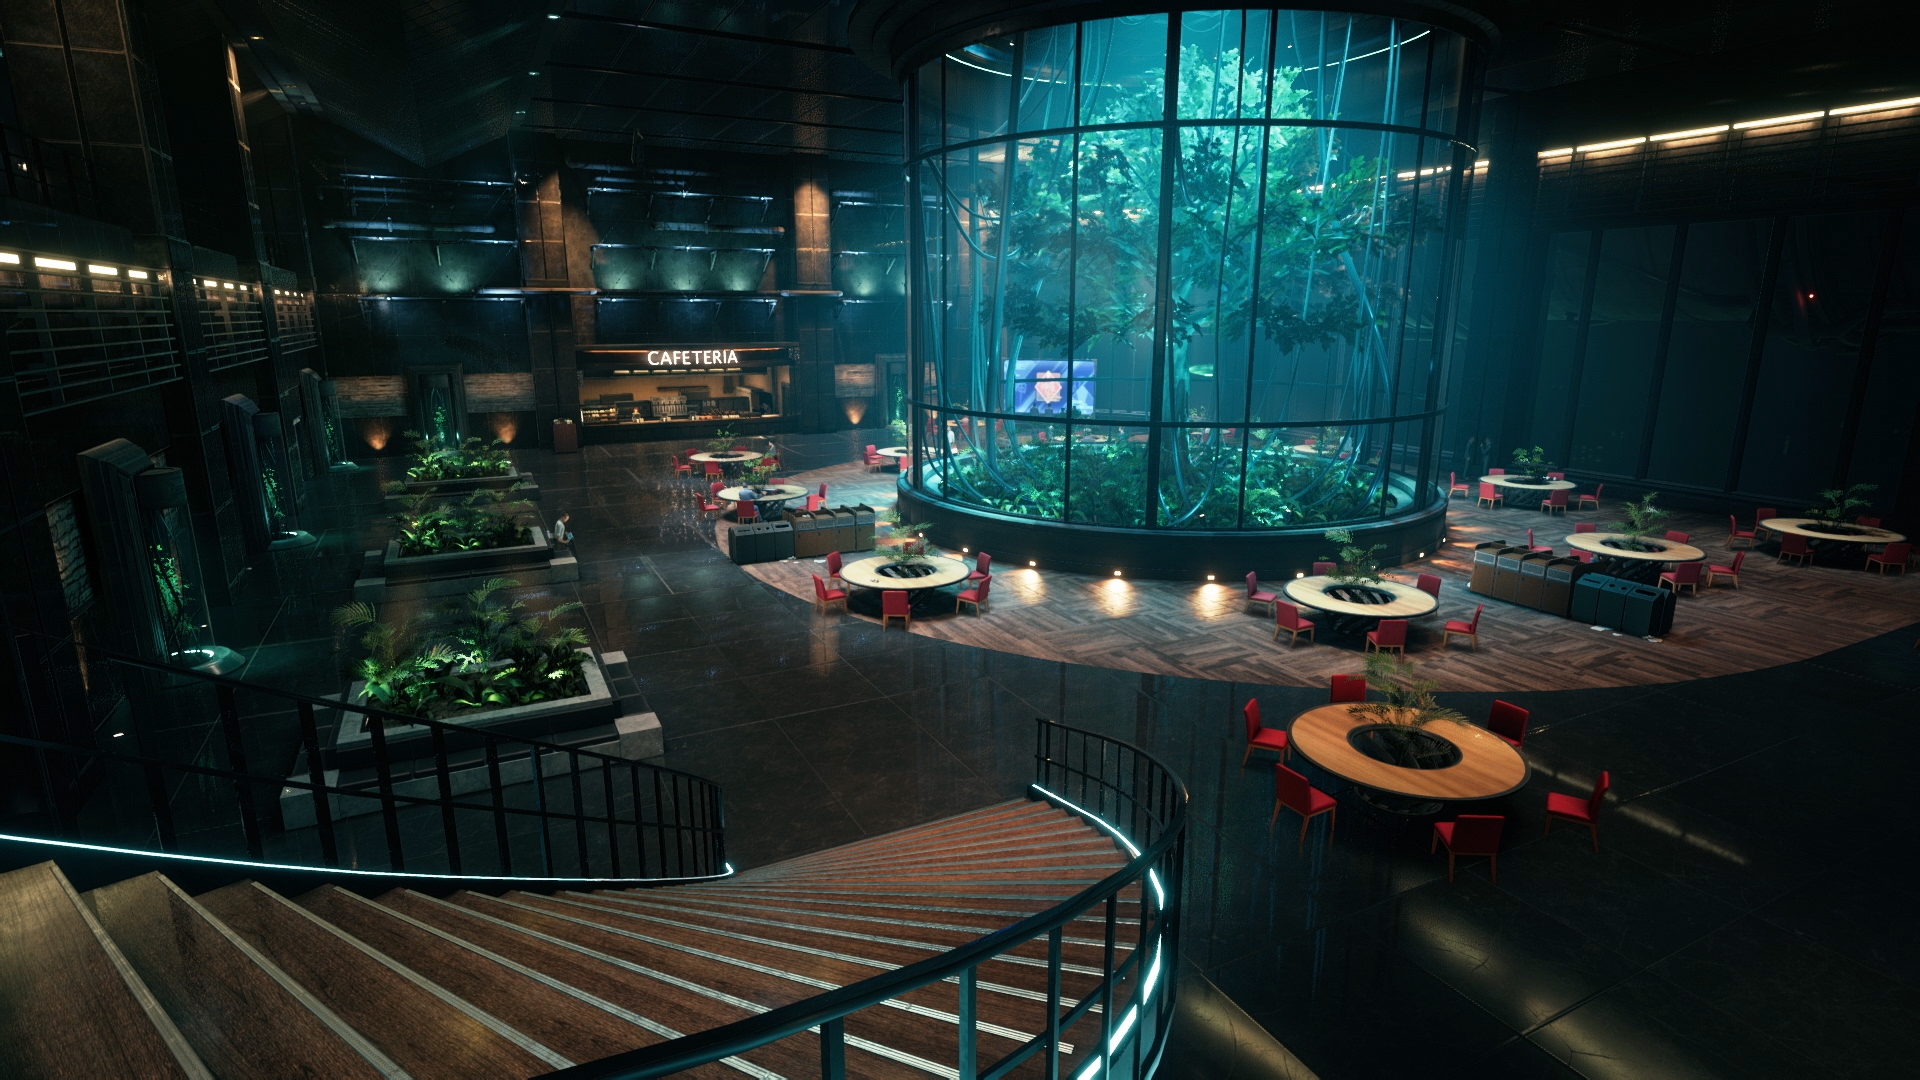
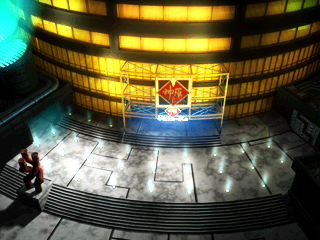
Cafeteria

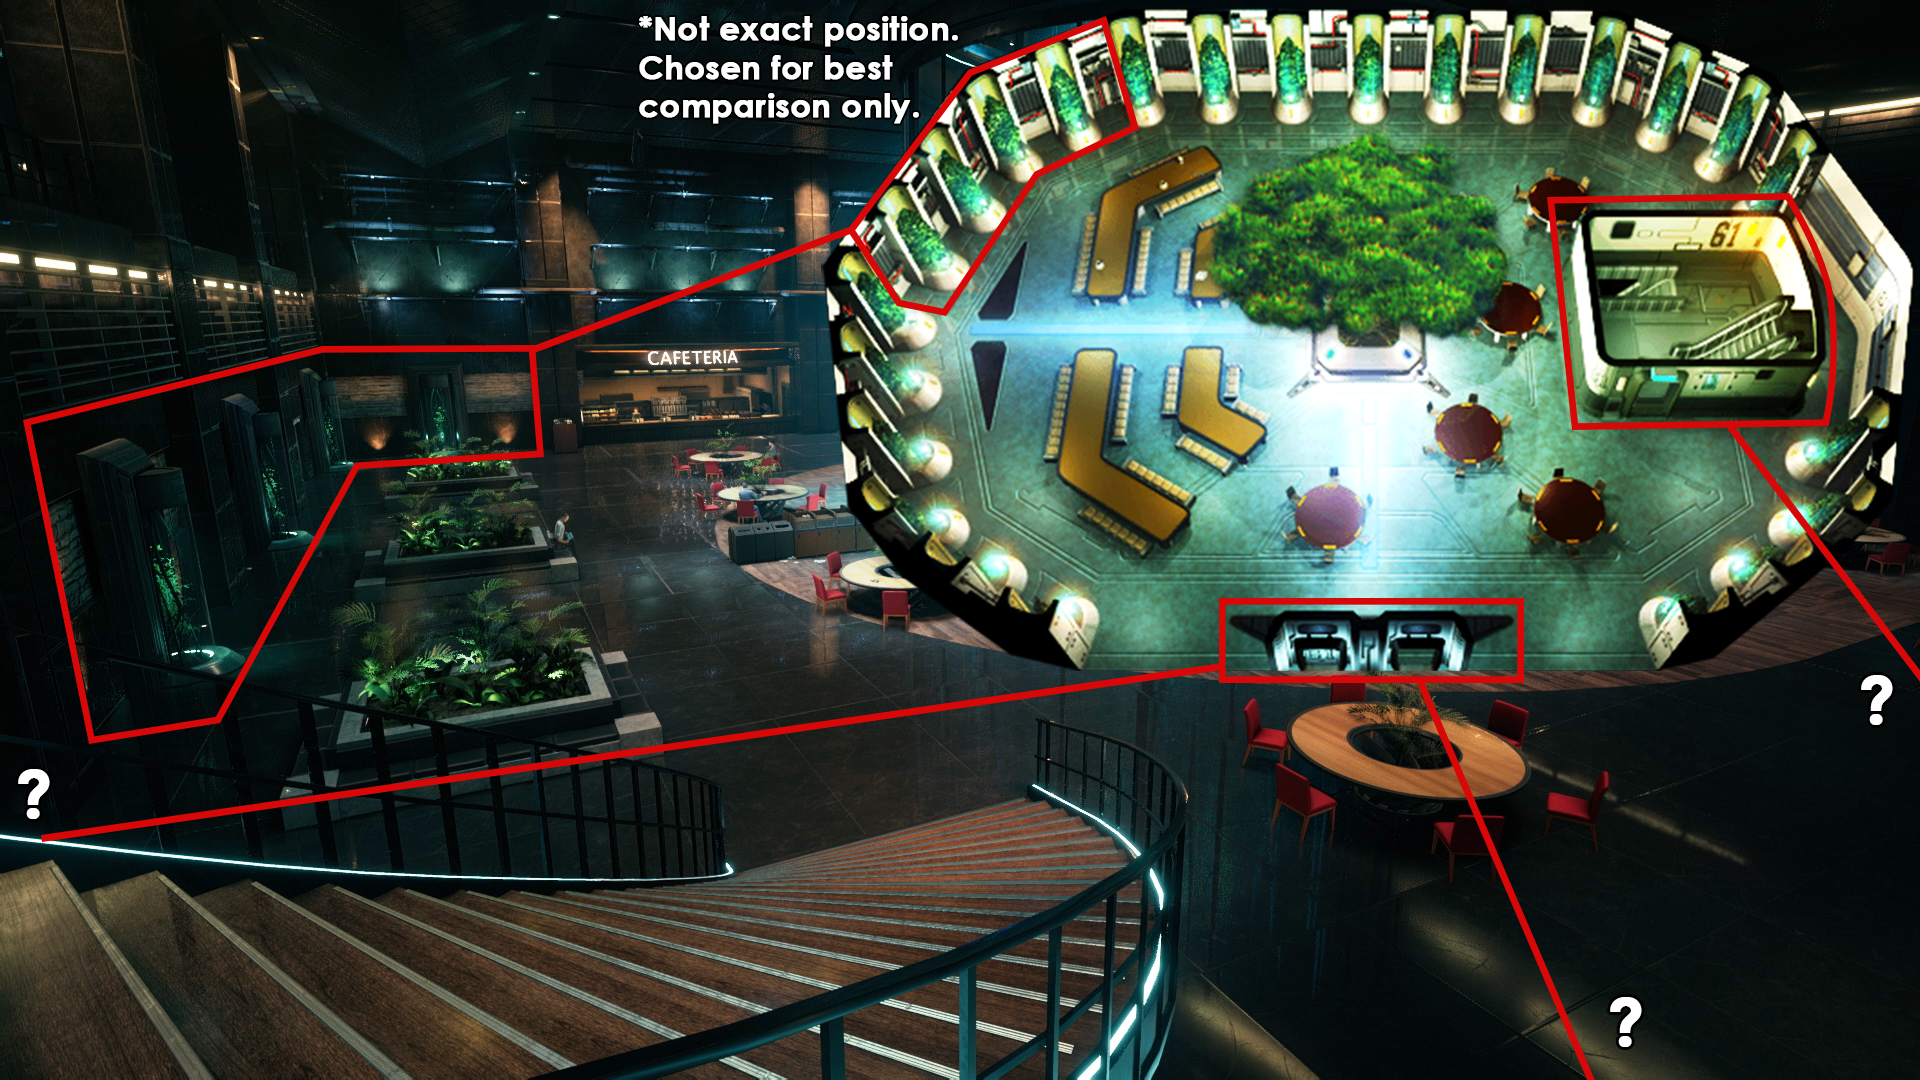
Floor 61 cafeteria – original render
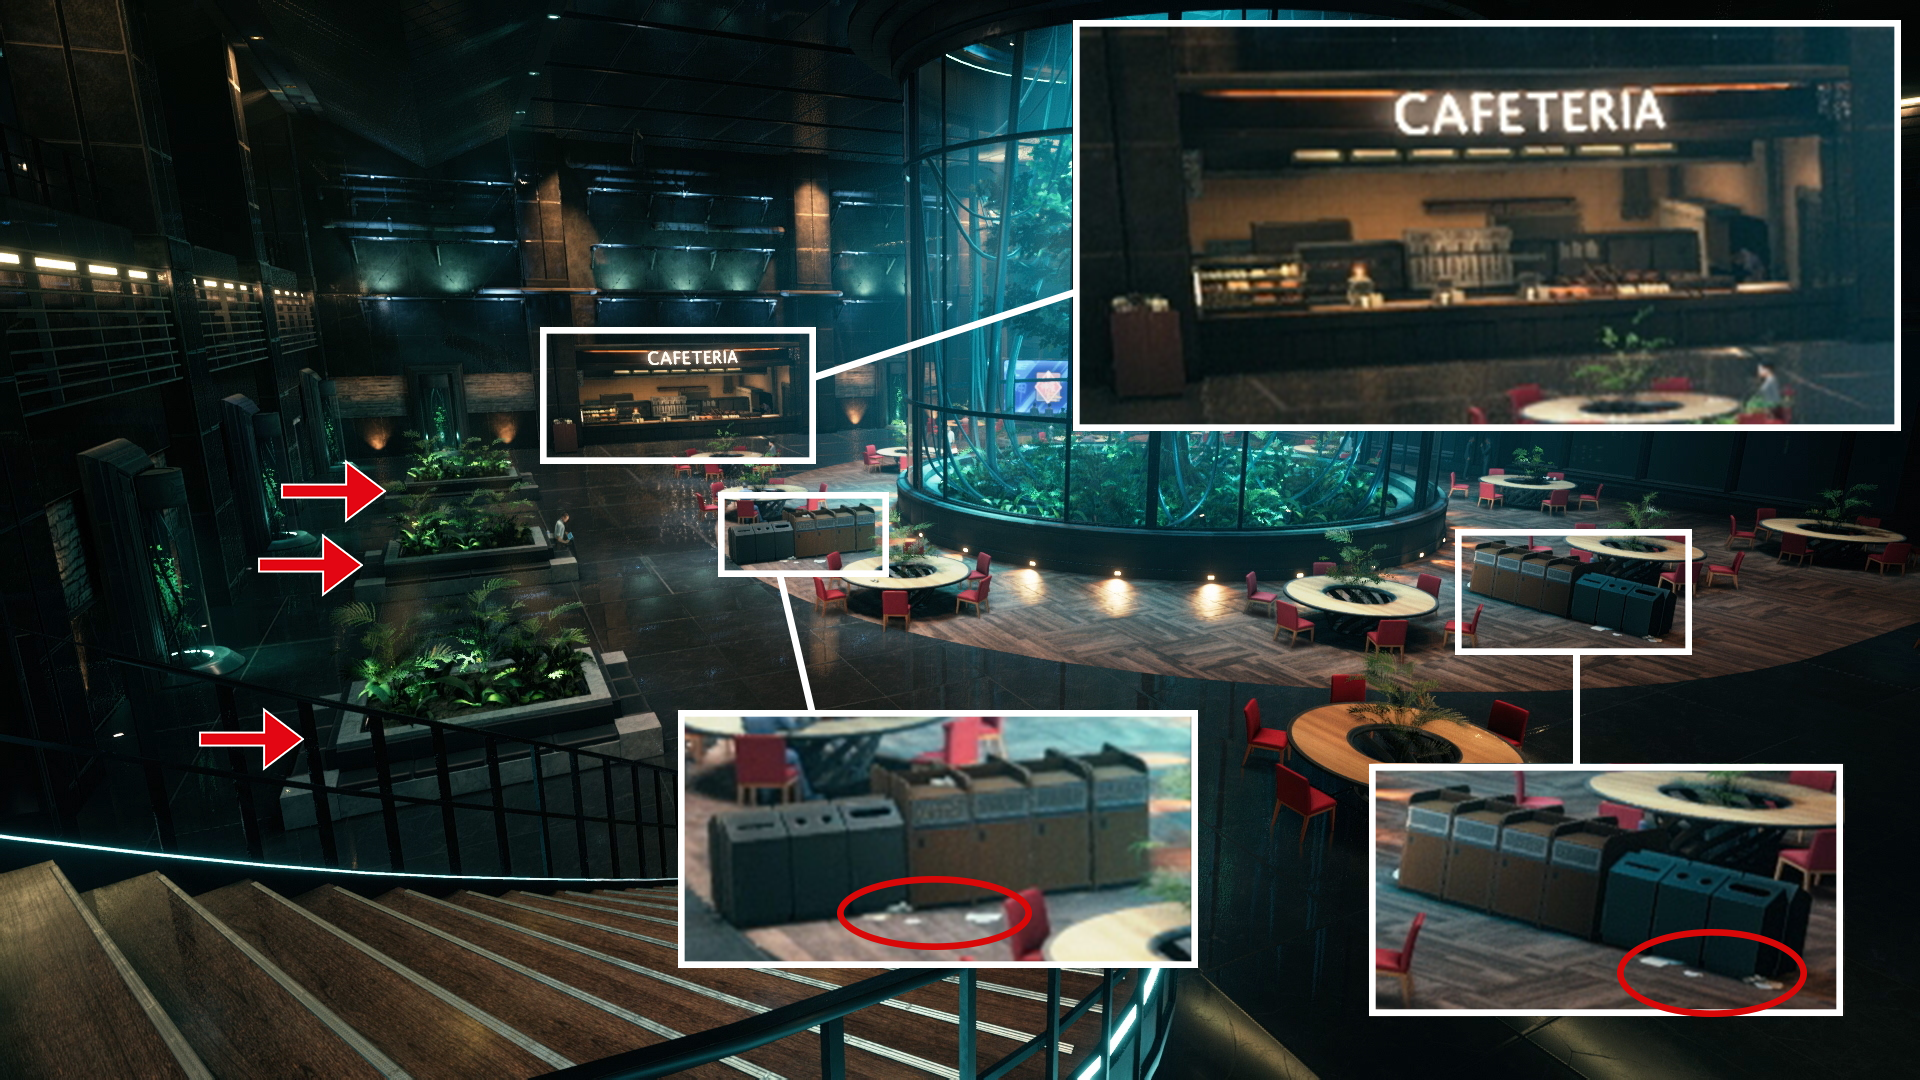
This is by far my favorite screenshot of this batch. Very cozy recreation of the original render if you ignore that it belongs to the main building of the most evil and exploitative corporation on the Planet.
While it’s easily recognizable and the main elements still remain, floor 61 of the ShinRa HQ received quite an overhaul. The main attraction of this place, the big tree in the middle, has been locked behind a tubular greenhouse instead, possibly to keep people from messing with it and keeping it alive in this dead building. The same happened to the smaller pointy trees along the walls.
Speaking of walls, the interior lost its decagonal shape to a more practical rectangular one. While there seems to be either a cut-off or a round corner behind the blue screen behind the tree, it’s not enough to consider this to be anything but a rectangular room.

Comparison to original
The round tables have been kept but were heavily redesigned. They now are presented in a doughnut shape with greenery growing out of the hole and possess a brown wooden surface instead of the plain red from the original. Interestingly, the chairs around those round tables appear in red instead of a wooden brown. Quite the inversion. Personally, I prefer the Remake version as the color balance exudes a more soothing atmosphere. While the floor is generally made of marble, like in the original, it’s now held in black, like the other floors we’ve seen so far. With the exception that the area around the central tree now consists of Parkette which goes all the way to the window wall on the right side.

View on sectors 1 & 8
And here’s another new addition to the Remake: the wall of windows, where we should be able to look down on at least sectors 1 and 8. Why those? This wall of windows is oriented to the rear of the ShinRa building. The pipe running along the top on the outside gives that away. When we compare the upper part of the Shinra HQ tower with the intro cinematic and other renders, there’s a pipe running around the lower part of the executive floors, which is situated higher in the back of the building, just above floor 61. Since the back side of the building faces towards the gap between sectors 1 and 8, those are the ones we should be able to see from above.
New elements
Back to the cafeteria. The original render doesn’t contain a place to get food and drinks from, which is weird. As if it’s just a place to eat and drink whatever people brought with them. Here, it’s a full-blown cafeteria where you can buy whatever your stomach desires. Also new are the array of trash and recycle bins on three of the four sides, which don’t really help much as seen by the litter around them, creating a stain in the otherwise very clean and beautifully designed hall. With those additions also comes a subtraction. The large tables on the left side in the original render are nowhere to be seen. Which I think is a good thing as it ensures consistency. I personally don’t miss them. It’s possible that they were just replaced by those rectangular mini gardens surrounded by seating accommodations on all four sides.
Walls, stairwell and elevators
Between the smaller trees along the wall, we see similar panels, which are made of a rough stone structure. Missing, however, are those red pipes running randomly along the walls in the original render. I also don’t miss those, even though they emanate a certain charm. We also don’t see neither the stairwell nor the elevator doors in this Remake screenshot, though they might be located just outside of view to the right. This would coincide with the orientation as the elevator tubes run along the east side and the window front faces to the north. Another new element is this staircase leading to the upper layer of this cafeteria. This could be the place where they relocated the large tables to. I wonder what else they changed on each of the executive floors.
Customers and other dwellers
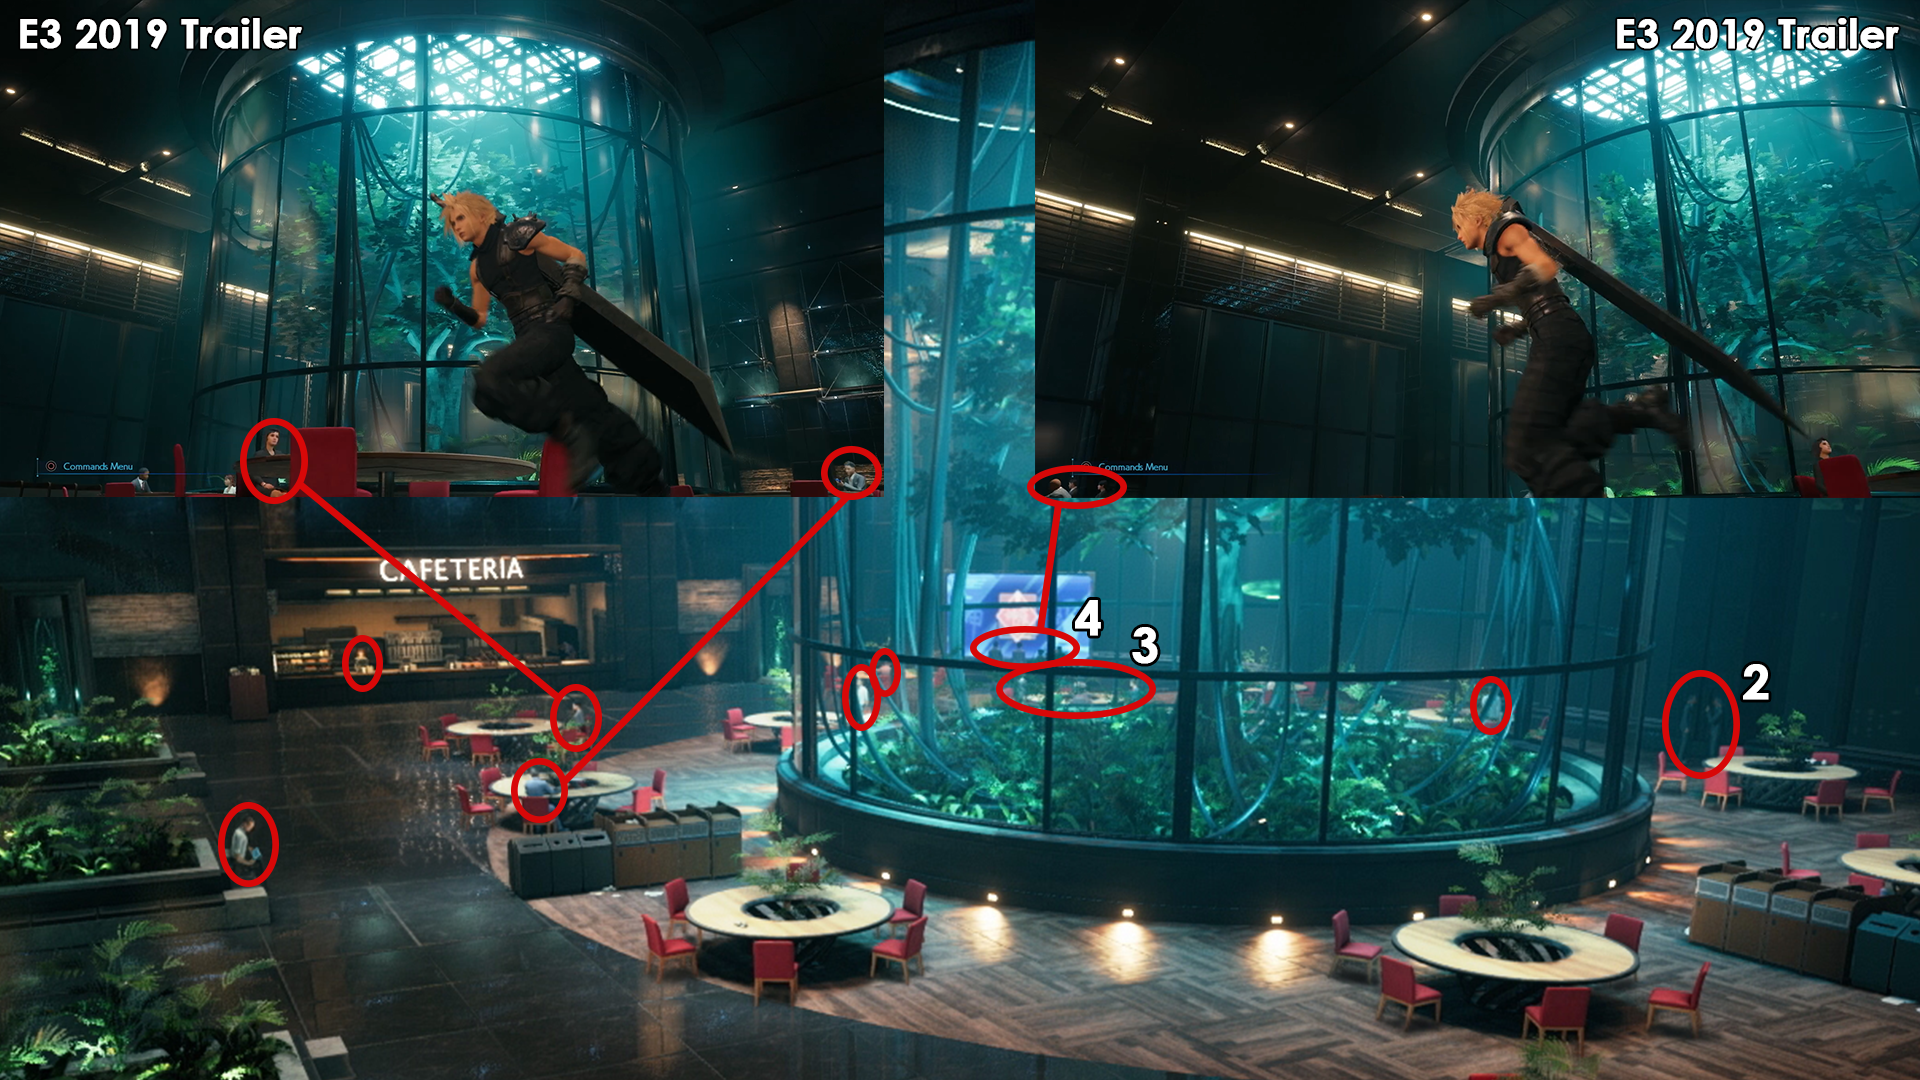
Before we move on to the last location screenshot, let’s check out the population on this floor. I can see 8 people sitting at the round tables, a single one on the rectangular seat array working on his tablet, a redhead behind the counter of the cafeteria waiting for customers, two businessmen standing between windows debating about something and four more people staring into the highly intriguing blue ShinRa propaganda screen in the farthest corner. That’s 16 people in total. We also saw some of them in the E3 2019 trailer already.
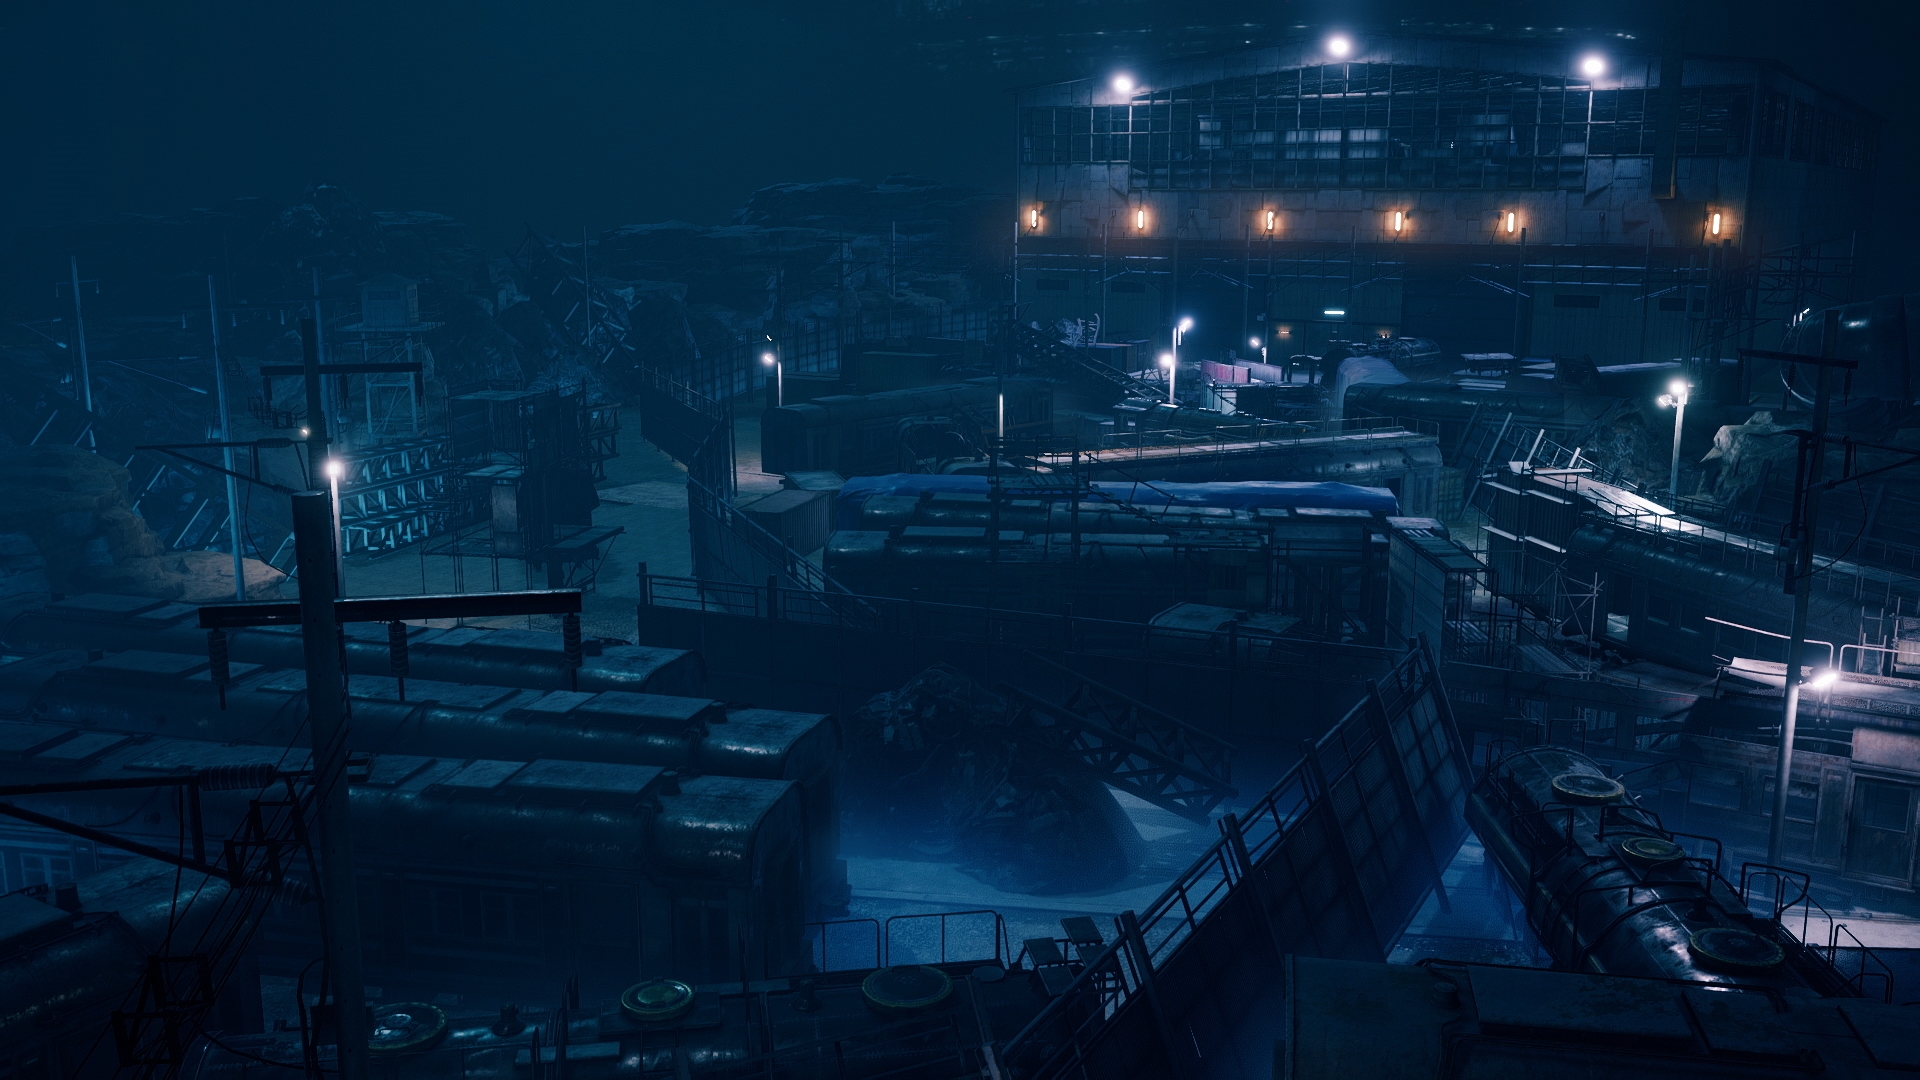
Train Graveyard

Original render south
We received many glimpses of the remade Train Graveyard in past images and footage, most of them during battles. With this screenshot, we finally get treated with a beautiful overview on this apparently massively expanded location. The English version of the screenshots article linked at the beginning of this analysis also has a few things to say about the new Train Graveyard: “FINAL FANTASY VII REMAKE takes many locations from the original game, and redesigns and reinterprets them to add additional depth. The story is more detailed too, with more dialogue, story sequences and a greater portrayal of citizens’ lives. The Train Graveyard is a perfect example of this. Originally used during the construction of Midgar, this area has since become a junkyard for old and abandoned trains. Strong winds make the rusting carriages creak and groan, and odd high-pitched sounds echo over the area.”
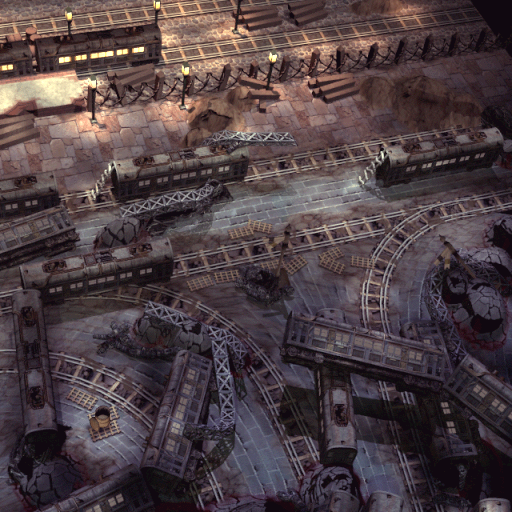
Original render north
With the railway turntable as an additional obstacle and that mysterious cutscene with Aerith and the ghosts (which most likely follows the one with the ghosts chasing after Cloud), we’re already in for a heck of a ride in the Train Graveyard, while the original version only consisted of two pre-rendered screens a very short dialog upon entering and merely finding way out there by taking the right route and moving two locomotives. Here, however, we get more story and dialog, actual lore, more puzzles, a normal enemy turned mini-boss (Eligor) and a generally bigger area to explore. Furthermore, the atmosphere will reach a whole new level with those creepy ambient noises and ghosts roaming around.
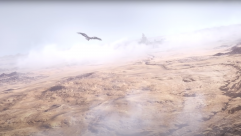
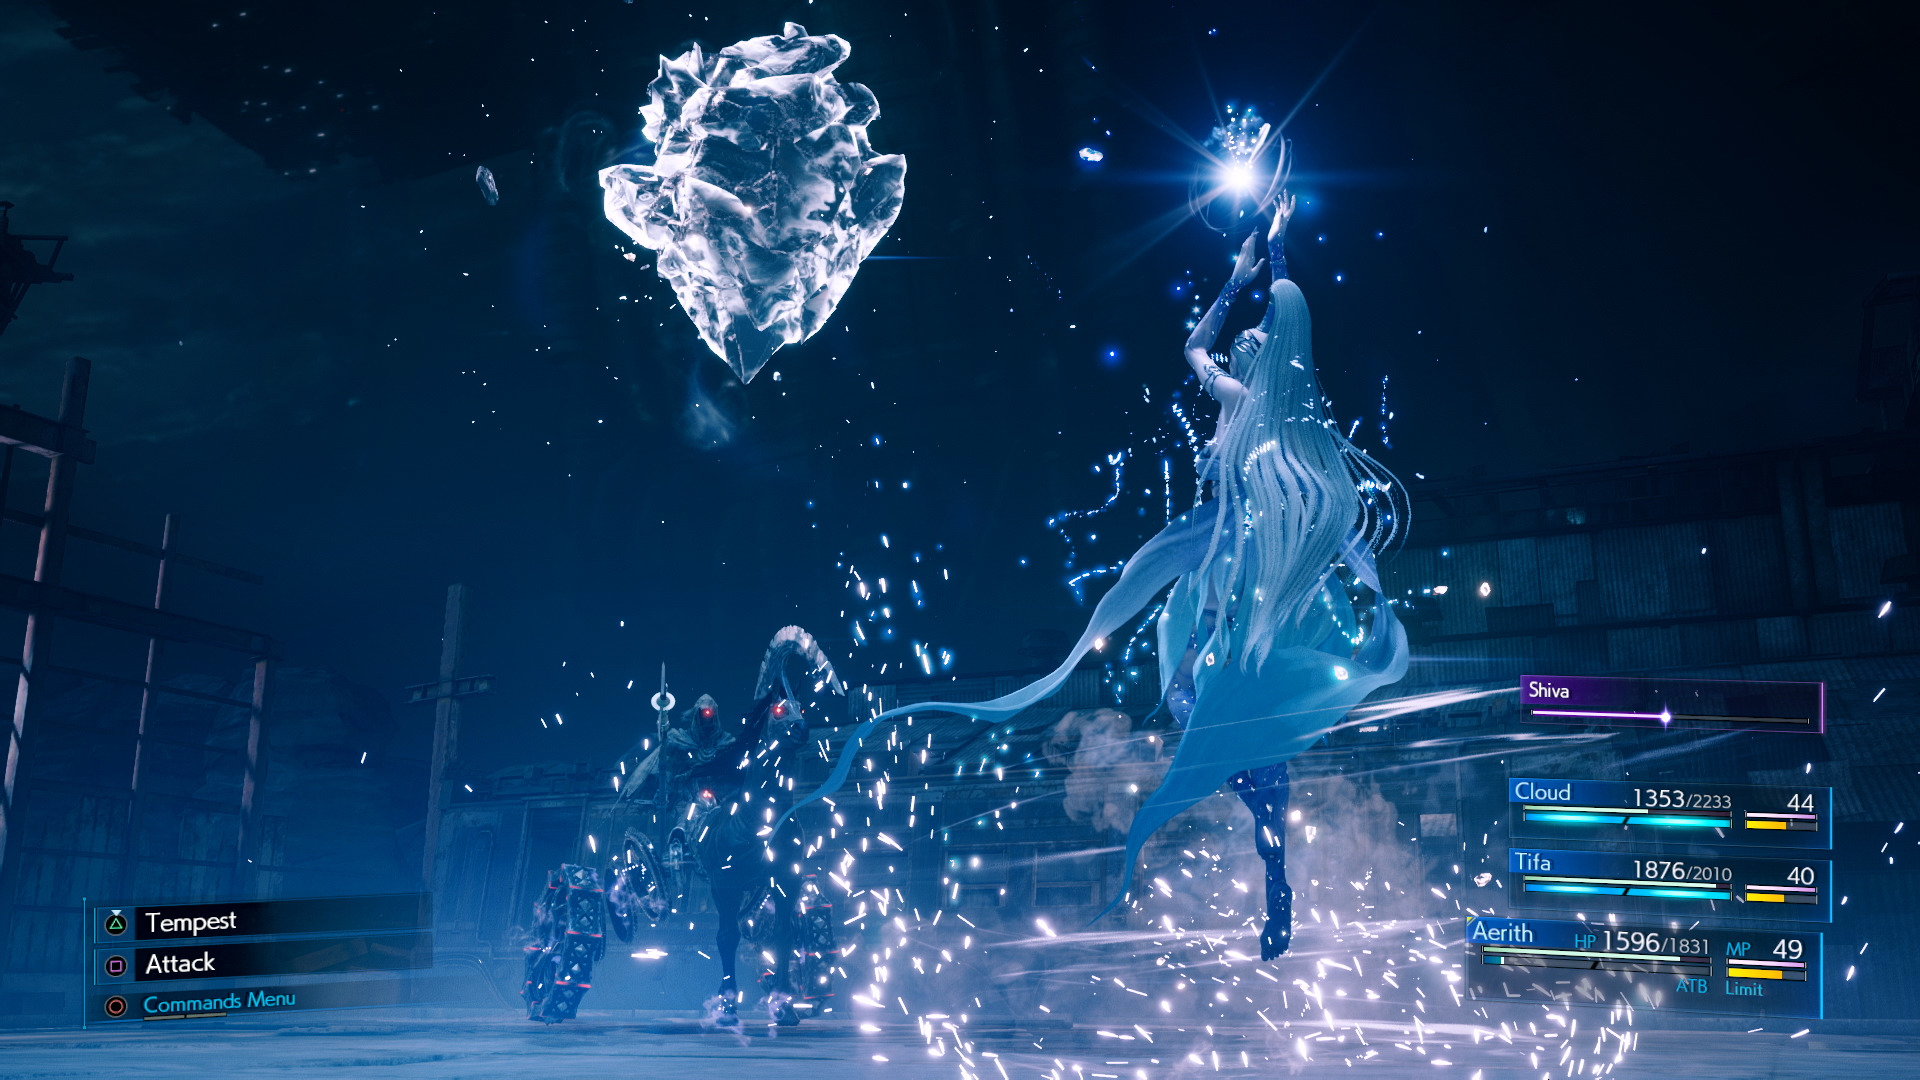
One completely new element is that huge hangar-like building, which seems to have served as a factory in the old days. Other screenshots like those of Shiva and two showing Aerith in battle also contain new buildings which I believe depict other ones as they all differ in size and composition. In addition to this, we now have many other reference points to place some of the previous screenshots and footage in relation to each other, so let’s get through all of them to hopefully paint a clear picture of this whole area.

“Love Triangle” scene
TGS 2019 Trailer – “Love Triangle” Scene: Let’s first take a look at the cutscene from the Tokyo Game Show 2019 trailer, where Tifa and Aerith are clinging to Cloud. There are only two elements that might give away a location and that’s the white pillar with the dark stripe to the left which is nowhere to be seen in the overview shot, where the central pillar seen in the background is obstructed by this huge new building. This means it is located either to the right or behind that building. If we compare that screenshot to another stillshot from the TGS 2019 trailer, the angle looks very similar thanks to the pipe visible in both shots which has its base on the pillar illuminated. It all depends on when this scene takes place. Before or after the exploration screenshot? Currently, I think this cutscene takes place at the very start of the Train Graveyard segment and we need to traverse through the building first to reach the area we see here in the overview shot. It’s probably that abandoned building in addition to the whole location which is giving Tifa the creeps.
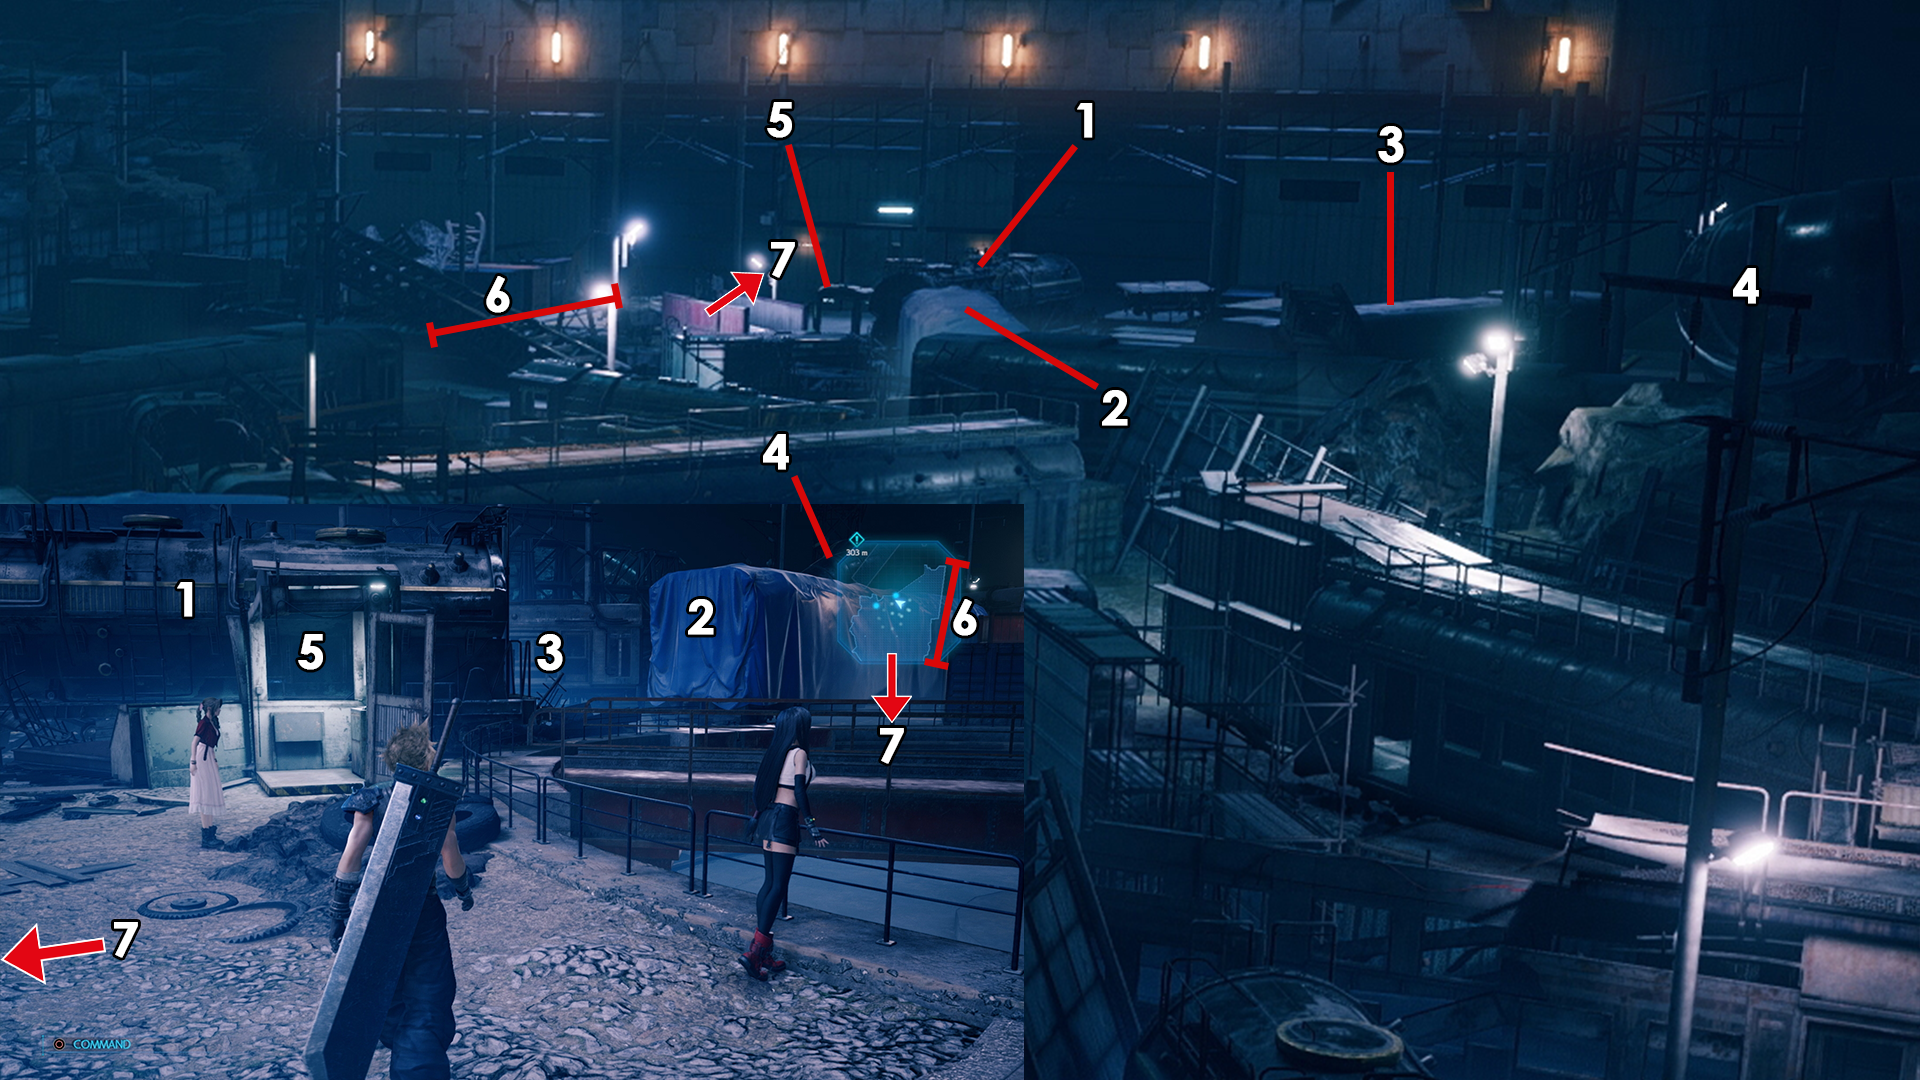
Railway turntable location
December Screenshots – Exploration: According to the placement of this screenshot, I’m confident that it is taken right in front of the abandoned factory building. The following objects can be seen in both images: The freight wagon behind Aerith (1), the passenger coach covered in blue tarp next to it (2), another uncovered passenger coach further in the background (3), the curving pipe behind the mini-map on a rocky hill (4), and the broken cabin containing the railway turntable controls is also visible (5). The terrain graphic in the mini-map also fits, as the path is closed off on both sides, one by the freight wagon (1) and the other by the cargo containers (6). The building would then be located just beyond the bottom border of the mini-map (7). With the target indicator pointing to the “north-west”, the illuminated coaches in the bottom right corner of the overview shot are now confirmed to be our path of choice. There’s even more proof later on.
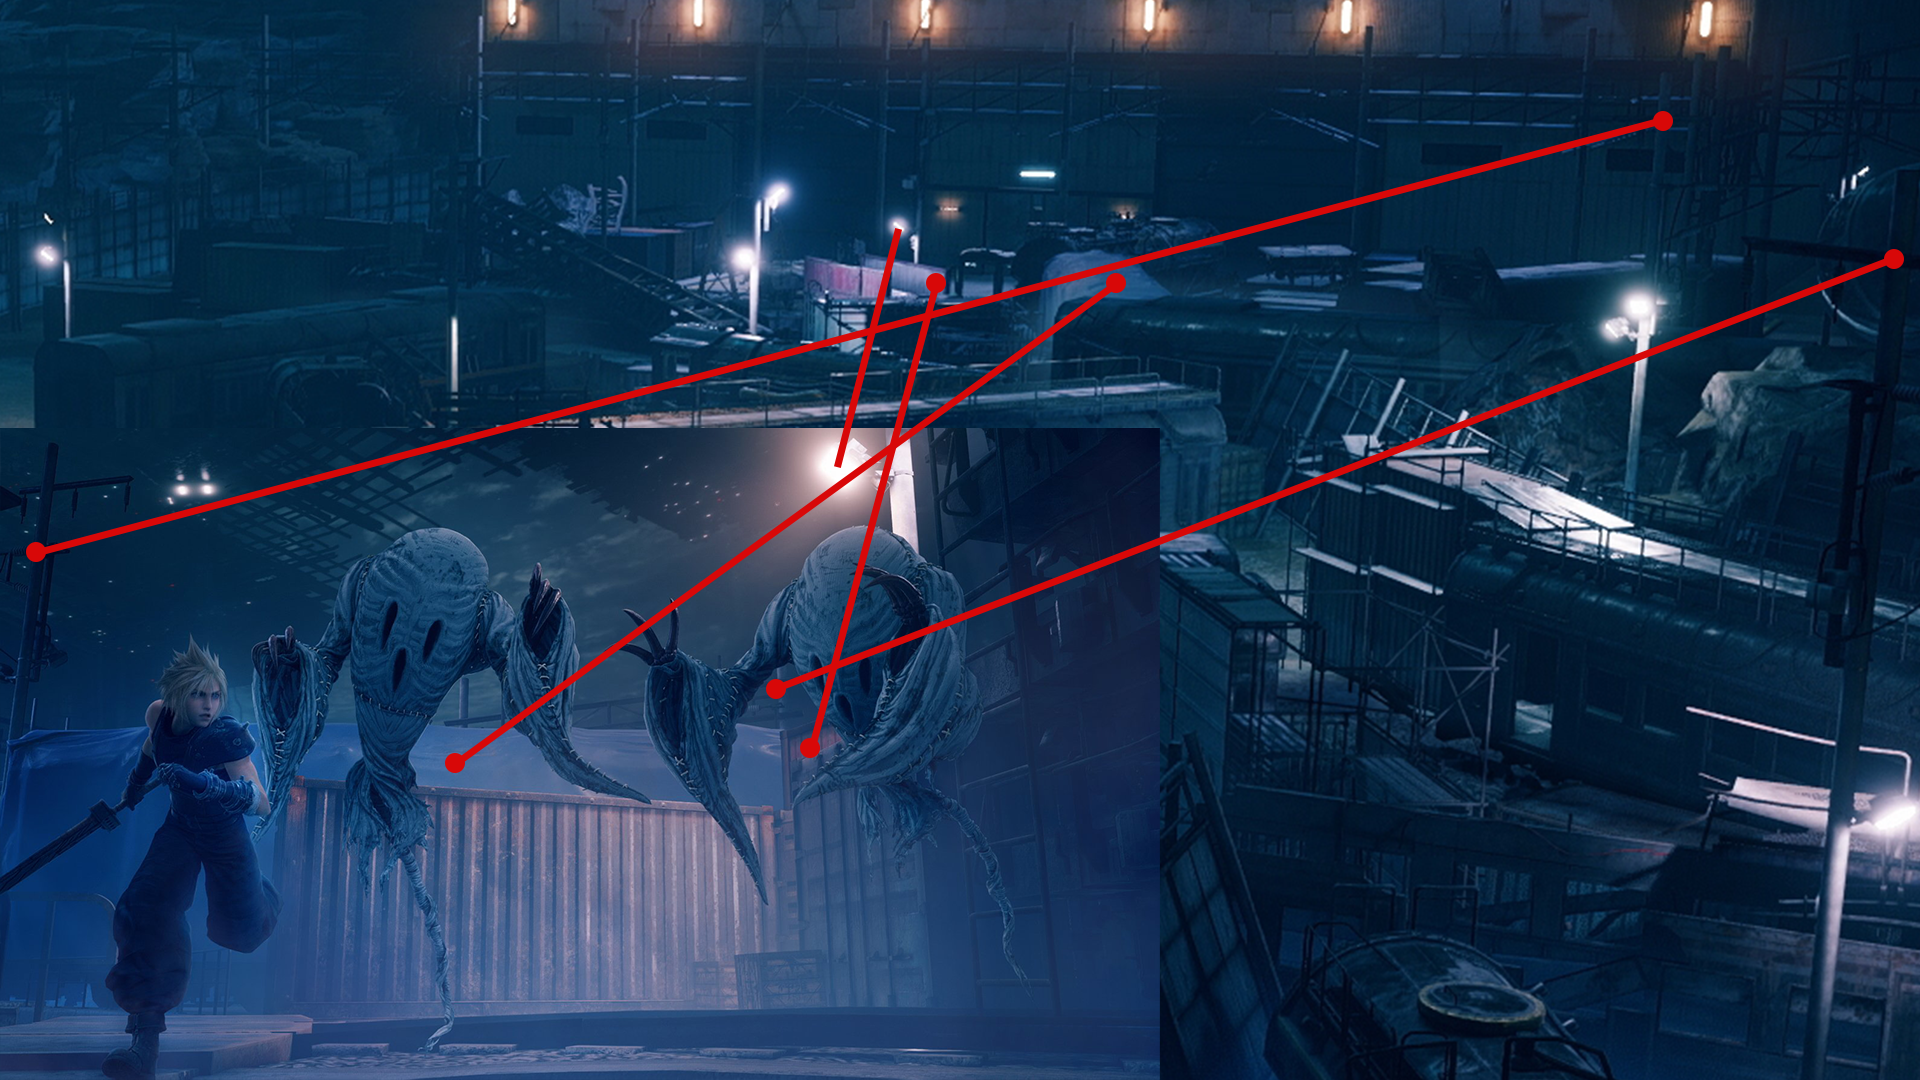
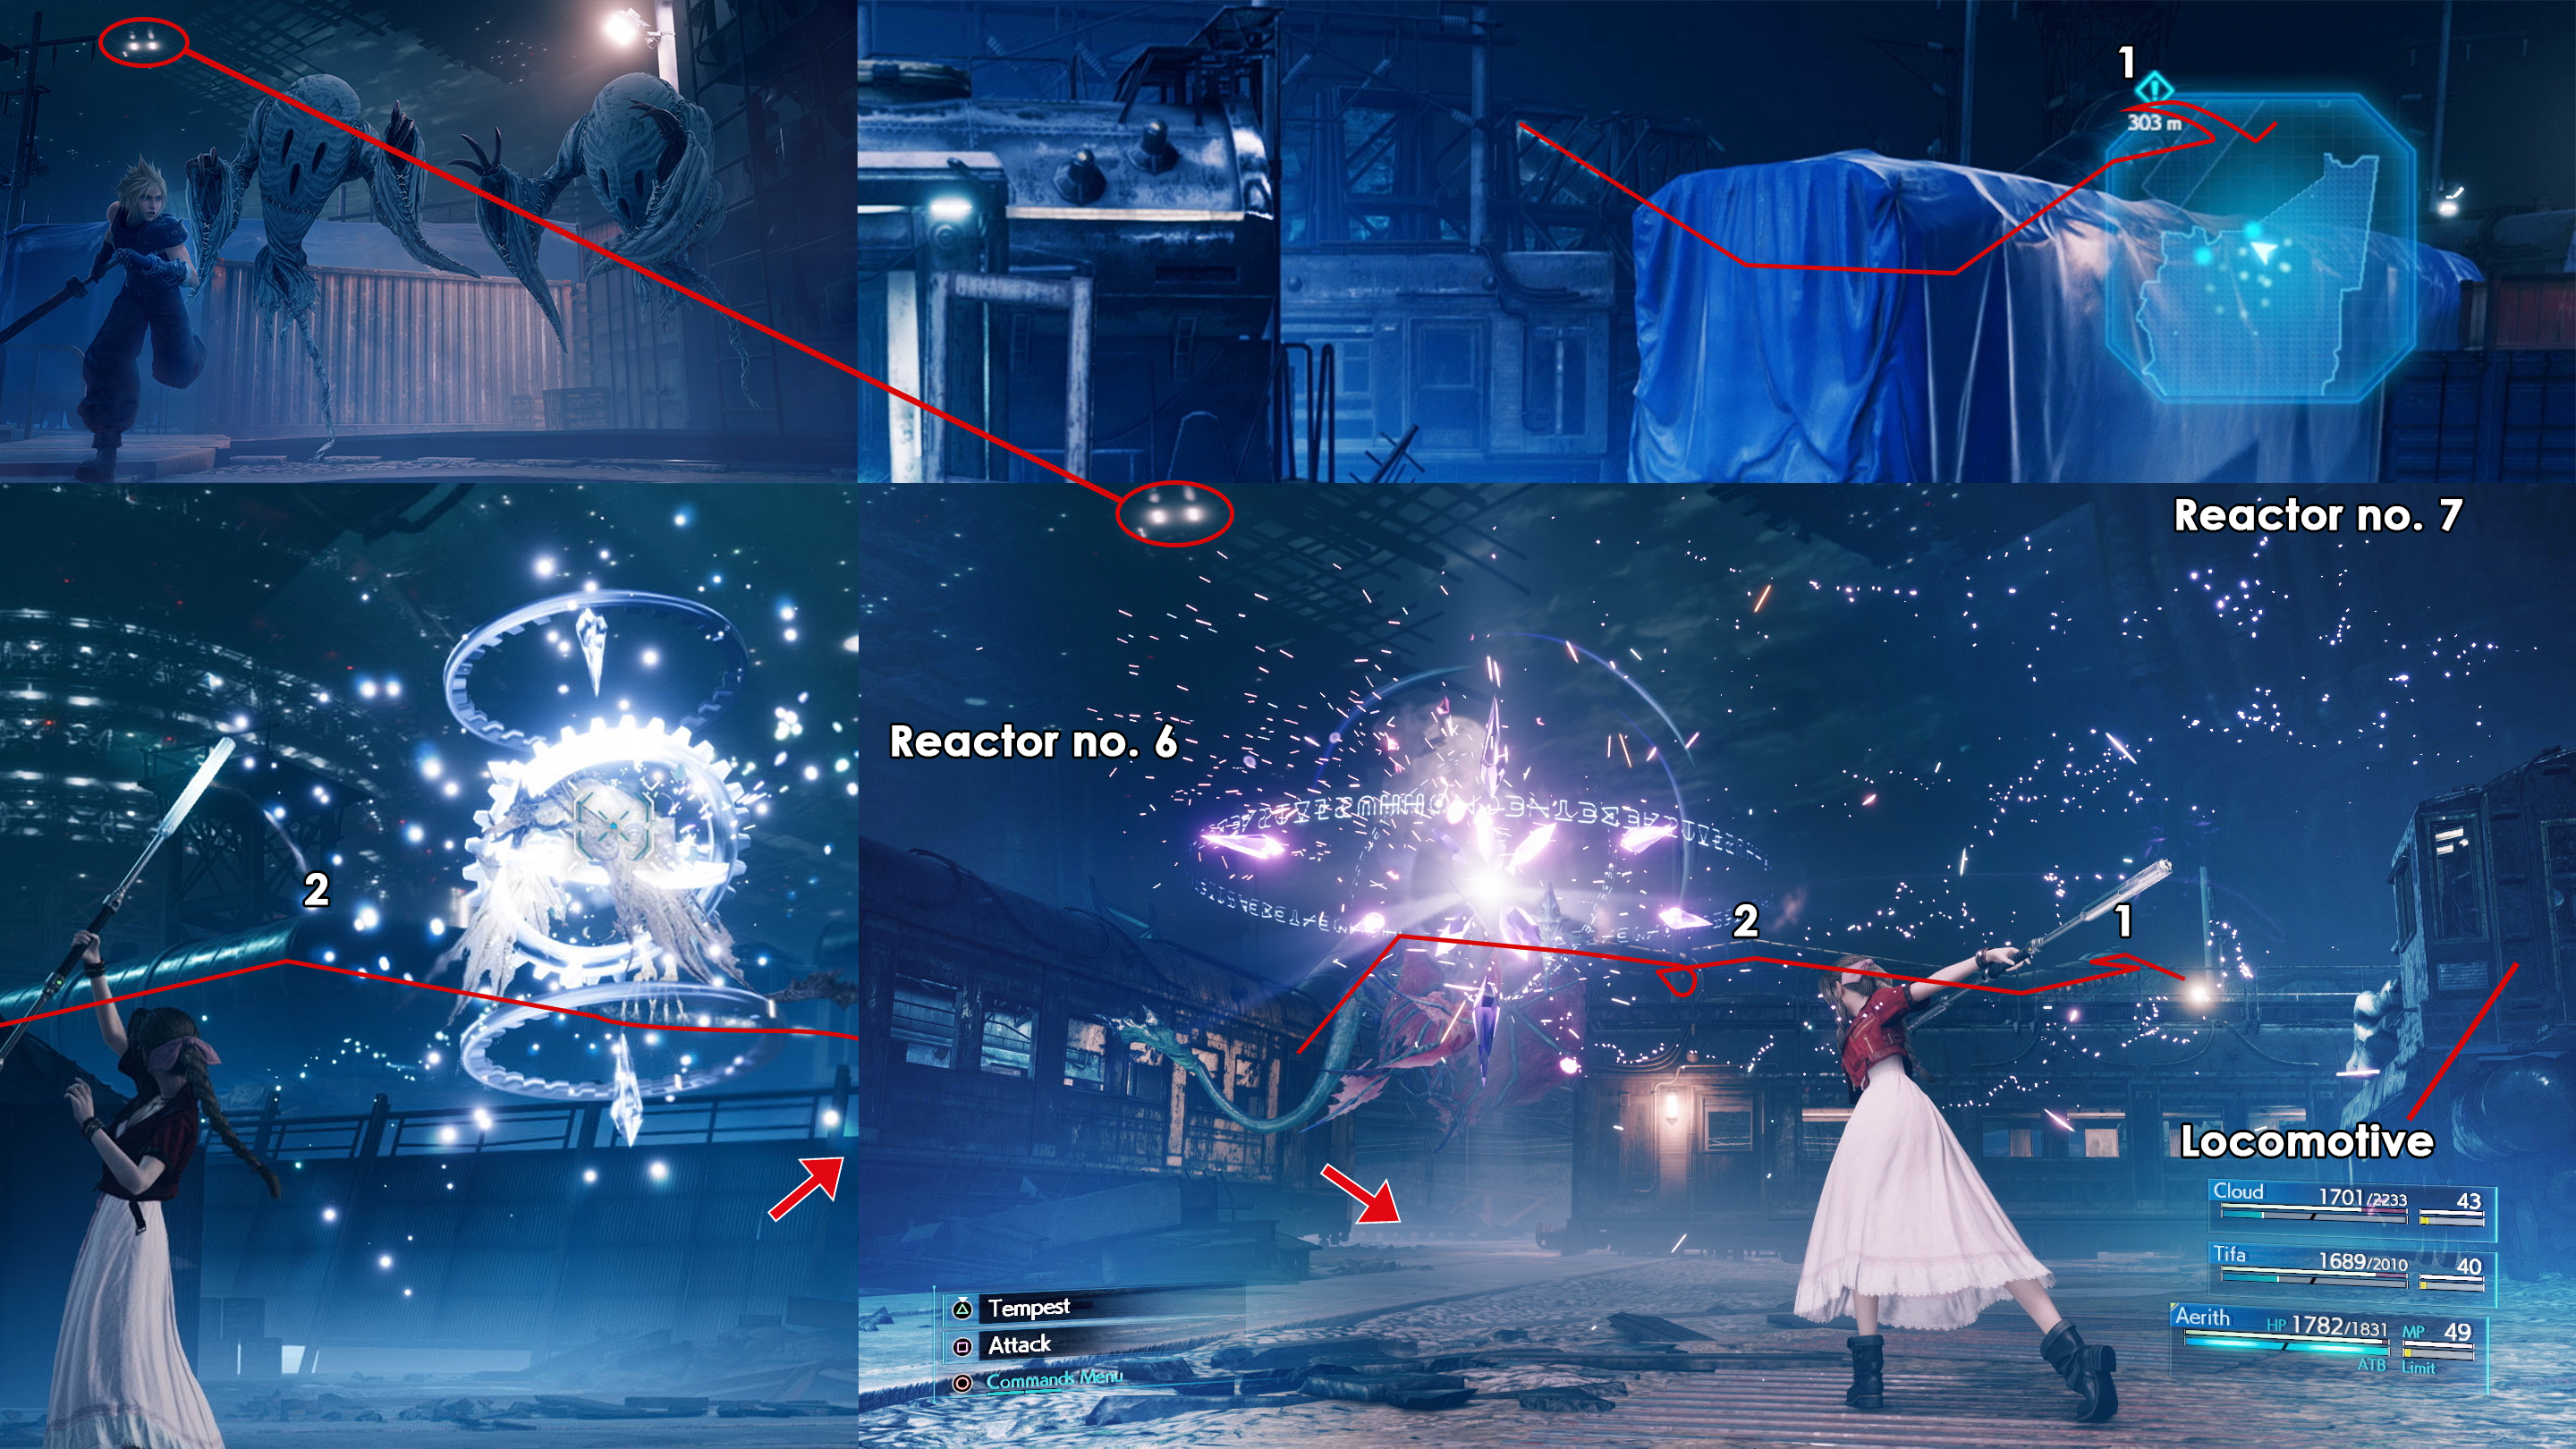
Ghost chase location
Halloween Special – Ghosts: As already laid out in part 2 of this analysis article series, this screenshot is located on the other side of the railway turntable. When comparing it to the overview shot, the location pans out. We see the covered passenger coach again and the dark contraption next to it with a ladder down to its left side might represent the wheel carriage towers seen to the right of the second ghost enemy, which also bear a ladder on this side, which makes the climb to the other side possible. Those two metal walls sticking out of whatever are either off-screen or can be partially seen in the background. In that case, the wheel carriage seen here is hidden from sight in the overview shot. The angle doesn’t quite match up, however.

Where Aerith tames the ghosts
December Screenshots – Aerith and the Ghosts: Continuing with the same enemies, there are three indicators in the background telling us where this one is located. The fence looks exactly like the one surrounding the area in front of the old factory building on the overview shot and I see only one lamp or powerline post along that wall where the central pillar of Midgar is also visible in the distance and that’s right next to the building, which is incidentally also in the direction Cloud is running towards in the Halloween Special screenshot. From there, we either need to backtrack to the previous spot and use the ladders to get to the other side or otherwise walk around to reach the locomotive in the middle.
Unlocking the path
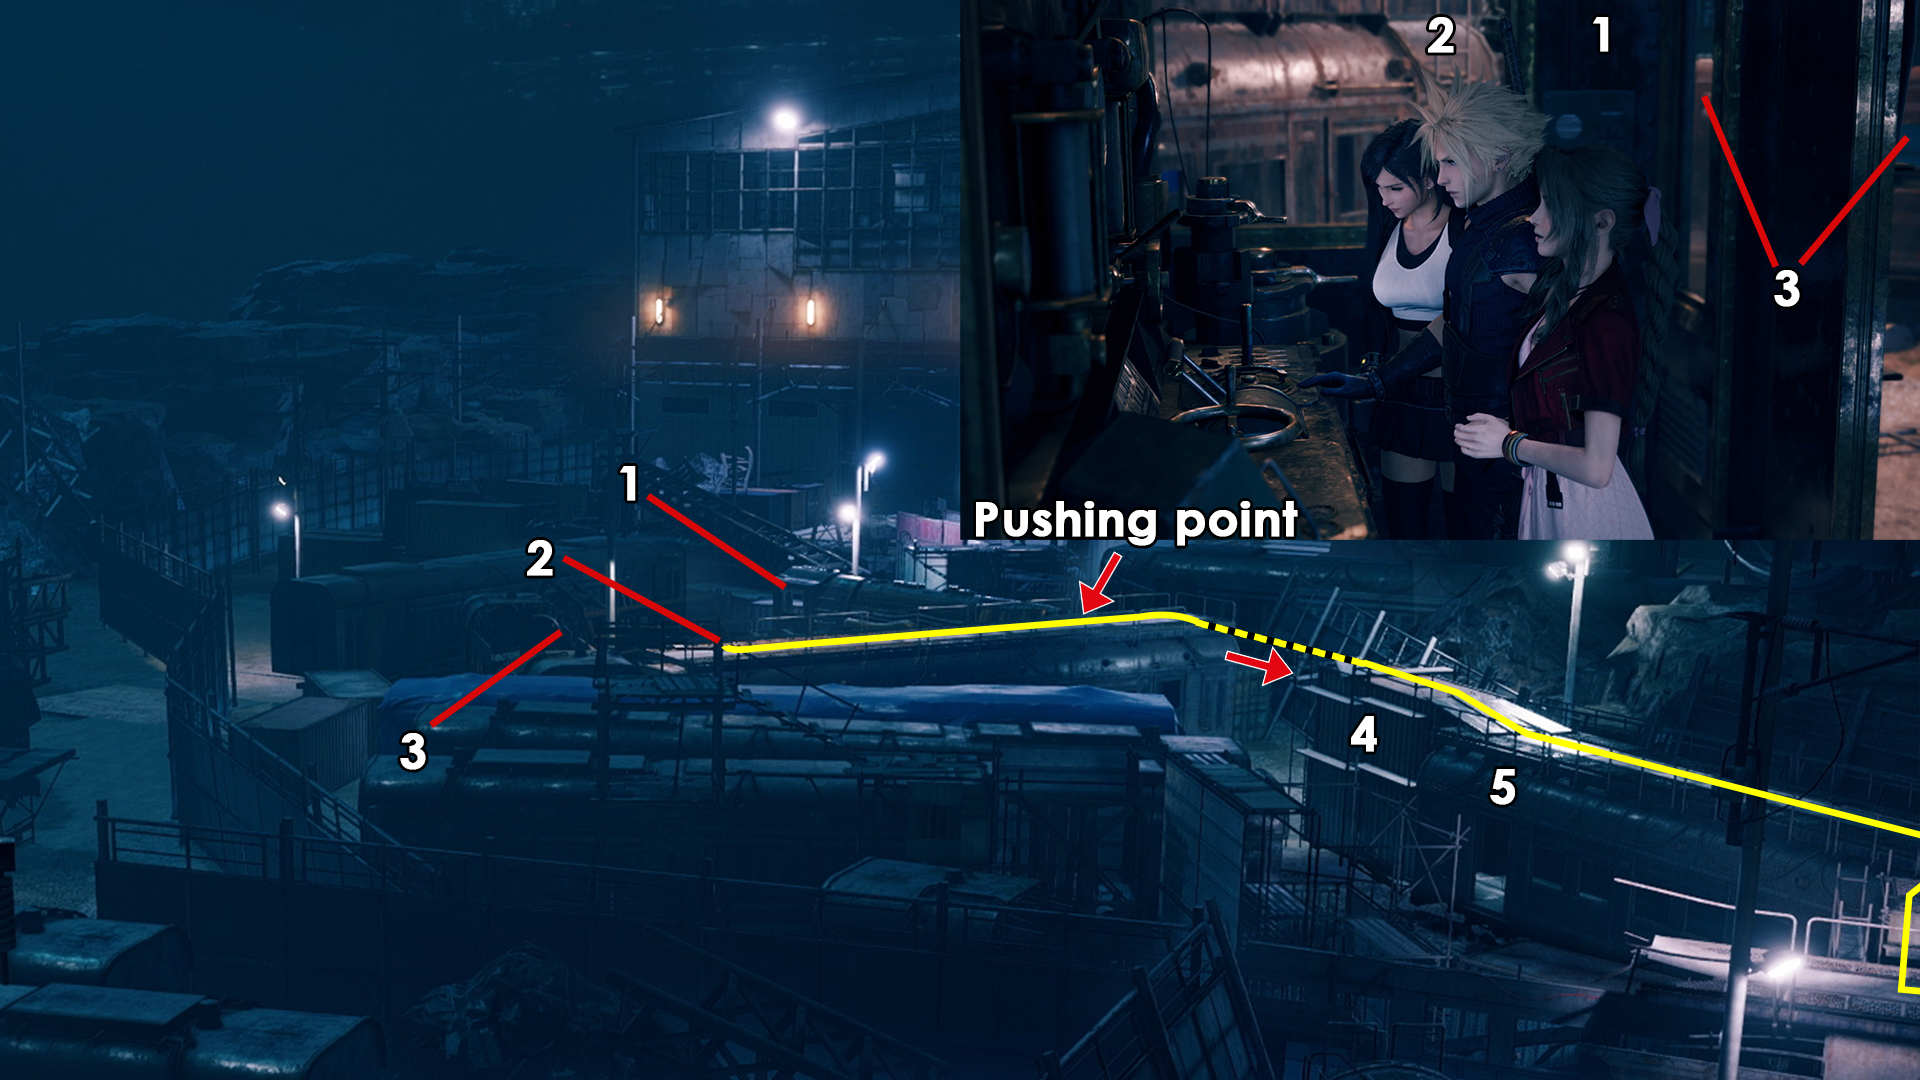
December Screenshots – Inside the Locomotive: In the previous article, I already talked about this scene and that this would be the first time to operate and pilot a locomotive to unlock a new path through this pile of metal wreckage. This lonely locomotive in the center of it all (1) fits the description perfectly and the surroundings seen through the gaps and windows also matches up. We see the illuminated coach with a ladder in the back (2), which is also present in the overview shot, as well as the barely visible coach adjacent to it (3). In the overview shot, our goal is rather obvious once noticed. Push the coach with the ladder towards the pile of containers surrounded by scaffolding (4), built against another coach (5), which is also illuminated. This creates a fully traversable passenger coach roof pathway. It’s also convenient that the railing on the first coach has gaps where we need to mount and leave it again. After this traversal, we reach another part of the Train Graveyard where most likely all the other battle-related screenshots take place.
Small shack reveals more
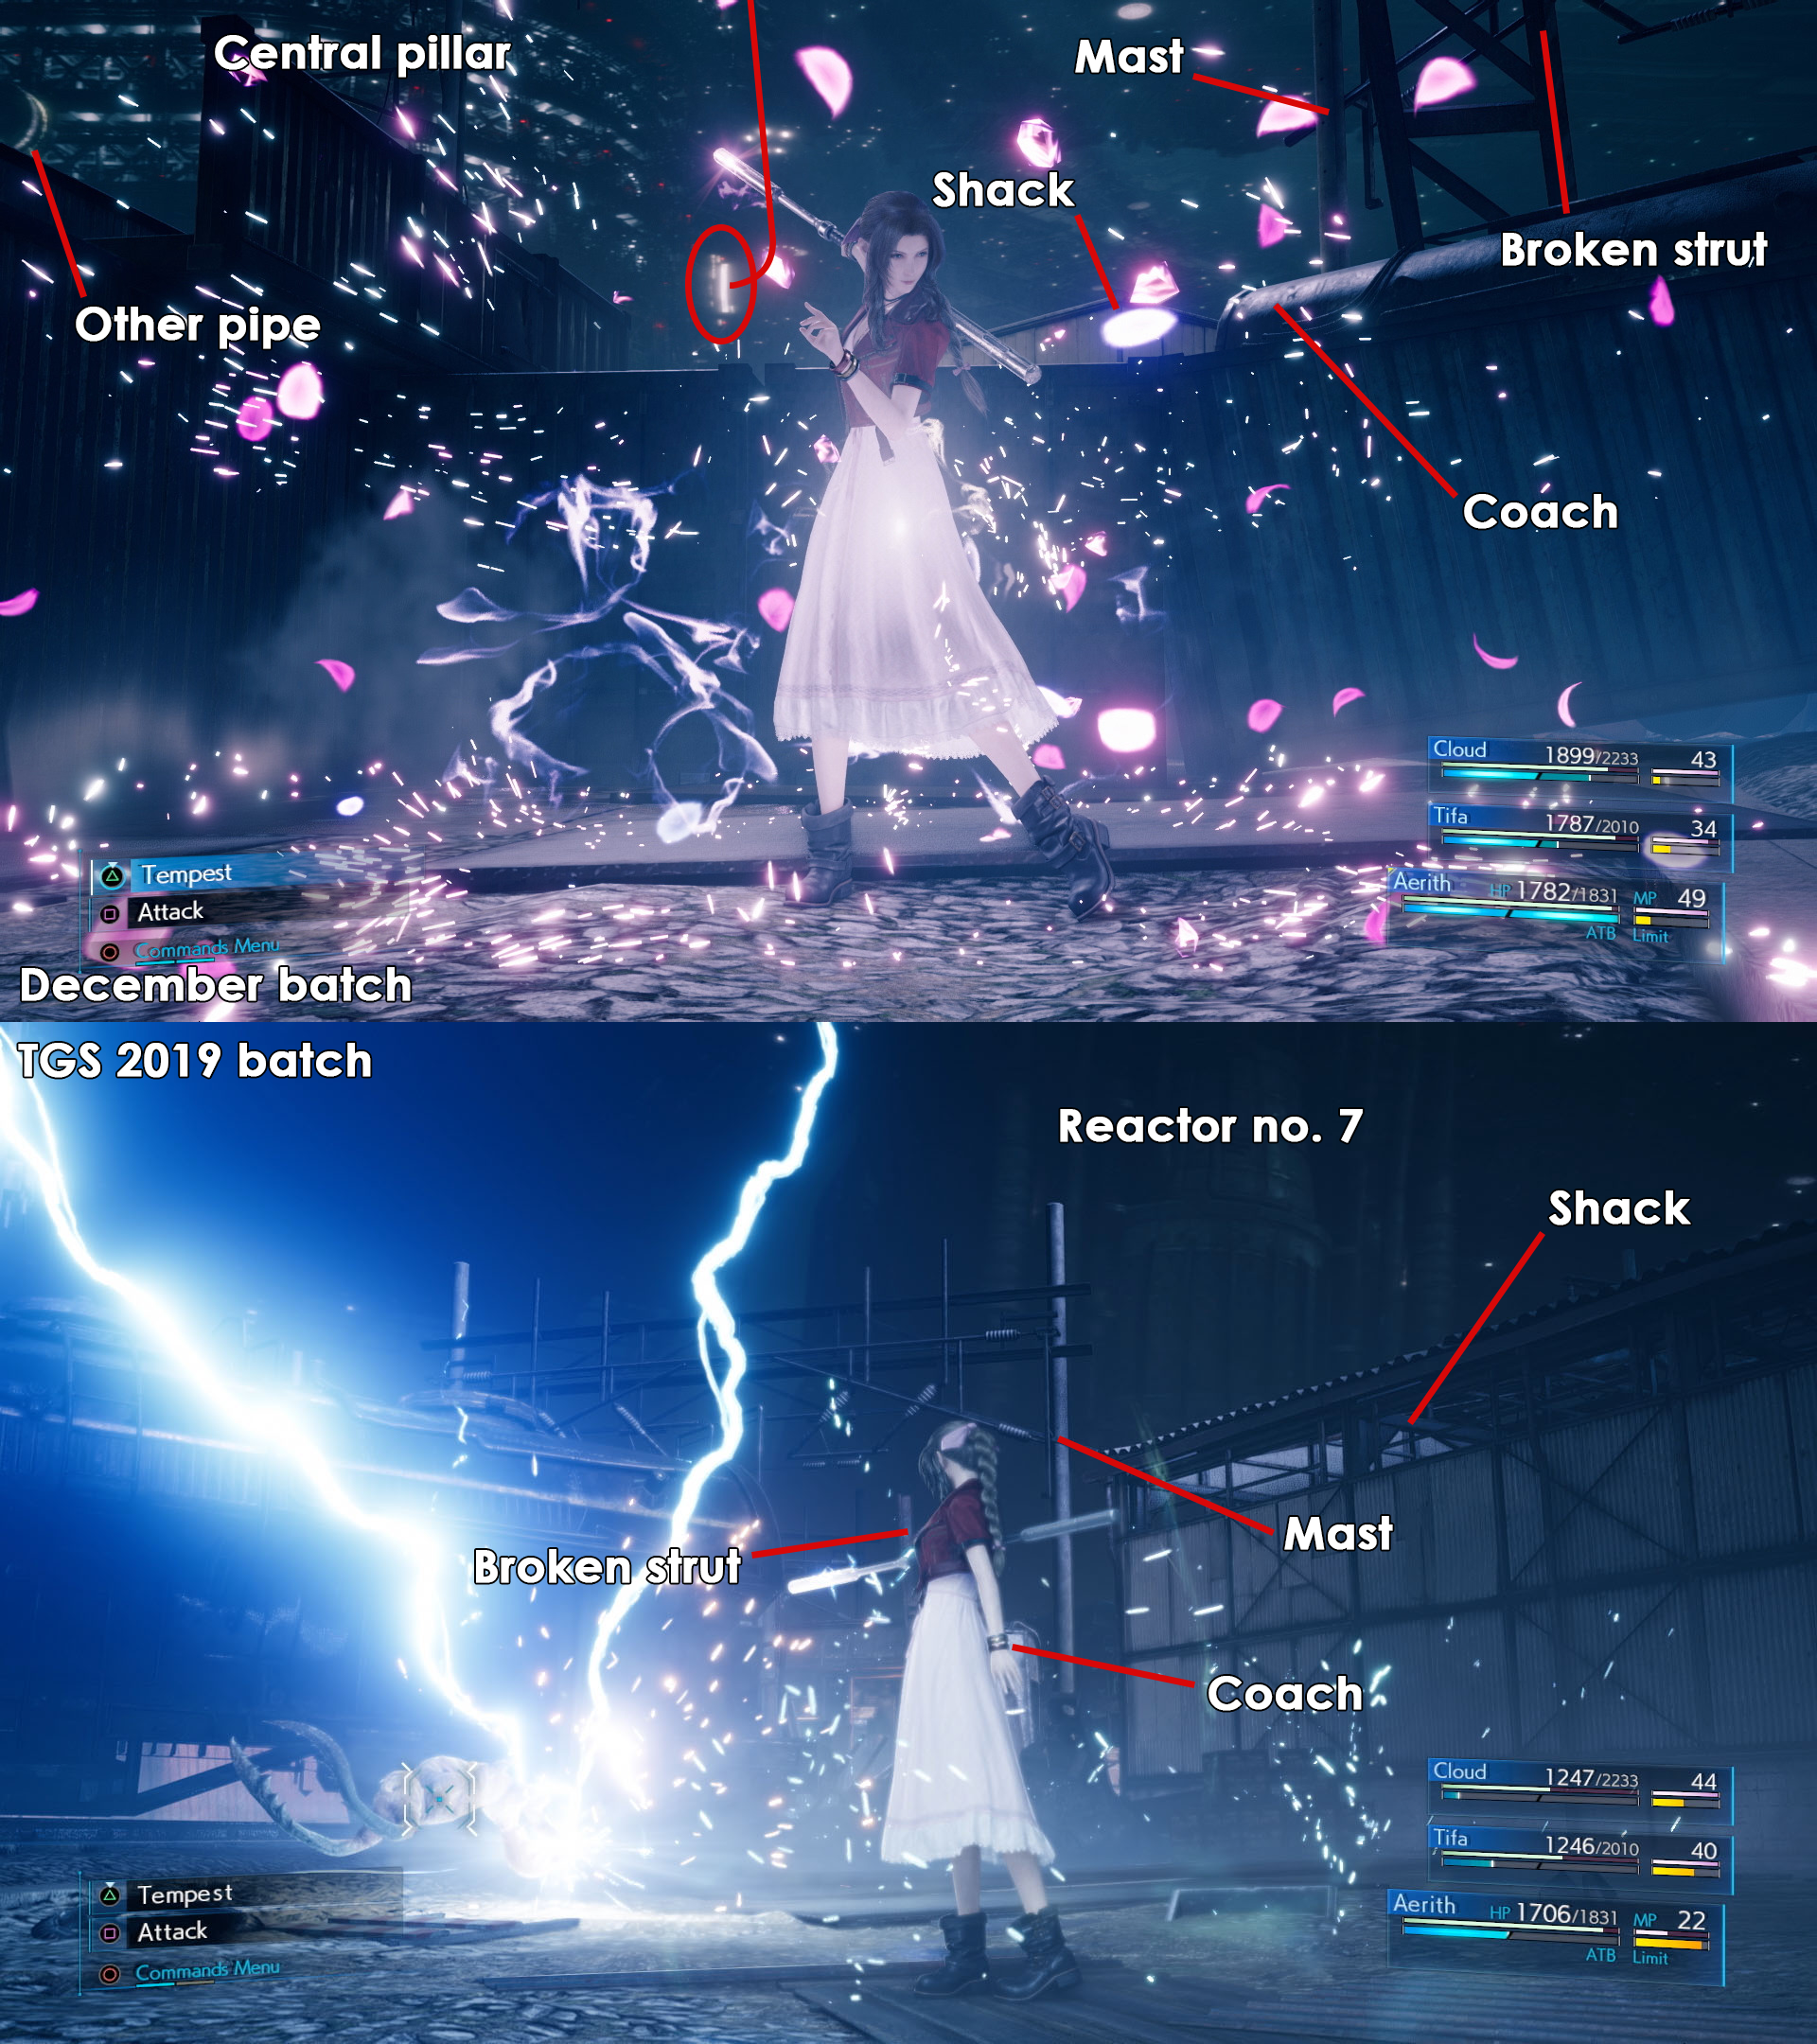
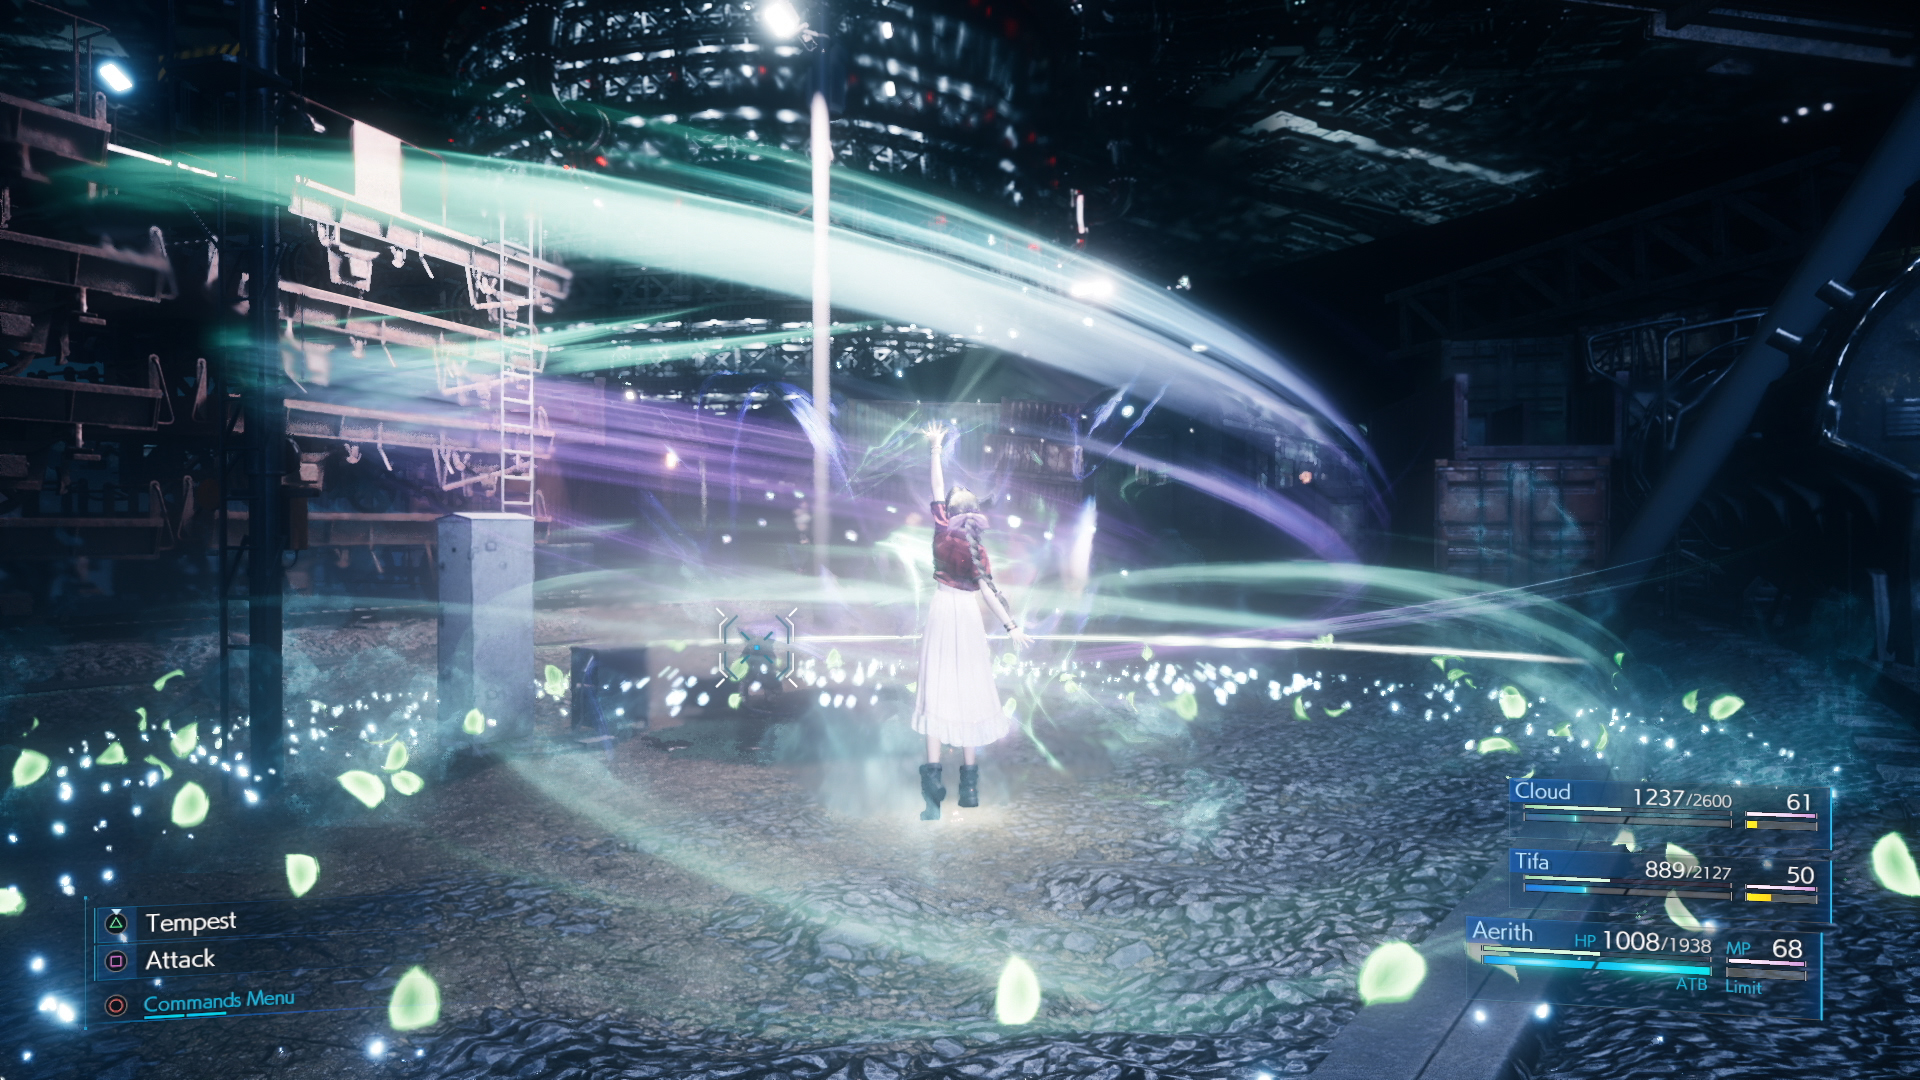
Misc Train Graveyard Battle Screenhots: The following screenshots are comprised of new and older ones, since some of the latter ones add some perspective. Let’s start with two screenshots we already looked at and compared in the previous article: Aerith’s standard attack and the charge-up phase of her Tempest attack. As established, both take place in the same location, just in a different angle and a few meters apart. The Tempest shot also shows the top of the gable end of another, smaller shack. It’s not the factory building from before, as that one’s much larger. Luckily, there’s a screenshot depicting Aerith casting a Thunder spell upon a Cripshay from the TGS 2019 batch, which depicts the same shack from a different perspective. How do I know this? We only need to look at the background, which shows the same passenger coach, powerline mast and broken strut. Additionally, the surroundings also match up with Midgar’s central pillar (Tempest charge-up) standing opposite to reactor number 7 in the background of the Thunder spell shot.
Another interesting detail is the pipes attached to the central pillar leading up to the plates seen in the Tempest charge-up screenshot. The right one, located between the sector 5 and 6 plates, is the same one I’ve mentioned earlier, giving us another hint for our current location. As there’s nothing obstructing our view, we’re to the right outside of the overview shot but looking into a similar direction as in the overview shot.
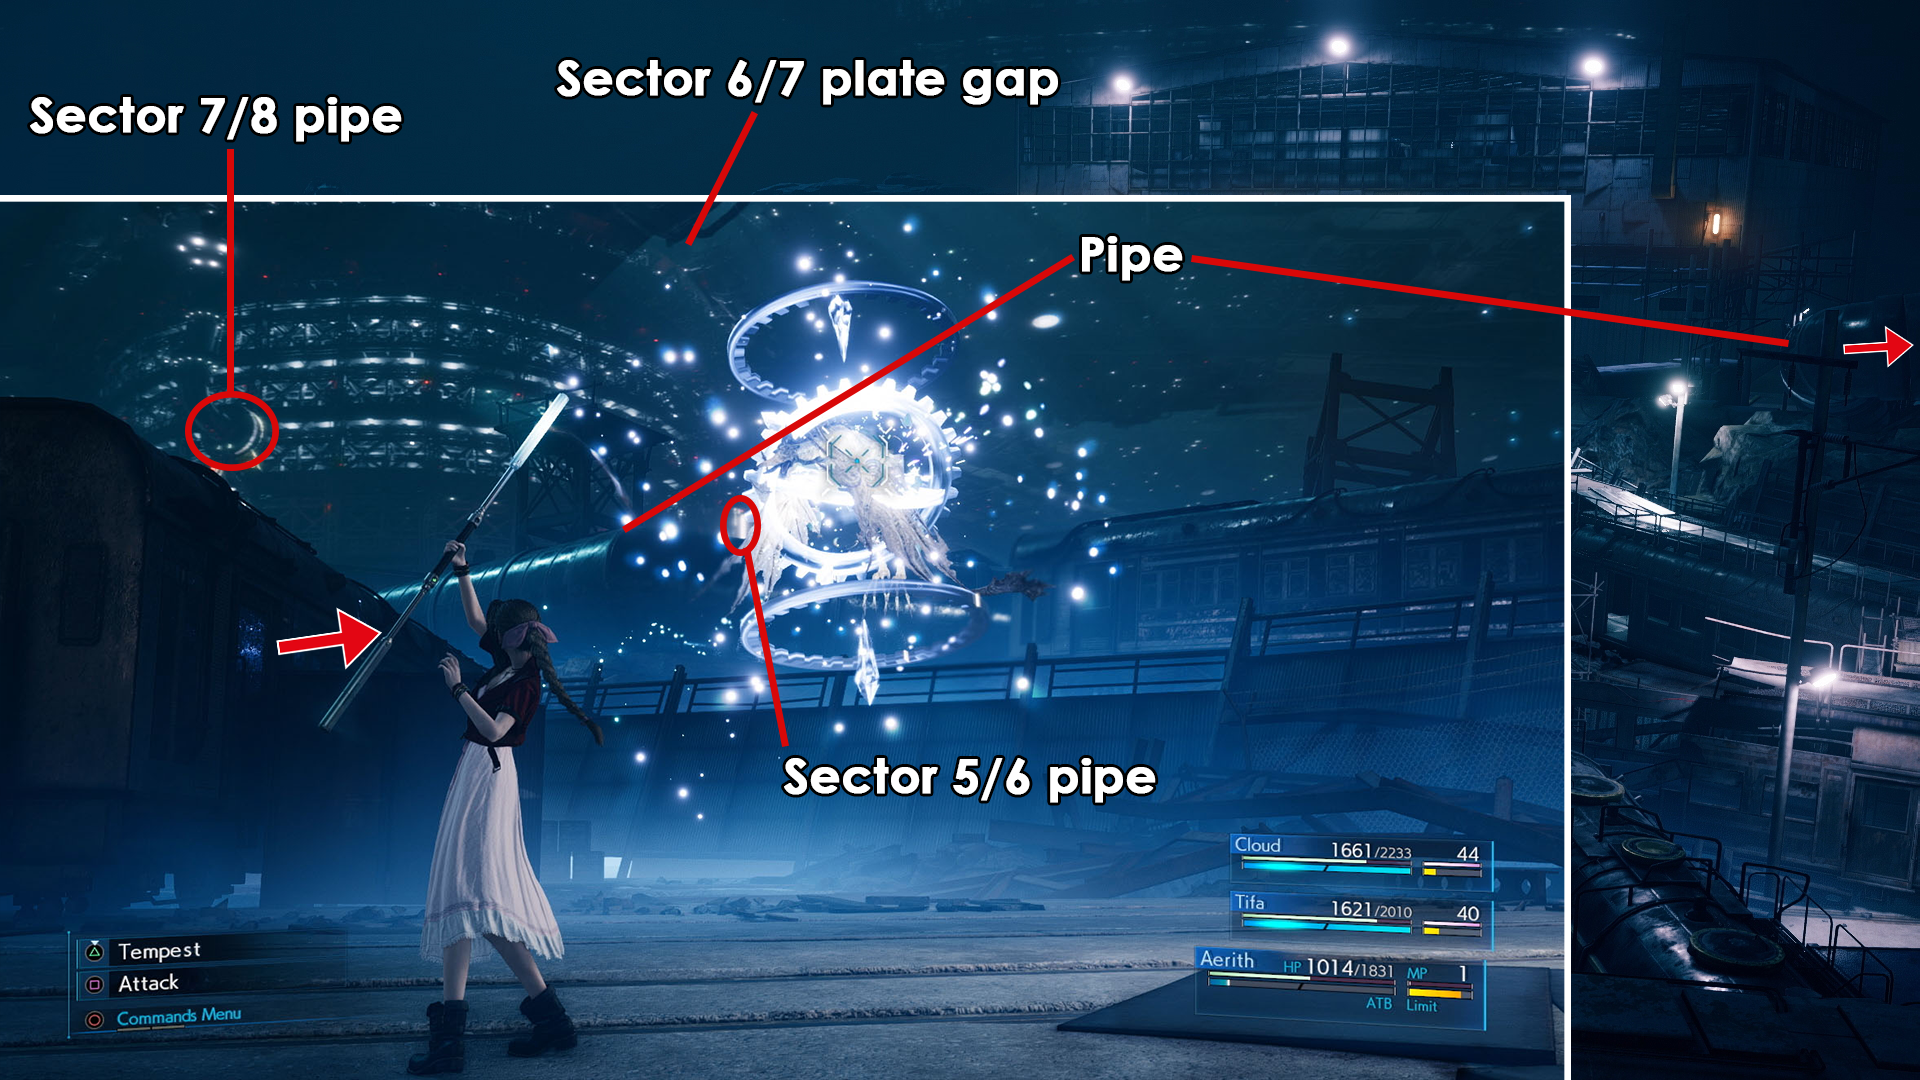
Follow the pipe
The next screenshot shows Aerith casting stop magic onto a Deenglow. Here, we see the central pillar again with the reference pipe covered behind the spell effects, but we can see the other reference pipe between sector 7 and 8. We’re closer towards our target here as seen by the large pipe running above our current location. I’m confident in predicting that this is the same pipe we see curving and running outside of view to the right in the overview shot, which places this screenshot also to the right.
Behind the pipes
Now follows the Tempest execution screenshot, which is oriented in practically the opposite direction as seen by the unfinished sector 6 opening, incidentally the same view as seen in the Halloween Special ghost chase screenshot. The interesting portion is the pipe running along the horizon, which looks very similar to the one in the background seen in the mini-map screenshot, just from the opposite side. I imagine we’re also on the somewhat opposite side of that pipe seen in the previous screenshot and even closer to our target. The gap between the coaches shows a familiar looking fence and due to the long pipe running supposedly into the ground close by, I believe it’s where we came from after passing the area from the Stop spell screenshot. And the locomotive to the right might be the second or even third one we need to operate to enable further travel.
Healing Wind
One of the E3 screenshot batch where Aerith executes her Healing Wind limit break also shows the central pillar in the background and looks to be away the farthest so far, so I’m placing it just before the battle against Eligor, which I believe to be near the end before we arrive in the sector 7 slums proper, which also means that big shack next to the battlefield does not depict the one in the overview shot and leaves us guessing about its exact location.
Alright, that’s all I have regarding the Train Graveyard. I tried to create a comprehensive overview on sector 7 but there are still too many unknowns, weird angles and the mini-map orientation including the objective marker doesn’t line up as well as I’d hoped. I might attempt this at a later point in time.
One last remark: I have a feeling those four screenshot we just dissected were taken in photo mode. Or at least I deeply hope they were. The developers might have used their developer tools to achieve those angles and photo mode isn’t as flexible, but one can still hope!
Sephiroth Key Art
Advent Children version
Crisis Core version
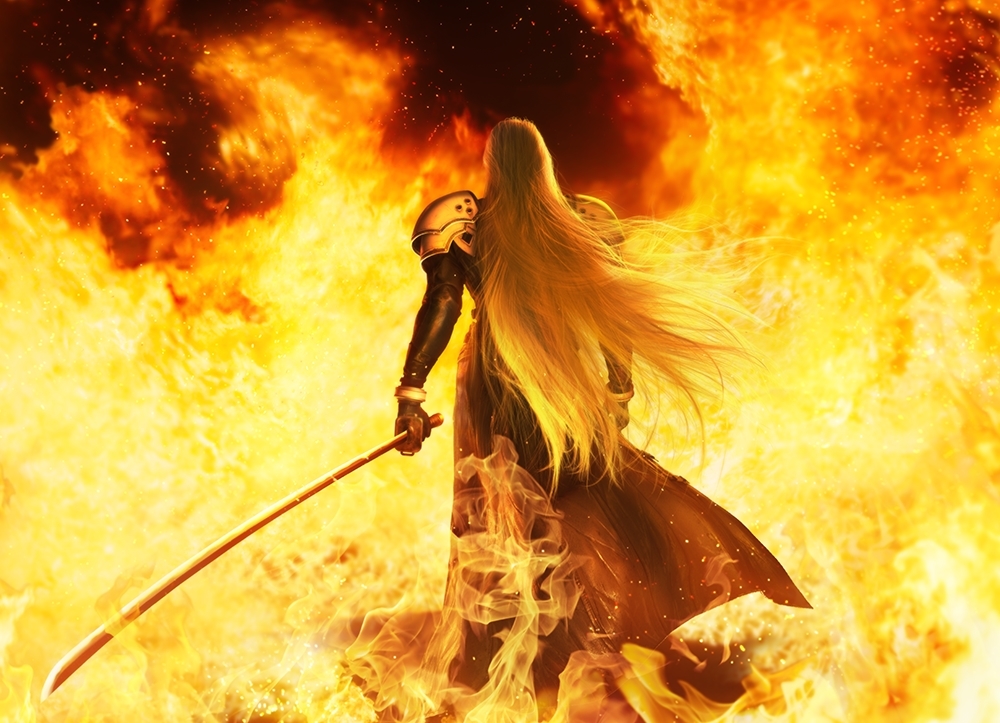
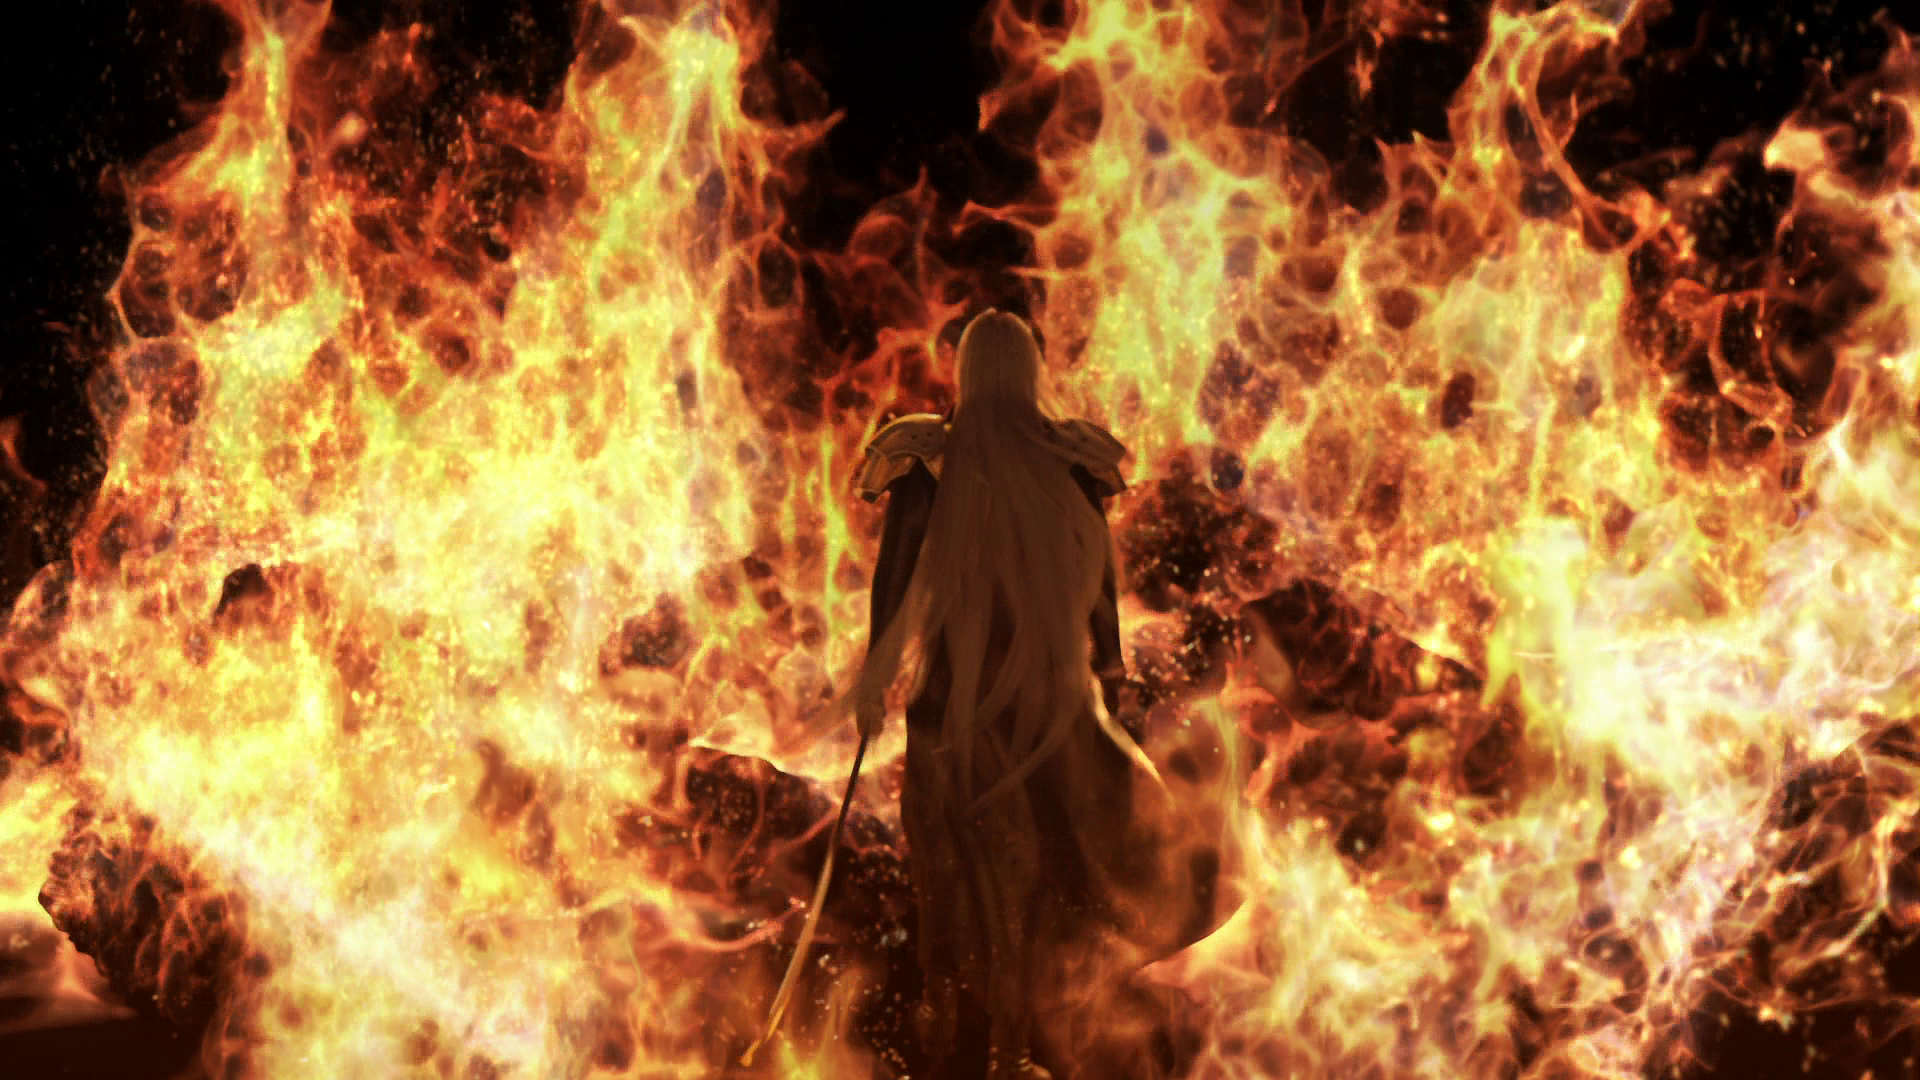
And here it is. The infamous Sephiroth in a sea of flames image. Besides the original, there have been several renditions across multiple Final Fantasy VII Compilation titles, including Advent Children and Crisis Core. The finer details differ, of course, but the general imagery is always the same across all versions. However, in direct comparison, the Remake rendition remains very faithful to the original as good as it can be with such big jump in graphical fidelity.
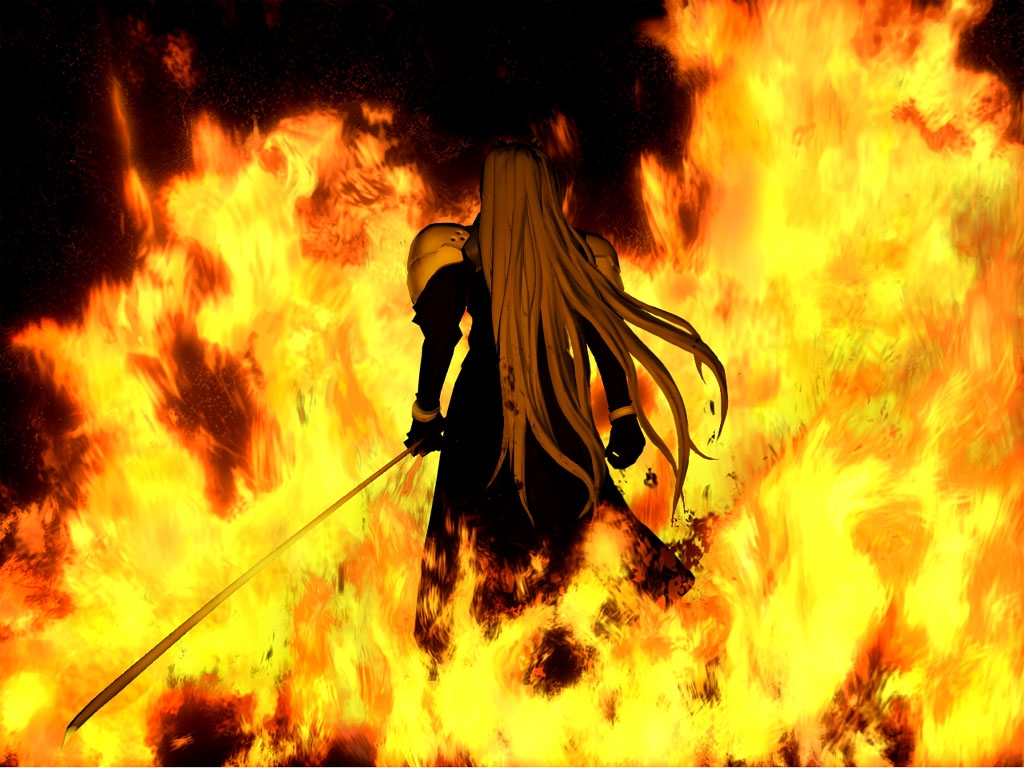
Original version
The flames have almost the same density, coloring and saturation, even the pattern deviates only by a little. He’s holding the sword in an almost identical fashion, the hair flow is very similar, albeit of much finer strands and his general posture looks very much alike. The only real differences are the wider flow of his coat and the lack of flames in the foreground which completely cover the ground in the original but stays visible in the Remake version, much like the Advent Children and Crisis Core versions.
It’s just a small detail but adds a lot to the overall image: The entirety of Sephiroth’s Masamune blade is glowing from the heat of the flames unlike in the original version, where only parts of it, namely the center and the tip, seem to be affected by the heat.

Tifa Key Art
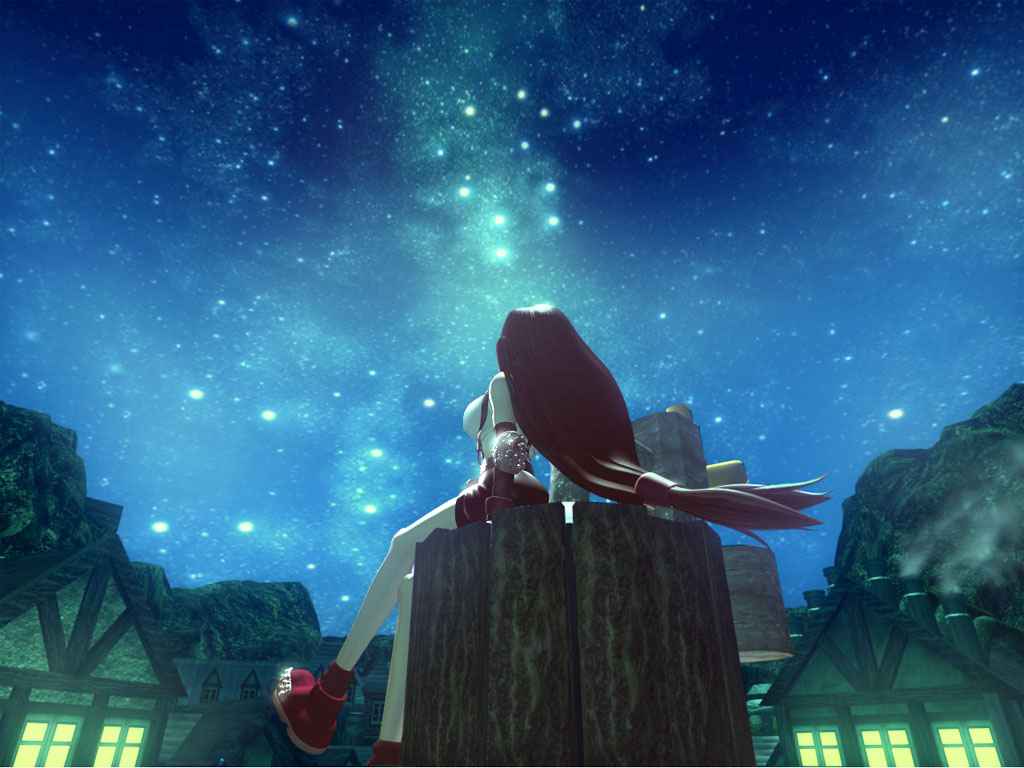
Original Tifa key art
Last but definitely not least, we finally got the Remake version of Tifa’s water tower character render, which looks beautiful. Tifa herself is presented in practically the same pose, just her hair has less comical proportions and flow a bit differently in the wind. She also lets her left foot relax a bit more. The water tower received a sizable enlargement, more planks and an additional iron ring to hold said planks in place. Furthermore, the canister underneath the plane propeller has been replaced by a small platform and said plane propeller made way for a more practical and more efficient wind wheel.
The background also looks very much alike with minor differences or alterations. There are still mountain ranges on both sides, but their distribution and modeling have been heavily updated to look more natural.

Nibelheim – original render
Unfortunately, we see much less of the town itself and have to content ourselves with the top of just two home buildings. At least those are still standing in the same spots and carry the Nibelheimian triple array chimneys, even though the full town render does not contain such a building on the left side where the rooftops are decorated a bit differently. I suppose they streamlined the architecture a bit to move away from the steam punk feel for Nibelheim, which they already do with the changed wind wheel on the water tower.
Lastly, a quick look at the sky shows another step towards realism with the more natural and logical star distribution in the beautiful and clear night sky. What is also quite noticeable is the general color tone. The Remake works with a more saturated color palette and a stronger contrast between light and dark. It also gets rid of the green tones to focus solely on a blue color scheme with the odd red accent on Tifa’s attire and the wind wheel’s blade tips. Personally, I prefer the Remake version over the original, especially in regard to color composition, lighting and contrast. It’s beauty in its pure form!
Huge thanks to Master tier supporter Dachdagger, who had the privilege to help me analyze those screenshots and managed to find a few details before I could. Thank you, my friend!
Did you notice something we didn’t? Let us know on the board or hit us up on our discord! Keep an eye out for upcoming in-depth analysis videos on our YouTube.
Also, check out Vyzzuvazzadth’s YouTube channel – the Cosmo Canyon Observatory, and associated Discord!

)
No comments yet
Log in or Register
No comments yet
Be the one to start the conversation!